Introduction
Welcome to the world of screen casting! In this digital age, the ability to securely share your device’s screen on a bigger display has become increasingly important. Whether you want to showcase a presentation, enjoy a movie, or simply mirror your screen for a better viewing experience, using the cast screen feature is the way to go.
But what exactly is cast screen? Cast screen is a technology that allows you to wirelessly transmit and display the content of your device’s screen onto a larger screen. Imagine being able to effortlessly stream your favorite mobile games, videos, or apps on your television or projector. It’s like having a virtual extension of your device, giving you the freedom to enjoy your content on a bigger and more immersive display.
In this article, we will explore how to use cast screen without the need for a Chromecast device. Chromecast is a popular and versatile streaming device, but it’s not the only option for casting your device’s screen. Whether you’re using an Android, Windows, Mac, or iOS device, we will guide you through the steps to cast your screen without the need for additional hardware.
So, whether you’re a tech enthusiast, a small business owner, or simply someone who enjoys the convenience of screen casting, get ready to unlock a whole new world of possibilities. By the end of this article, you’ll have all the knowledge you need to effortlessly cast your screen without a Chromecast and enjoy a seamless streaming experience on any compatible device.
What is Cast Screen?
Before diving into the intricacies of using cast screen without a Chromecast device, it’s essential to understand what cast screen actually means and how it works. At its core, cast screen allows you to mirror the display of your smartphone, tablet, laptop, or desktop onto a larger screen, such as a television, computer monitor, or projector.
This powerful technology utilizes your device’s Wi-Fi or Bluetooth connection to wirelessly transmit the visual content from your screen onto the larger display. By doing so, you can enjoy a more immersive viewing experience, share presentations, stream videos, or even play games on a bigger screen.
Cast screen is a versatile feature that provides convenience and flexibility, whether you’re in a business meeting, presenting to a group, or simply want to enjoy your favorite content on a larger display. It eliminates the need for cumbersome cables and allows for seamless wireless screen sharing, making it ideal for various scenarios.
It’s important to note that cast screen is not limited to a specific operating system or device. While Google Chromecast is a popular casting device, it’s not the only option to cast your screen. Many devices, including Android smartphones and tablets, Windows laptops, Mac computers, and even iOS devices, offer built-in cast screen functionality.
To make use of cast screen, you need a compatible device with the necessary software and hardware. Typically, your device should have Wi-Fi or Bluetooth capabilities and support screen mirroring or casting. The specific steps and settings to enable cast screen will vary based on the operating system and device manufacturer.
In the following sections, we will explore how to use cast screen on different devices and operating systems. You will learn the step-by-step process to cast your screen without the need for a Chromecast device. Whether you’re an Android user, Windows enthusiast, Mac devotee, or iOS aficionado, we have got you covered.
Now that you have a solid understanding of what cast screen is and how it works, let’s jump right into the exciting world of wireless screen mirroring.
Using Cast Screen on Android Devices
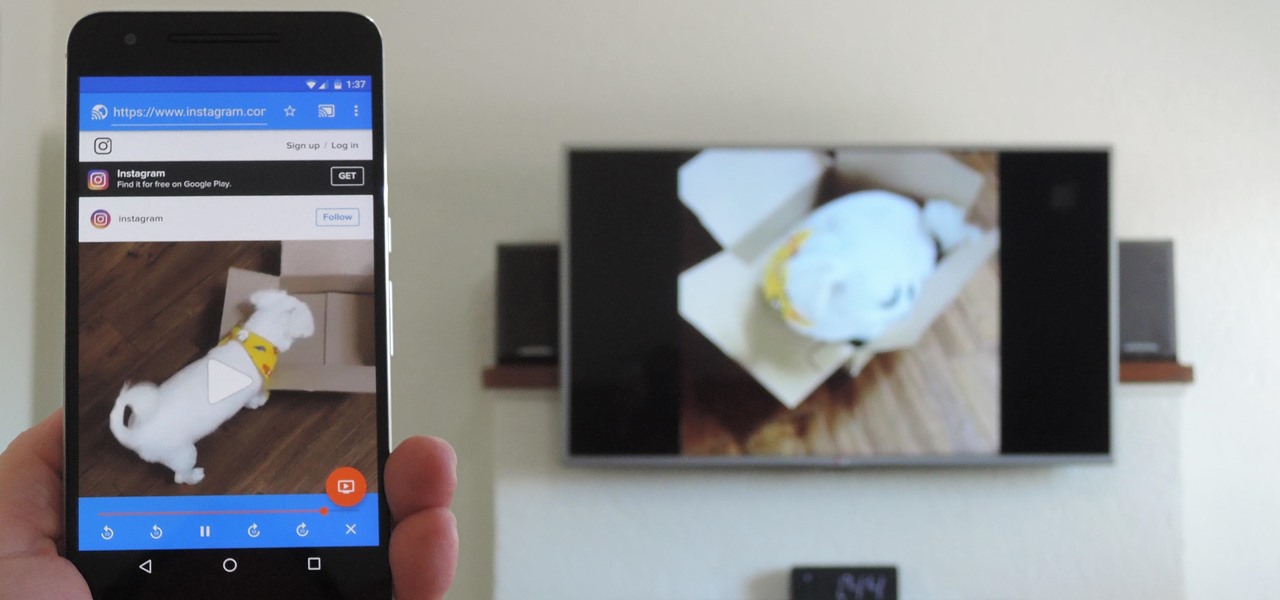
Android devices provide a seamless and straightforward way to cast your screen onto a larger display without the need for a Chromecast device. With the built-in casting functionality, you can easily mirror your device’s screen on a compatible TV, monitor, or projector.
To get started, ensure that your Android device and the screen you want to cast to are connected to the same Wi-Fi network. This is crucial for establishing a stable and secure connection. Once the devices are connected, follow these steps to cast your screen:
- Swipe down from the top of your Android device’s screen to access the notification panel.
- Look for the “Cast,” “Screen Cast,” or “Smart View” icon and tap on it.
- A list of available devices will appear. Select the device you want to cast to.
- Follow any additional instructions or prompts that may appear on your screen.
- Your Android device’s screen should now be mirrored on the larger display. You can navigate through your device as usual, and the actions will be replicated on the casting screen.
It’s important to note that the terminology and exact steps may vary slightly depending on the version of Android you’re using and the device manufacturer. Some devices may have a dedicated “Cast” or “Screen Mirroring” option in the settings menu instead of the notification panel.
Additionally, you may find advanced features like audio preferences or resolution settings within the casting menu or settings. Explore these options to customize your casting experience and ensure optimal audiovisual quality.
To stop casting your screen, simply access the notification panel again, tap on the casting icon, and select the “Stop Casting” or “Disconnect” option. Alternatively, you can go to the settings menu and disable the casting feature from there.
With the ability to cast screen effortlessly, Android users can enjoy a wide range of content on a larger display. From streaming videos and playing games to sharing presentations and browsing the internet, your Android device becomes a powerful screen-sharing tool.
Now that you know how to cast your Android device’s screen, let’s move on to exploring how to use cast screen on Windows devices, giving you even more options for wireless screen mirroring.
Using Cast Screen on Windows Devices
Unlike Android devices, Windows devices may not have native built-in screen casting capabilities. However, with the help of third-party software and built-in features, you can still cast your Windows device’s screen onto a larger display without the need for a Chromecast device.
One popular method to cast your Windows device’s screen is by using the “Connect” app. This app allows you to wirelessly project your screen onto a compatible TV, monitor, or projector. To get started, follow these steps:
- Ensure that your Windows device and the screen you want to cast to are connected to the same Wi-Fi network.
- Press the “Windows” key on your keyboard to open the start menu, and type “Connect”.
- Select the “Connect” app from the search results to open it.
- In the Connect app, a list of available devices will be displayed. Select the device you want to cast to.
- Once the connection is established, your Windows device’s screen will be mirrored on the larger display.
Alternatively, if you own a Windows 10 device, you can use the built-in “Wireless Display” feature. This feature allows you to mirror your screen to compatible devices without the need for additional software.
To use the “Wireless Display” feature, follow these steps:
- Open the “Action Center” by clicking on the speech bubble icon in the bottom right corner of your screen or by pressing the “Windows” key + “A” on your keyboard.
- Click on the “Connect” quick action tile in the Action Center.
- A list of available devices will be displayed. Select the device you want to cast to.
- Once connected, your Windows device’s screen will be mirrored on the larger display.
It’s important to note that the exact steps and terminology may vary slightly depending on the version of Windows you’re using and the device manufacturer. Some devices may have additional casting options in the settings menu or dedicated software for screen sharing.
To stop casting your screen, simply close the Connect app or disconnect the wireless display connection from the settings menu.
By using either the “Connect” app or the built-in “Wireless Display” feature, Windows users can enjoy the convenience of casting their device’s screen without the need for additional hardware. Whether you want to watch videos, give a presentation, or collaborate on a project, casting your Windows screen opens up a world of possibilities.
Now that you know how to cast your Windows device’s screen, let’s move on to exploring how to use cast screen on Mac devices, expanding your screen mirroring options even further.
Using Cast Screen on Mac Devices
Mac devices offer various methods to cast your screen onto a larger display without the need for a Chromecast device. Whether you want to share your Mac’s screen for presentations, watch movies, or play games on a bigger screen, there are several options available.
One popular method to cast your Mac’s screen is by using AirPlay, a built-in feature that allows you to wirelessly mirror your screen on compatible devices. To use AirPlay, make sure your Mac and the screen you want to cast to are connected to the same Wi-Fi network, and follow these steps:
- Click on the “AirPlay” icon located in the menu bar at the top of your Mac’s screen.
- A list of available devices will be displayed. Select the device you want to cast to.
- Your Mac’s screen will be mirrored on the larger display, replicating everything you do on your Mac.
If you don’t see the AirPlay icon in the menu bar, you can enable it from the System Preferences. Go to the “Displays” preference pane, click on the “Arrangement” tab, and check the “Show mirroring options in the menu bar when available” box.
Another option for casting your Mac’s screen is by using third-party applications like Reflector or AirServer. These applications provide additional features and compatibility with a wider range of devices.
To use third-party applications, follow these general steps:
- Install the preferred third-party application on your Mac.
- Launch the application and make sure your Mac and the screen you want to cast to are connected to the same Wi-Fi network.
- Follow the application’s instructions to connect and cast your Mac’s screen to the larger display.
Each third-party application may have its own set of features and settings, allowing you to customize your casting experience further. Explore the application’s options to adjust audio preferences, screen resolutions, or even record your screen.
To stop casting your screen using AirPlay, click on the AirPlay icon in the menu bar and choose the “Turn Off AirPlay” or “Disconnect” option. For third-party applications, follow the application’s instructions to disconnect or close the casting session.
By utilizing AirPlay or third-party applications, Mac users can enjoy the flexibility and convenience of casting their screens onto larger displays. Whether you’re giving a presentation, collaborating on projects, or simply enjoying multimedia content, casting your Mac’s screen adds a new dimension to your computing experience.
Now that you know how to cast your Mac device’s screen, let’s move on to exploring how to use cast screen on iOS devices, making screen mirroring accessible on your iPhone or iPad.
Using Cast Screen on iOS Devices
Screen mirroring on iOS devices, such as iPhones and iPads, is made possible through the use of AirPlay, a built-in wireless technology that enables seamless casting to compatible devices. With AirPlay, you can easily mirror your iOS device’s screen on a larger display without the need for a Chromecast device.
To get started, make sure your iOS device and the screen you want to cast to are connected to the same Wi-Fi network. Once connected, follow these steps to cast your iOS device’s screen using AirPlay:
- Swipe down from the top right corner of your iOS device’s screen to access the Control Center.
- Tap on the “Screen Mirroring” or “AirPlay” icon. Note that the specific terminology may vary depending on your iOS version.
- A list of available devices will be displayed. Select the device you want to cast to.
- If prompted, enter the device’s password or passcode to establish the connection.
- Your iOS device’s screen will now be mirrored on the larger display, allowing you to navigate and interact with your device as usual.
AirPlay also offers additional features that enhance your screen mirroring experience. For example, you can enable “Mirroring” to have the device’s orientation automatically adjust on the larger screen. You can also control audio output preferences and toggle on or off streaming options like “Play Video as Overlays” or “Show Subtitles and Captioning.”
To stop casting your iOS device’s screen, simply access the Control Center again, tap on the “Screen Mirroring” or “AirPlay” icon, and select the “Stop Mirroring” or “Disconnect” option from the list of available devices.
In addition to AirPlay, there are third-party applications available on the App Store that offer screen mirroring functionalities for iOS devices. These applications can expand your casting options and provide additional features and compatibility with a wider range of devices. To use these applications, simply install them from the App Store and follow their instructions to connect and cast your iOS device’s screen.
With AirPlay and third-party applications, iOS users can seamlessly cast their device’s screen onto larger displays, making it easy to share presentations, enjoy multimedia content, or collaborate on projects. The flexibility and convenience of screen mirroring on iOS devices enhance the overall user experience and provide endless possibilities for wireless display sharing.
Now that you know how to cast your iOS device’s screen, let’s move on to the next section, where we will troubleshoot common issues that you may encounter while using cast screen on any device.
Troubleshooting Common Issues
While using the cast screen feature on any device, you may encounter certain issues that can hinder the smooth screen mirroring experience. Thankfully, there are common troubleshooting steps you can take to resolve these issues and ensure a seamless casting experience. Here are some of the most common issues and their potential solutions:
- Devices not appearing: If the device you want to cast to does not appear in the list of available devices, ensure that both your casting device and the target device are connected to the same Wi-Fi network. Restarting the devices or refreshing the casting menu might also solve the issue.
- Connection drops or lags: If the casting connection is unstable or experiences significant lag, try moving the devices closer to the Wi-Fi router to enhance signal strength. Restarting both devices and ensuring that they have the latest software updates installed can also help resolve connectivity issues.
- No audio or poor audio quality: If the casting screen does not have audio or the audio quality is poor, make sure the volume settings are not muted or too low on both the casting device and the receiving device. Additionally, ensure that the correct audio output is selected in the casting settings.
- Video playback issues: If you’re experiencing issues with video playback, such as stuttering or buffering, check your internet connection speed. If your connection is slow or unreliable, consider moving closer to the Wi-Fi router or connecting your device via an Ethernet cable. It’s also a good idea to clear cache and data from the media streaming apps to optimize performance.
- Compatibility issues: Some devices may not be compatible with certain casting protocols or may require specific software versions. Ensure that your casting device and the target device support the same casting technology, such as AirPlay, Miracast, or DLNA. Updating the software on both devices can also help resolve compatibility issues.
If the above troubleshooting steps do not resolve the issue, referring to the user manuals or support documentation provided by the device manufacturers or seeking assistance from their support channels can provide further guidance and a resolution to specific issues.
Regardless of the issue you encounter, it’s essential to stay patient and follow the troubleshooting steps systematically. Remember that technology can sometimes be unpredictable, but with a little persistence and troubleshooting, you can overcome most obstacles and enjoy a seamless screen mirroring experience.
Now that you’re equipped with troubleshooting knowledge, you can confidently cast your screen without any major hiccups. In the next section, we’ll wrap up the article by summarizing the key points and emphasizing the benefits of using cast screen without a Chromecast device.
Conclusion
In today’s digital world, the ability to cast your screen onto a larger display without the need for a Chromecast device opens up a world of possibilities. Whether you’re using an Android, Windows, Mac, or iOS device, the built-in casting capabilities or third-party applications allow you to effortlessly share your screen and enjoy a more immersive viewing experience.
With Android devices, you can easily access the cast screen feature from the notification panel and mirror your device’s screen on a compatible display. Windows users can utilize the “Connect” app or the built-in “Wireless Display” feature to project their screens wirelessly. Mac users can take advantage of AirPlay to seamlessly mirror their screens, while iOS users can rely on AirPlay or third-party applications for screen mirroring.
By following the steps outlined in this article, you can cast your device’s screen, whether it’s for presentations, multimedia content, or collaborative projects. The convenience and flexibility of screen mirroring without a Chromecast device enhance your overall user experience and make sharing your content on a larger screen a breeze.
While using cast screen, it’s important to be aware of common issues that may arise. By troubleshooting problems related to device visibility, connectivity, audio, video playback, and compatibility, you can overcome these obstacles and enjoy a seamless casting experience.
Remember, each device and operating system may have its own unique casting process and terminology. Reading the user manuals, referring to support documentation, and seeking assistance from the device manufacturers can provide additional guidance specific to your device.
Now that you have learned how to utilize the cast screen feature without a Chromecast device, it’s time to unlock a whole new level of screen sharing. Whether you’re sharing presentations in a professional setting, enjoying multimedia content in the comfort of your home, or collaborating on projects with colleagues, casting your screen offers a world of possibilities.
So, go ahead and start exploring the exciting world of wireless screen mirroring. Get ready to enhance your viewing experience, share your content effortlessly, and take full advantage of the capabilities of your device. Happy screen casting!