Introduction
The Samsung Galaxy A12 is a popular smartphone that offers a wide range of features and functionalities. However, many users may find themselves wanting to unlock their device to have more control over its settings and personalize it to their liking. Whether you want to install custom ROMs, root your device, or simply unlock its full potential, this guide will walk you through the process of unlocking your Samsung Galaxy A12.
Unlocking your Samsung Galaxy A12 can provide you with several benefits. It allows you to install custom ROMs, giving you the freedom to customize your device’s look and feel. You can also root your phone, which provides deeper access to the system files and allows you to use advanced apps and features that are not available on a stock device. Additionally, unlocking your device opens up the possibility of using it with different carriers, giving you more flexibility when it comes to choosing a phone plan.
Before we dive into the step-by-step process, it’s important to note that unlocking your Samsung Galaxy A12 requires technical knowledge and comes with potential risks. It is essential to follow the instructions carefully and understand the consequences of your actions. Proceeding with the unlocking process will void your warranty, and there is a possibility of damaging your device if not done correctly. With that being said, if you’re ready to unlock your Samsung Galaxy A12 and explore its full potential, let’s get started!
Step 1: Prepare Your Device
Before unlocking your Samsung Galaxy A12, it’s essential to prepare your device by following a few preliminary steps. These steps will ensure that your device is ready for the unlocking process and minimize the risk of any complications. Here’s what you need to do:
- Backup Your Data: Unlocking your device can result in data loss, so it’s crucial to back up all your important files, photos, contacts, and other data. You can use the built-in backup feature on your Galaxy A12 or sync your data with a cloud storage service.
- Charge Your Device: Ensure that your Samsung Galaxy A12 has a sufficient battery charge to go through the unlocking process. A fully charged battery will prevent any interruptions during the procedure.
- Check the Device Compatibility: Make sure that your Samsung Galaxy A12 model is supported for unlocking. Different models may have different unlocking methods or limitations, so double-check the device specifications.
- Gather the Required Tools: You will need a computer or laptop with a stable internet connection, a USB cable compatible with your Galaxy A12, and the necessary software and files for unlocking (which we will cover in the following steps).
By taking these preparatory steps, you will ensure a smooth unlocking process for your Samsung Galaxy A12. It’s important to note that in certain cases, unlocking the device may void the warranty, so proceed at your own risk. With your device prepared, let’s move on to the next step: enabling Developer Options.
Step 2: Enable Developer Options
In order to proceed with unlocking your Samsung Galaxy A12, you need to enable Developer Options on your device. Developer Options provide advanced settings and debugging options that are essential for the unlocking process. Here’s how you can enable Developer Options:
- Open the Settings app on your Samsung Galaxy A12.
- Scroll down and tap on “About phone.”
- Find the “Software information” or “Software” section and tap on it.
- Look for the “Build number” or “Build information” entry.
- Tap on the “Build number” or “Build information” entry repeatedly, around seven times. You will see a message indicating that you are now a developer.
- Return to the main Settings screen, and you will find a new option called “Developer Options.”
- Tap on “Developer Options” to access the advanced settings.
Enabling Developer Options on your Samsung Galaxy A12 is a crucial step as it allows you to configure additional settings required for the unlocking process. It grants you access to options like USB debugging, which we will enable in the next step. Keep in mind that Developer Options provides advanced settings that should be handled with caution, as making improper changes can potentially harm your device. With Developer Options enabled, we can now proceed to the next step: enabling USB debugging.
Step 3: Enable USB Debugging
In order to unlock your Samsung Galaxy A12, you need to enable USB debugging. USB debugging allows your device to communicate with a computer and provides access to advanced debugging tools and commands. Here’s how you can enable USB debugging:
- Go to the Settings app on your Samsung Galaxy A12.
- Scroll down and tap on “Developer Options.”
- Find the “USB debugging” option and toggle it on.
- You will see a prompt warning you about potential security risks. Tap on “OK” to proceed.
- Now, connect your Samsung Galaxy A12 to your computer using a USB cable.
- A prompt may appear on your device asking for permission to allow USB debugging. Tap on “Allow” to grant permission.
Enabling USB debugging is an essential step for the unlocking process. It allows your computer to communicate with your Samsung Galaxy A12 and execute commands needed to unlock the device. Keep in mind that USB debugging provides access to sensitive system functions, so only enable it when necessary and ensure that you trust the computer you are connecting to. With USB debugging enabled, we can proceed to the next step: installing USB drivers.
Step 4: Install USB Drivers
In order to establish a proper connection between your Samsung Galaxy A12 and your computer, you need to install the necessary USB drivers. USB drivers allow your computer to recognize your device and facilitate smooth communication during the unlocking process. Follow these steps to install USB drivers:
- Ensure that your Samsung Galaxy A12 is connected to your computer via USB cable.
- Visit the official Samsung website and navigate to the “Support” section.
- Search for your specific Samsung Galaxy A12 model and locate the USB drivers for your device.
- Download the USB driver package compatible with your computer’s operating system.
- Once the download is complete, locate the downloaded file and double-click on it to begin the installation process.
- Follow the on-screen instructions to complete the USB driver installation.
- After the installation is finished, restart your computer to ensure the drivers are properly configured.
Installing USB drivers is essential to ensure a stable and reliable connection between your Samsung Galaxy A12 and your computer. Without the correct drivers, your computer may not recognize your device, leading to connectivity issues during the unlocking process. By installing the USB drivers specific to your Samsung Galaxy A12 model, you are ensuring seamless communication and optimal performance. With the USB drivers installed, we can move on to the next step: connecting your device to the computer.
Step 5: Connect Your Device to PC
Now that you have enabled USB debugging and installed the necessary USB drivers for your Samsung Galaxy A12, it’s time to connect your device to your computer. This step is crucial in establishing a stable connection, enabling you to proceed with the unlocking process. Follow these steps to connect your device to your PC:
- Using a USB cable, connect your Samsung Galaxy A12 to an available USB port on your computer.
- Ensure that both ends of the USB cable are securely plugged in.
- Once connected, your computer should recognize your device and automatically detect it.
- Wait for a few moments as the necessary drivers and software are installed.
- You may see a prompt on your Samsung Galaxy A12 asking for permission to allow USB debugging. If prompted, tap on “Allow” to grant permission.
- Check that your device is successfully connected by opening the device manager or using any relevant software to detect connected devices.
Establishing a proper connection between your Samsung Galaxy A12 and your computer is crucial to successfully proceed with the unlocking process. Ensure that the USB cable is in good condition and properly plugged in on both ends. This will prevent any disruptions during the procedure and ensure a smooth unlocking experience. With your device connected to your PC, you are now ready to proceed with the next steps to unlock your Samsung Galaxy A12.
Step 6: Unlock Bootloader
Unlocking the bootloader is a crucial step in the process of unlocking your Samsung Galaxy A12. The bootloader is a program that runs before the operating system boots up and ensures that the system is secure. Unlocking the bootloader allows you to install custom recoveries, flash custom ROMs, and gain administrative access to your device. However, please note that unlocking the bootloader may void your warranty and can potentially be risky. Here’s how you can unlock the bootloader of your Samsung Galaxy A12:
- Ensure that your device is connected to your computer and detected by the appropriate software.
- Turn off your Samsung Galaxy A12 and enter into bootloader mode. To do this, press and hold the Volume Down and Power buttons simultaneously.
- Once in bootloader mode, use the volume keys to navigate to the “Unlock Bootloader” option and select it using the Power button.
- A disclaimer or warning message might appear, informing you about the risks associated with unlocking the bootloader. Read through it carefully, and if you agree, confirm your decision.
- Wait for the bootloader unlocking process to complete. Your device may restart multiple times during this process.
- Once the bootloader is successfully unlocked, your device will reboot into the normal operating mode.
It’s important to note that unlocking the bootloader may wipe all data on your Samsung Galaxy A12, so it’s essential to backup any important files before proceeding. Additionally, unlocking the bootloader will void your warranty, and Samsung or your carrier may not provide support for any issues that arise as a result. Exercise caution and make sure you understand the risks associated with this step. With the bootloader unlocked, you can move on to the next step: installing a custom recovery.
Step 7: Install a Custom Recovery
Installing a custom recovery is an important step in unlocking the full potential of your Samsung Galaxy A12. A custom recovery allows you to perform advanced operations such as creating backups, restoring system images, and installing custom ROMs. Here’s how you can install a custom recovery on your device:
- Download the custom recovery of your choice. Popular custom recoveries for Samsung devices include TWRP (Team Win Recovery Project) and ClockworkMod Recovery.
- Ensure that your Samsung Galaxy A12 is connected to your computer and recognized by the relevant software.
- Copy the downloaded custom recovery file to the internal storage or SD card of your device.
- Enter into bootloader mode by turning off your device and holding the Volume Down and Power buttons simultaneously.
- Using the volume keys, navigate to the “Recovery Mode” option and select it using the Power button. This will boot your device into the custom recovery.
- In the custom recovery mode, select the “Install” or “Install zip” option (the exact wording may vary depending on the recovery you are using).
- Locate and select the custom recovery file that you copied to your device in step 3.
- Follow the on-screen instructions to install the custom recovery onto your Samsung Galaxy A12.
- Once the installation is complete, reboot your device.
Installing a custom recovery gives you access to additional features and functionalities that are not available through the stock recovery. It also allows you to make system-level changes and install custom ROMs to further personalize your device. Remember that installing a custom recovery may void your warranty and can be risky if not done correctly. Ensure that you have a good understanding of the process and follow the instructions carefully. With the custom recovery installed, we can move on to the next step: rooting your device.
Step 8: Root Your Device
Rooting your Samsung Galaxy A12 allows you to gain administrative access to the device’s operating system, giving you more control and customization options. Rooting can enable you to install powerful apps, remove bloatware, and customize your device’s appearance and functionality. However, it’s essential to note that rooting can void your warranty and may lead to security risks. Here’s how you can root your Samsung Galaxy A12:
- Ensure that your Samsung Galaxy A12 has a custom recovery installed, such as TWRP or ClockworkMod Recovery.
- Download the appropriate root file for your device model from a trusted source. It’s recommended to visit reputable forums or websites that specialize in Android rooting.
- Copy the downloaded root file to the internal storage or SD card of your device.
- Reboot your Samsung Galaxy A12 into recovery mode. This can be done by turning off your device and holding the Volume Up and Power buttons simultaneously.
- In the custom recovery mode, select the “Install” or “Install zip” option.
- Navigate to the location where you copied the root file and select it.
- Follow the on-screen instructions to flash the root file onto your device.
- Once the rooting process is complete, reboot your Samsung Galaxy A12.
- You can verify if your device has been successfully rooted by installing a root checker app from the Google Play Store.
Rooting your device can provide you with many benefits, but it’s crucial to understand the potential risks and consequences. Make sure to research and follow reputable guides specific to your device model, as the rooting process may vary. It’s also recommended to create a backup of your data before rooting in case anything goes wrong. With your Samsung Galaxy A12 rooted, you can now enjoy the full potential of your device and explore various customization options.
Step 9: Install Custom ROM (Optional)
Installing a custom ROM on your Samsung Galaxy A12 is an optional step that allows you to replace your device’s stock operating system with a modified version. Custom ROMs offer different features, optimizations, and design elements, giving you greater control over your device’s user experience. Here’s how you can install a custom ROM on your Samsung Galaxy A12:
- Before proceeding, ensure that your device is rooted and you have a custom recovery installed, such as TWRP or ClockworkMod Recovery.
- Research and choose a custom ROM that is compatible with your device model. Visit reputable forums or websites that specialize in Android customizations for a wide variety of options.
- Download the custom ROM file to your device’s internal storage or SD card.
- Reboot your Samsung Galaxy A12 into recovery mode. To do this, turn off your device and hold the Volume Up and Power buttons simultaneously.
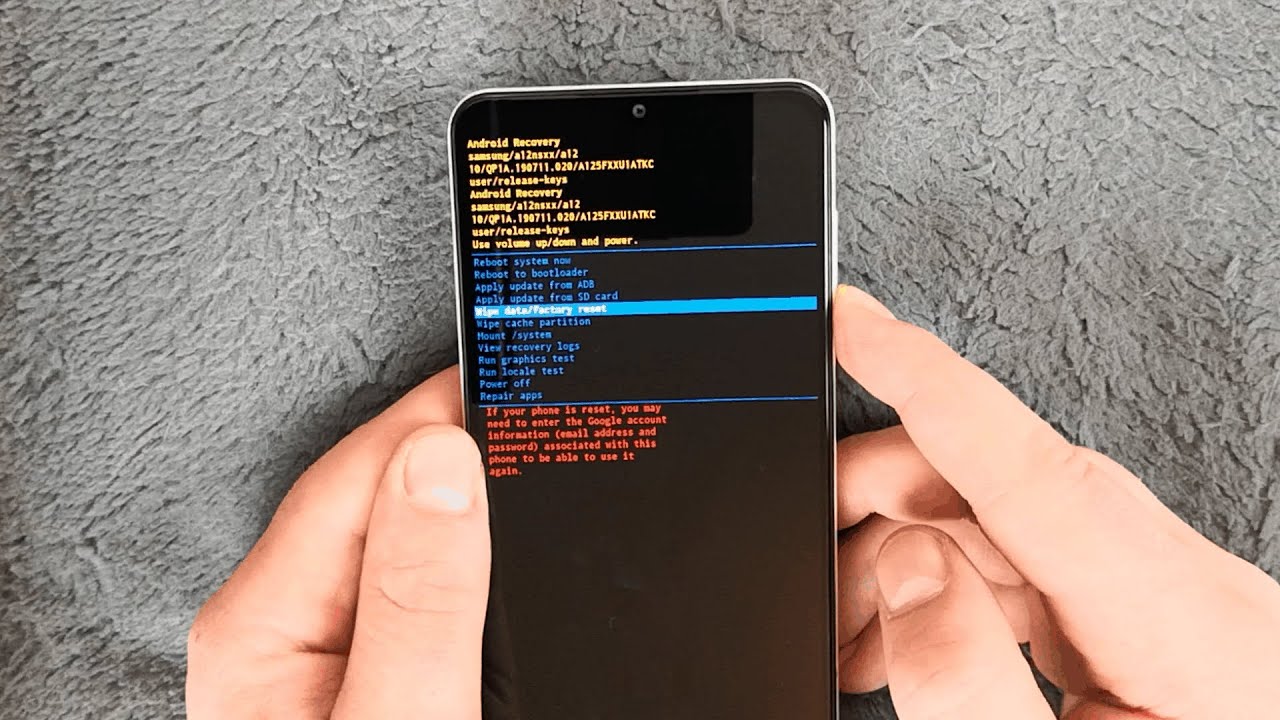
- In the custom recovery mode, select the “Wipe” option and perform a full data wipe, including cache, system, and data partitions. This will ensure a clean installation of the custom ROM.
- Go back to the main menu of the custom recovery and select the “Install” or “Install zip” option.
- Navigate to the location where you downloaded the custom ROM file and select it.
- Follow the on-screen instructions to install the custom ROM onto your Samsung Galaxy A12.
- Once the installation is complete, reboot your device.
Installing a custom ROM can introduce new features, a different user interface, and improved performance to your Samsung Galaxy A12. However, it’s important to note that custom ROM installations can be complex and may come with certain risks. Make sure to thoroughly research and choose a reputable custom ROM that is compatible with your device model. Additionally, create a backup of your data before proceeding with the installation, as it will wipe your device’s existing data during the process. With a custom ROM installed, you can enjoy a highly personalized and customized experience on your Samsung Galaxy A12.
Conclusion
Unlocking your Samsung Galaxy A12 can open up a world of possibilities, allowing you to customize your device, install custom ROMs, and explore advanced features. However, it’s important to approach the process with caution, as unlocking, rooting, and installing custom ROMs come with certain risks and may void your warranty. Here’s a quick recap of the steps involved in unlocking your Samsung Galaxy A12:
- Prepare your device by backing up your data, charging your device, and checking compatibility.
- Enable Developer Options on your device to access advanced settings.
- Enable USB debugging to establish a connection with your computer.
- Install USB drivers to facilitate a stable connection between your device and computer.
- Connect your Samsung Galaxy A12 to your PC via USB.
- Unlock the bootloader to gain administrative access.
- Install a custom recovery for advanced functionality.
- Root your device to gain full control and customization options.
- Optionally, install a custom ROM to replace your device’s stock operating system.
Remember to carefully follow instructions, research trustworthy sources, and proceed at your own risk. It’s crucial to understand that modifying your device can have unintended consequences, including data loss and potential damage. If you are unsure about any step or unfamiliar with the process, it’s recommended to seek assistance from experienced individuals or communities dedicated to Samsung device customization. With the appropriate precautions and knowledge, unlocking your Samsung Galaxy A12 can be an exciting and rewarding endeavor, offering a truly personalized smartphone experience.