Introduction
Welcome to our guide on how to turn off Safe Mode in Windows 10. If you’ve recently encountered the Safe Mode screen on your Windows 10 computer, you may be wondering how to exit this mode and return to your normal desktop. Well, you’ve come to the right place!
Before we get into the various methods to turn off Safe Mode, let’s take a moment to understand what Safe Mode is and why you may want to exit it.
What is Safe Mode in Windows 10?
Safe Mode is a diagnostic mode that Windows 10 provides, designed to help troubleshoot and fix various system issues. When you boot your computer into Safe Mode, it loads only the essential drivers and services necessary for the operating system to run. This minimal configuration can be beneficial when you’re facing problems such as frequent crashes, blue screens of death, or malware infections.
Why would you want to turn off Safe Mode?
While Safe Mode can be incredibly helpful in resolving system issues, there are times when you may need to exit Safe Mode and return to normal operation. For example, you may have entered Safe Mode accidentally and want to restore all your applications and settings. Or perhaps you have fixed the underlying issue and no longer need to operate in a limited capacity.
Now, without further ado, let’s explore the different methods you can use to turn off Safe Mode in Windows 10. Whether you prefer using the System Configuration tool, the Shift + Restart option, the Command Prompt, or the Advanced Boot Options menu, we’ve got you covered.
What is Safe Mode in Windows 10?
Safe Mode is a diagnostic mode offered by Windows 10 that allows users to troubleshoot and fix various system issues. When you boot your computer into Safe Mode, the operating system starts with a limited set of drivers and services, which can help isolate and identify problems that might be causing your computer to malfunction.
In Safe Mode, Windows loads only the essential drivers and services necessary for the system to run. This means that non-essential components, such as third-party applications and startup programs, are not loaded during the boot process. Safe Mode also uses default settings, which means that any changes you made to your desktop background or display settings will be temporarily disabled.
Safe Mode can be incredibly helpful in situations where your computer is experiencing frequent crashes, blue screens of death (BSOD), or malware infections. By starting Windows in Safe Mode, you can perform troubleshooting steps to identify and rectify the underlying issue without any interference from third-party software or unnecessary system processes.
To enter Safe Mode in Windows 10, you can follow these steps:
- Click on the Start button and then click on the Power button.
- Hold down the Shift key on your keyboard and click on Restart.
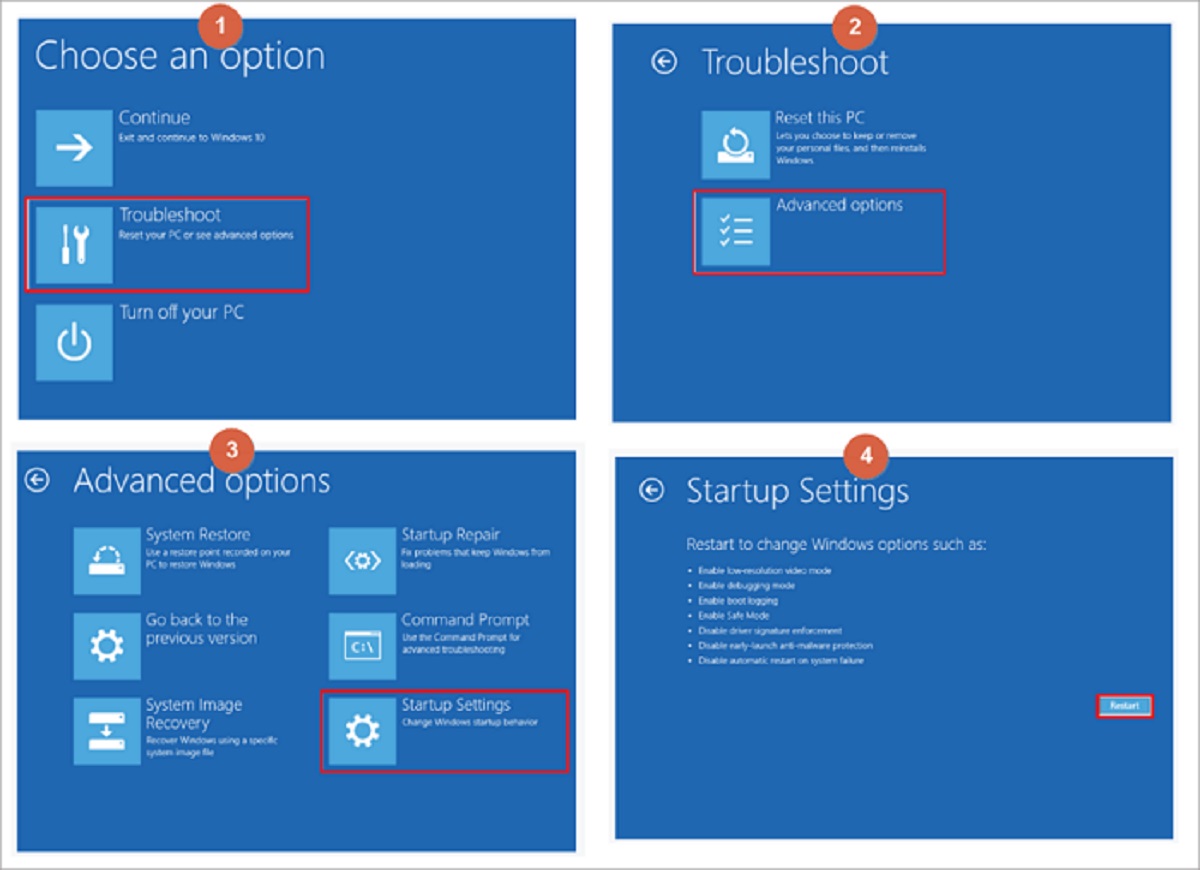
- After the restart, you will see the “Choose an option” screen. Select “Troubleshoot”.
- In the Troubleshoot menu, select “Advanced options”.
- Under the Advanced options, click on “Startup Settings”.
- Finally, click on “Restart” to start your computer in Safe Mode.
Once your computer boots into Safe Mode, you will notice that the desktop looks different from the normal mode. Icons may appear larger, and the screen resolution might be lower. However, this is completely normal and expected behavior in Safe Mode.
In addition to the standard Safe Mode, Windows 10 also offers two other advanced options:
- Safe Mode with Networking: This mode allows you to access the internet and network services in Safe Mode. It is useful when you need to download and install updates, drivers, or troubleshoot network-related issues.
- Safe Mode with Command Prompt: This mode starts the computer with a command prompt instead of the graphical user interface (GUI). It is useful for troubleshooting advanced issues or performing system repairs using commands.
Now that you have a better understanding of Safe Mode in Windows 10, let’s explore how you can turn off Safe Mode and return to normal operation.
Why would you want to turn off Safe Mode?
While Safe Mode can be a lifesaver when it comes to troubleshooting and fixing system issues, there are several reasons why you may want to exit Safe Mode and return to normal operation on your Windows 10 computer.
One of the most common reasons is that you may have entered Safe Mode accidentally. It’s easy to trigger Safe Mode unintentionally, especially if you’re not familiar with the key combinations or the menu options required to access it. If you find yourself in Safe Mode without intending to be, you’ll likely want to turn it off and restore your computer to its regular functioning state.
Another reason to exit Safe Mode is when you have resolved the underlying problem that led you to enter Safe Mode in the first place. Safe Mode is a limited mode of operation that disables some functionality and restricts access to certain features. If you have successfully repaired your computer or resolved the specific issue you were facing, you’ll want to exit Safe Mode to regain full functionality and access to all your applications and settings.
Safe Mode can also be inconvenient if you need to perform tasks that are not possible in this diagnostic mode. For example, if you want to install or update software, change system settings, or perform regular maintenance tasks, Safe Mode may restrict your ability to do so. Exiting Safe Mode will allow you to carry out these activities without any limitations.
Moreover, some functionalities are disabled in Safe Mode for security reasons. For instance, Windows Defender, the built-in antivirus software in Windows 10, operates in a limited capacity in Safe Mode. If you want to perform a thorough system scan or take advantage of the advanced security features provided by Windows Defender, you’ll need to turn off Safe Mode.
Lastly, Safe Mode can sometimes cause inconvenience due to the lower screen resolution, larger icons, and lack of customization options. If you prefer your regular desktop appearance and settings, exiting Safe Mode will restore your desired display settings and customization options.
Now that you understand why you may want to turn off Safe Mode, let’s explore the different methods to exit Safe Mode and return your Windows 10 computer to its normal operating state.
Method 1: Exiting Safe Mode using the System Configuration tool
If you entered Safe Mode using the System Configuration tool, also known as msconfig, you can use the same tool to exit Safe Mode and return to normal operation on your Windows 10 computer.
Here’s how you can do it:
- Press the Windows key + R key on your keyboard to open the Run dialog box.
- Type msconfig into the text field and click OK.
- In the System Configuration window that appears, navigate to the Boot tab.
- Under the Boot options section, uncheck the box labeled Safe boot.
- Click Apply and then click OK to save the changes.
- A prompt will appear asking if you want to restart your computer. Choose Restart to exit Safe Mode and restart your computer in normal mode.
Once your computer finishes restarting, it will boot up in normal mode, and you will no longer be in Safe Mode.
Please note that the exact steps may vary slightly depending on your version of Windows 10. If you encounter any difficulties, you can refer to the Microsoft support documentation or seek assistance from the Windows 10 community.
Now that you know how to exit Safe Mode using the System Configuration tool, let’s move on to another method that involves the Shift + Restart option.
Method 2: Disabling Safe Mode using the Shift + Restart option
If you entered Safe Mode using the Shift + Restart option in Windows 10, you can easily disable Safe Mode and return to normal operation by following these steps:
- Click on the Start button to open the Start menu.
- Click on the Power button.
- Hold down the Shift key on your keyboard.
- While holding down the Shift key, click on Restart.
- Your computer will restart and display the “Choose an option” screen.
- Click on Troubleshoot.
- In the Troubleshoot menu, select Advanced options.
- Under the Advanced options, click on Startup Settings.
- Finally, click on Restart to start your computer in the Startup Settings menu.
- Once your computer restarts, you will see a list of startup options.
- Press the number corresponding to Disable safe mode or use the function key assigned to it.
- Your computer will then boot up in normal mode, and Safe Mode will be disabled.
By following these steps, you can easily turn off Safe Mode and resume normal operation on your Windows 10 computer.
Please note that the process may vary slightly depending on your specific Windows 10 version. If you encounter any difficulties or have trouble locating the startup options, you can refer to the official Microsoft documentation or seek assistance from the Windows 10 community.
Now that you know how to disable Safe Mode using the Shift + Restart option, let’s explore another method using the Command Prompt.
Method 3: Turning off Safe Mode through the Command Prompt
If you entered Safe Mode and want to turn it off using the Command Prompt in Windows 10, you can follow these steps:
- Press the Windows key + R key on your keyboard to open the Run dialog box.
- Type cmd into the text field and press Enter to open the Command Prompt.
- In the Command Prompt window, type the command bcdedit /deletevalue {current} safeboot and press Enter.
- After executing the command, you will see a success message indicating that the operation was completed successfully.
- Close the Command Prompt window.
- Restart your computer to exit Safe Mode and start Windows 10 in normal mode.
Once your computer finishes restarting, you will be in normal mode, and Safe Mode will be disabled.
Please note that the Command Prompt method requires administrative privileges. If you are not logged in as an administrator, you may need to enter the administrator password or confirm your action.
If you encounter any issues or errors while executing the command, double-check that you entered it correctly. Alternatively, you can refer to official Microsoft documentation or seek assistance from the Windows 10 community for further guidance.
Now that you know how to turn off Safe Mode using the Command Prompt, let’s move on to another method using the Advanced Boot Options menu.
Method 4: Exiting Safe Mode via the Advanced Boot Options menu
If you entered Safe Mode and want to exit it using the Advanced Boot Options menu in Windows 10, you can follow these steps:
- Restart your computer and continuously press the F8 key before the Windows logo appears. Alternatively, you can hold down the Shift key and repeatedly press F8.
- This will bring up the Advanced Boot Options menu. Using the arrow keys, navigate to and select Safe Mode.
- Press Enter to boot into Safe Mode.
- Once your computer has finished starting in Safe Mode, press the Windows key + R key on your keyboard to open the Run dialog box.
- Type msconfig into the text field and press Enter to open the System Configuration tool.
- Navigate to the Boot tab in the System Configuration window.
- Under the Boot options section, uncheck the box labeled Safe boot.
- Click Apply and then click OK to save the changes.
- Restart your computer again.
Once your computer finishes restarting, it will boot up in normal mode, and Safe Mode will be disabled.
The Advanced Boot Options menu may not appear on all systems or may have different key combinations depending on your hardware. If the F8 key or Shift+F8 doesn’t bring up the menu, you can refer to the official Microsoft documentation or seek assistance from the Windows 10 community for alternative methods.
Now that you know how to exit Safe Mode via the Advanced Boot Options menu, let’s summarize what we’ve covered so far.
Conclusion
In this guide, we’ve explored various methods to turn off Safe Mode in Windows 10 and return your computer to its normal operating state. Whether you used the System Configuration tool, the Shift + Restart option, the Command Prompt, or the Advanced Boot Options menu, you have learned how to disable Safe Mode and regain full functionality on your Windows 10 machine.
Safe Mode is a valuable diagnostic mode that can help troubleshoot and fix various system issues. It restricts the loading of unnecessary drivers and services, allowing you to identify and address underlying problems. However, there are instances where you may want to exit Safe Mode, such as when you entered it accidentally, or when you have successfully resolved the underlying issue.
By following the methods outlined in this guide, you can easily disable Safe Mode and resume normal operation. Remember to carefully follow the step-by-step instructions provided for each method to ensure a successful transition out of Safe Mode.
If you encounter any difficulties or have specific questions related to your Windows 10 version, it is always beneficial to consult the official Microsoft documentation or seek assistance from the vibrant Windows 10 community.
We hope this guide has been helpful to you in understanding how to turn off Safe Mode in Windows 10. Now you can confidently navigate your way out of Safe Mode and enjoy a fully functional Windows 10 experience.
Thank you for reading, and we wish you a smooth and trouble-free computing experience!