Introduction
A Panasonic projector is a valuable tool for presentations, educational activities, or enjoying movie nights at home. Over time, the lamp inside the projector will require replacement to maintain optimal performance. Resetting the lamp hours after installing a new lamp ensures accurate tracking of its usage and prevents unnecessary warnings or errors. If you’re unsure how to reset the lamp hours on your Panasonic projector, don’t worry – we’ve got you covered.
In this guide, we will walk you through the step-by-step process of resetting a Panasonic projector lamp. Whether you’re a novice or have some experience with electronics, you can easily follow these instructions to ensure a successful lamp reset.
Before we dive into the steps, it’s important to note that each Panasonic projector model may have slight variations in design and specific instructions. Therefore, it’s always recommended to consult the user manual provided with your projector for any model-specific guidelines. With that said, the following instructions provide a general overview of the process that applies to most Panasonic projector models.
Now let’s get started and learn how to properly reset the lamp hours on your Panasonic projector. By following these instructions, you’ll be able to maximize the lifespan of your projector lamp and ensure consistent and high-quality performance.
Step 1: Turn off and unplug the projector
The first step in resetting the lamp hours on your Panasonic projector is to ensure that the projector is turned off and unplugged from the power source. This is crucial for your safety and to prevent any electrical damage during the lamp reset process.
Start by locating the power button on your projector. Press and hold the power button until the projector powers off completely. Once the projector is turned off, unplug the power cord from the wall socket or power strip.
It’s important to note that some projectors have additional standby buttons or switches that need to be turned off as well. Make sure to check your specific model’s manual for any additional steps required to fully power down the projector.
By following this step, you create a safe environment for the upcoming lamp reset process and reduce the risk of any electrical mishaps. Once you’ve turned off and unplugged the projector, you’re ready to move on to the next step.
Step 2: Locate the lamp cover
Now that the projector is turned off and unplugged, the next step is to locate the lamp cover. The lamp cover is usually located on the bottom or side of the projector, depending on the model.
Take a moment to carefully examine the projector’s exterior. Look for any indicators or markings that suggest the presence of the lamp cover. In most cases, you’ll notice a small panel or door with an icon resembling a lightbulb or lamp.
If you’re having trouble finding the lamp cover, refer to the user manual for your specific Panasonic projector model. The manual will provide detailed instructions and illustrations to help you locate the lamp cover accurately.
Once you spot the lamp cover, make sure you have easy access to it without any obstructions. Clear away any cables, objects, or debris that might impede your ability to open the cover fully. Ensuring a clear path to the lamp cover will make the lamp replacement process much smoother.
Now that you’ve successfully located the lamp cover, you’re ready to proceed to the next step in resetting the lamp hours on your Panasonic projector.
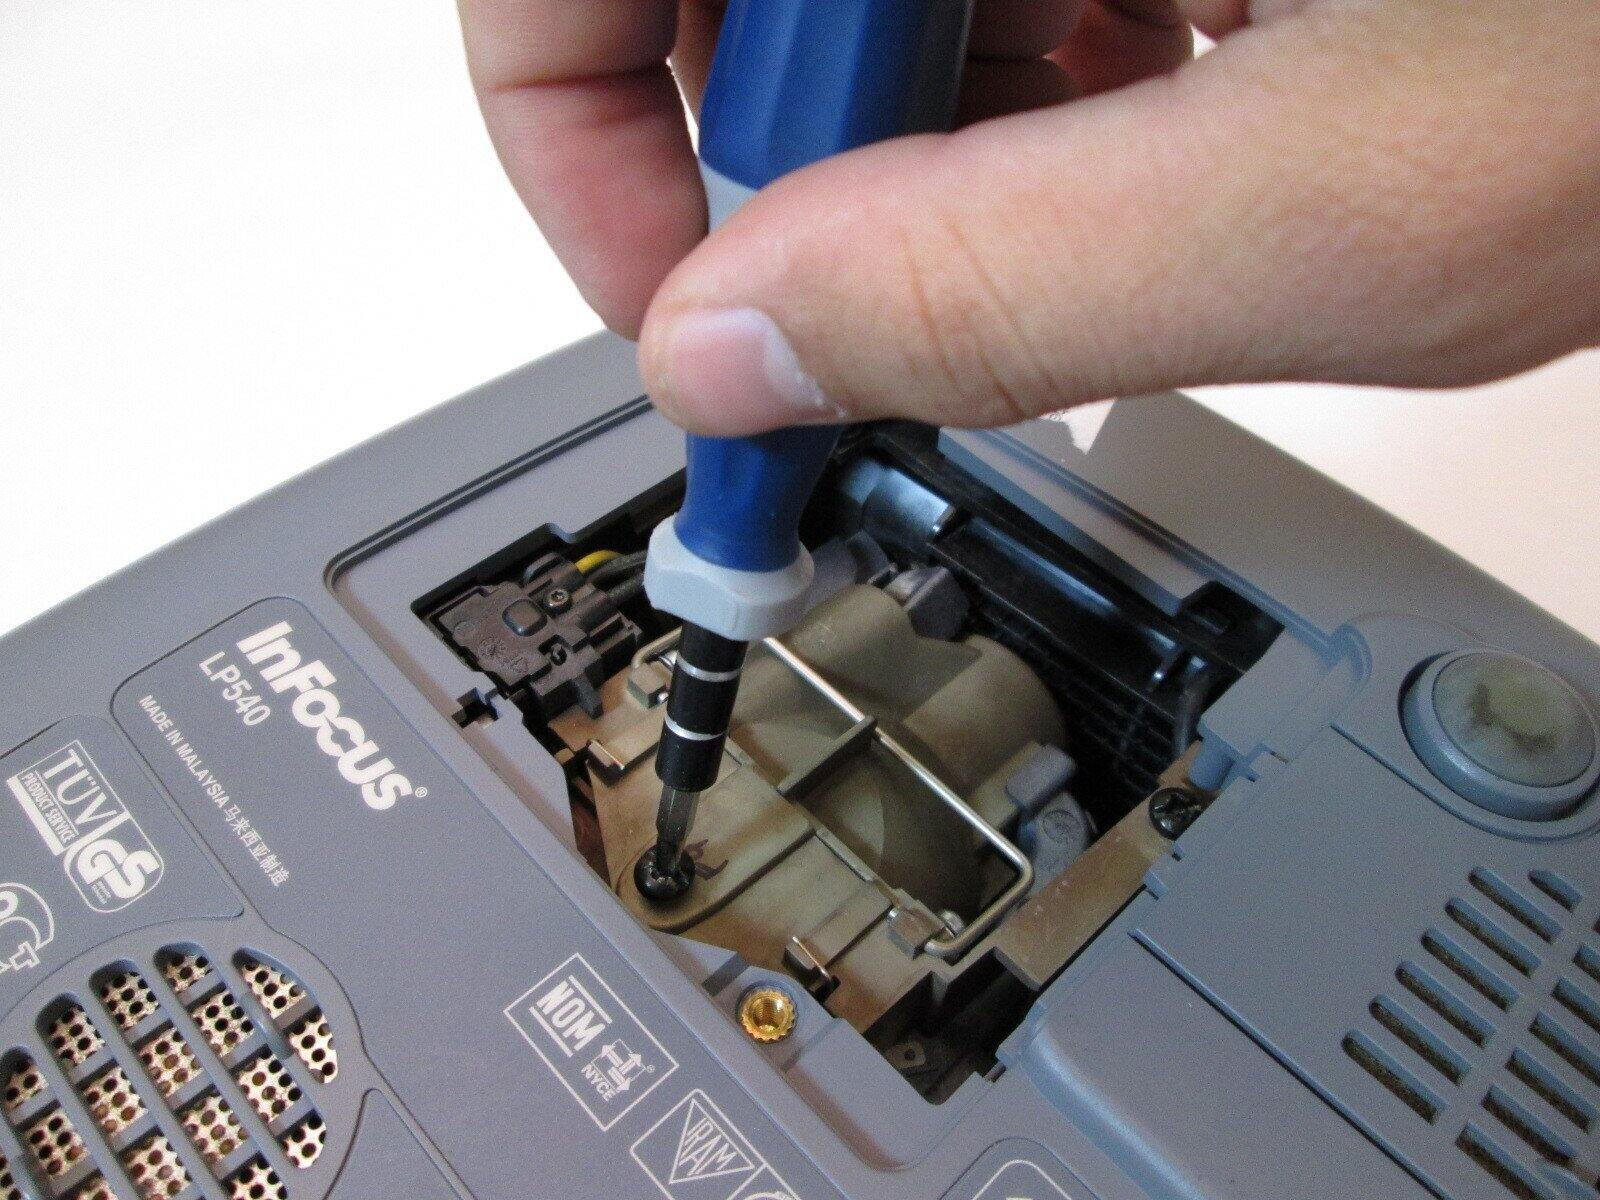
Step 3: Remove the lamp cover
With the lamp cover located, the next step is to remove it carefully. Removing the lamp cover will give you access to the lamp compartment, allowing you to proceed with replacing the old lamp and resetting the lamp hours.
Depending on your Panasonic projector model, the method of removing the lamp cover may vary slightly. Generally, the lamp cover will have screws or a latch securing it in place. Use a screwdriver or your fingers, as applicable, to loosen and remove the screws or release the latch.
As you remove the screws or release the latch, keep them in a safe place. It’s essential to keep track of these small parts to avoid misplacing them during the lamp replacement process.
Once the screws are removed or the latch is released, gently pull the lamp cover towards you. Be cautious not to use excessive force or twist it excessively, as this may cause damage to the cover or the projector itself.
If the lamp cover doesn’t come off easily, refer to your projector’s user manual for any additional steps or precautions required for removing the lamp cover on your specific model.
After successfully removing the lamp cover, set it aside in a safe and easily accessible location, as you will need to reinstall it later in the process.
With the lamp cover removed, you’ve completed Step 3 in the process of resetting the lamp hours on your Panasonic projector. Now, you’re ready to move on to the next step: removing the old lamp.
Step 4: Remove the old lamp
Now that the lamp cover has been removed, you can proceed to remove the old lamp from your Panasonic projector. Removing the old lamp is a crucial step in the lamp reset process, as it allows you to replace it with a new one and ensure accurate tracking of the lamp hours.
Before handling the lamp, it’s important to exercise caution. The lamp may still be hot from previous use, so allow it to cool down for a few minutes to avoid burning yourself.
Once the lamp has cooled down, locate and carefully grasp the lamp by its handle or designated grip area. Gently pull the lamp out of its socket while applying even pressure. Be careful not to twist or force the lamp, as it may be held in place securely.
Some projector models may have additional securing mechanisms, such as screws or levers, that need to be released before the lamp can be removed. If your projector has these mechanisms, refer to the user manual for specific instructions on how to properly detach the lamp.
As you remove the old lamp, pay attention to how it is positioned within the lamp compartment. This will help you orient the new lamp correctly when it’s time for installation.
Set the old lamp aside in a safe place or dispose of it according to local regulations. Remember, projector lamps contain sensitive components and should not be discarded as regular household waste.
By successfully removing the old lamp, you’ve completed Step 4 in the process of resetting the lamp hours on your Panasonic projector. Now, it’s time to move on to the next step: inserting the new lamp.
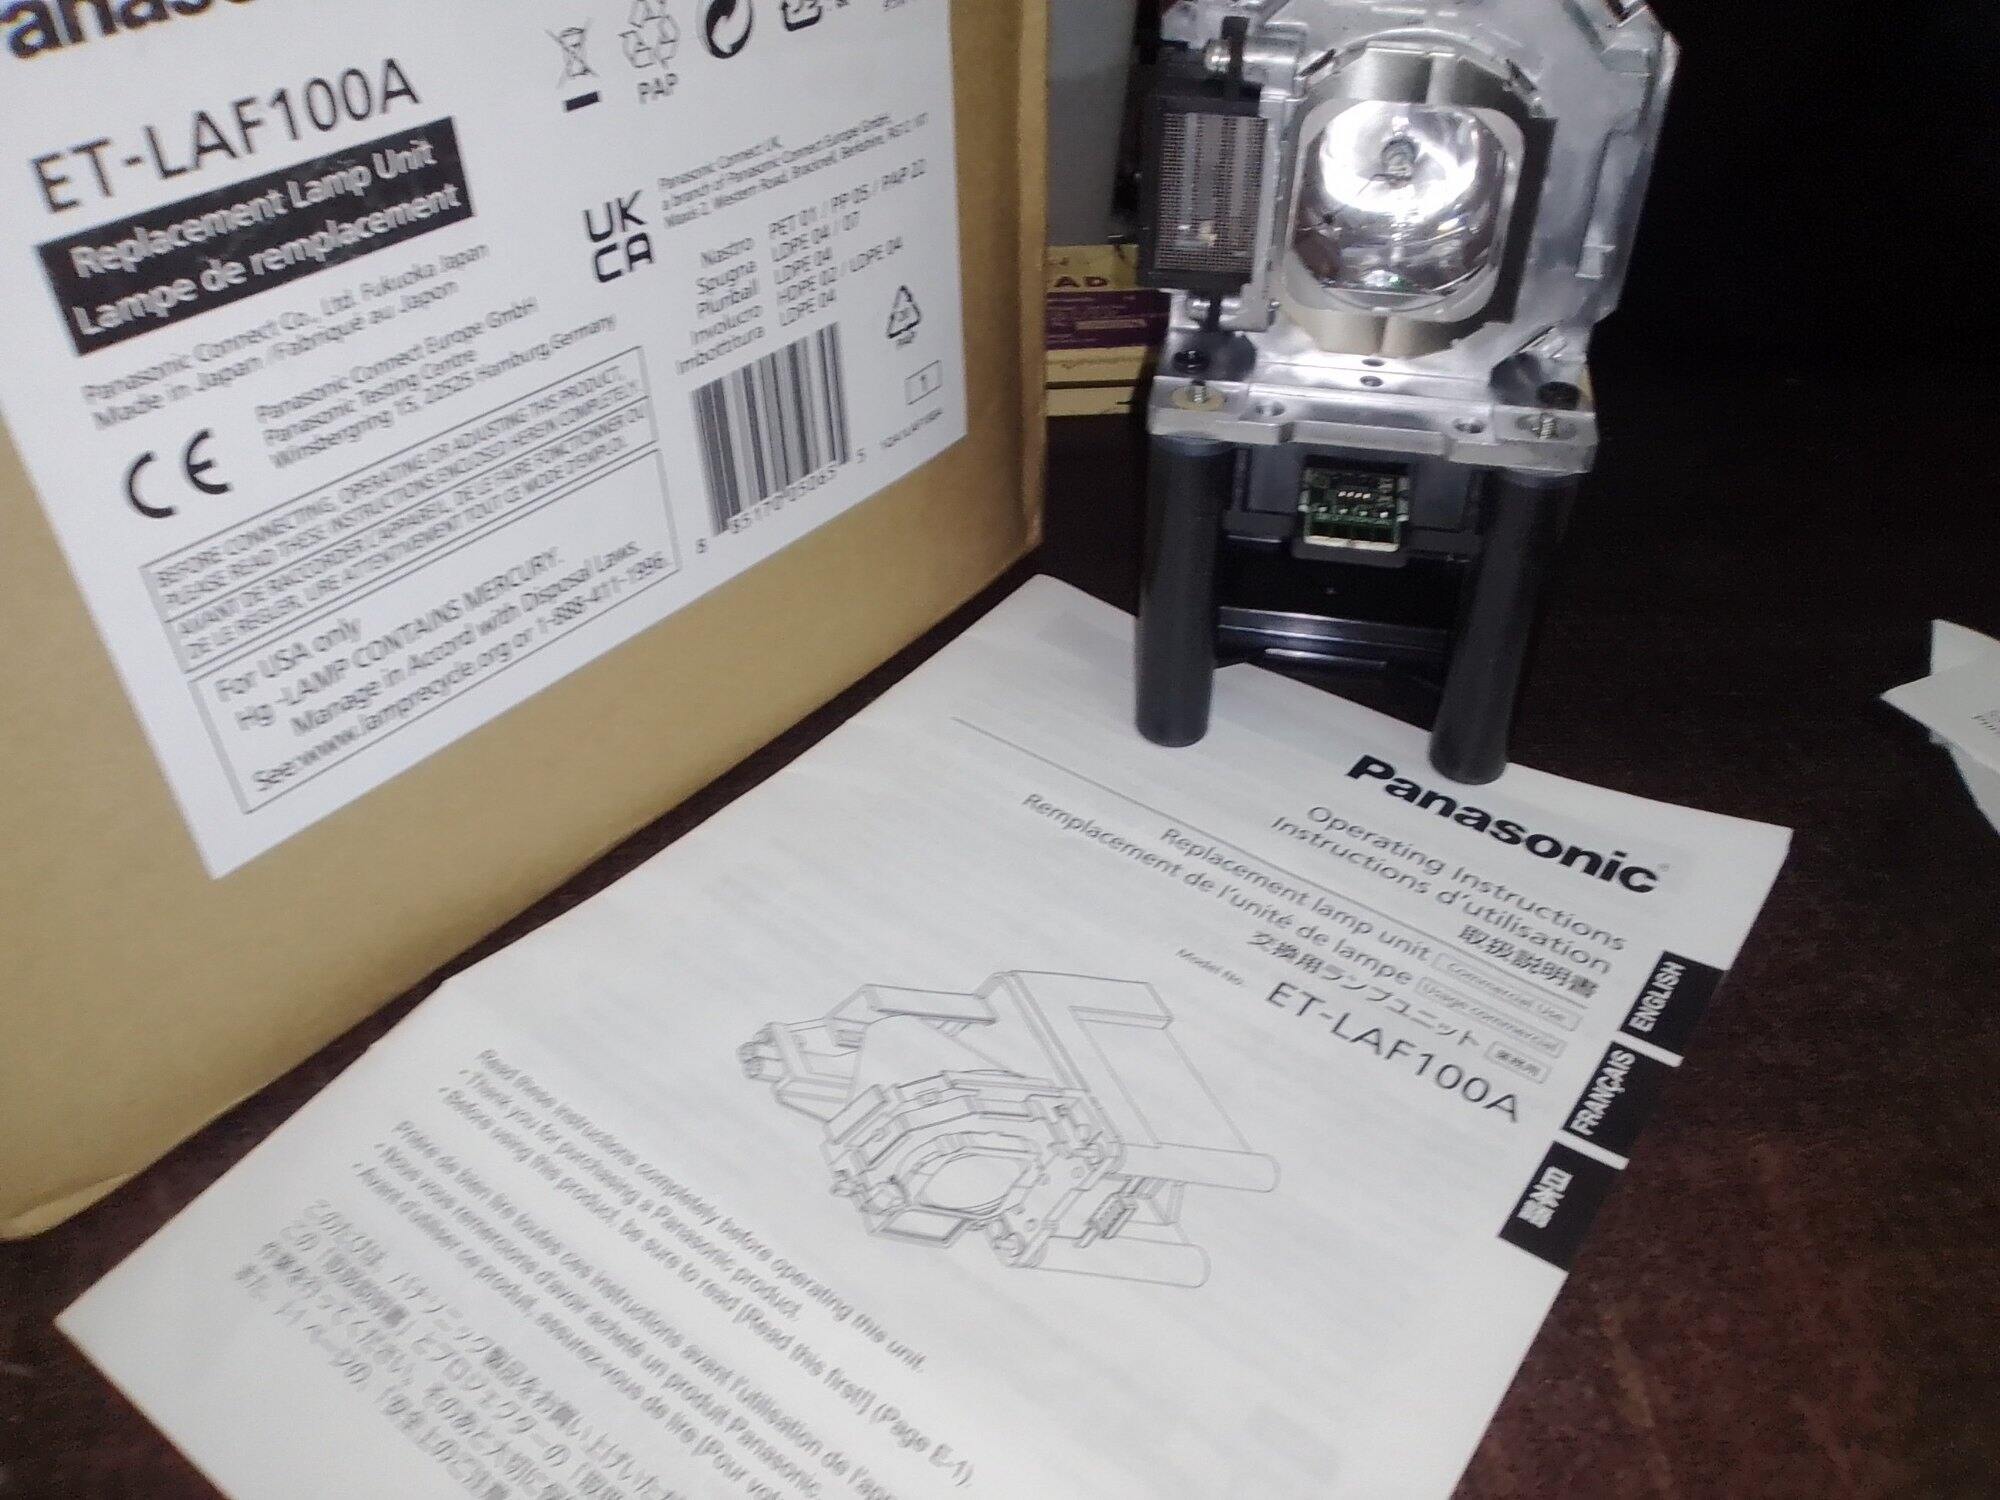
Step 5: Insert the new lamp
Now that the old lamp has been removed, it’s time to insert the new lamp into your Panasonic projector. Installing a new lamp ensures optimal performance and extends the lifespan of your projector.
Before proceeding, check the new lamp to ensure it is the correct model for your projector. Refer to the user manual or the lamp manufacturer’s instructions for any specific guidelines or precautions.
Hold the new lamp by its handle or designated grip area and align it with the socket inside the lamp compartment. Take note of any notches or markers on the lamp and the compartment to ensure proper alignment.
Gently slide the new lamp into the socket, applying even pressure. Be careful not to force or push too hard, as this may cause damage to the lamp or the projector. The lamp should fit snugly and securely in place.
Once the new lamp is inserted, use your fingers or a screwdriver, if applicable, to secure any screws or locking mechanisms that hold the lamp in place. These mechanisms vary depending on the projector model, so consult the user manual if necessary.
Double-check that the lamp is firmly installed by gently tugging on it. If it doesn’t budge, it is securely in place.
Now that you have successfully inserted the new lamp, you’re one step closer to resetting the lamp hours on your Panasonic projector. The next step is to replace the lamp cover.
Step 6: Replace the lamp cover
With the new lamp securely installed, it’s time to replace the lamp cover on your Panasonic projector. The lamp cover protects the lamp and ensures its proper functioning, so it’s crucial to correctly reattach it.
Start by aligning the lamp cover with its designated position on the projector. Take note of any grooves or markings on the projector and the cover that indicate the proper alignment.
Gently slide the lamp cover back into place, ensuring it fits snugly and smoothly. Avoid using excessive force or pressing down too hard, as this may damage the cover or the projector.
If the lamp cover has screws, use a screwdriver to reinsert and tighten them. Make sure to not overtighten the screws, as this may strip the threads or cause damage.
Once the screws are securely tightened, if applicable, verify that the lamp cover is firmly in place by gently wiggling it. It should not move or come loose.
With the lamp cover successfully replaced, you’ve completed Step 6 in the process of resetting the lamp hours on your Panasonic projector. Now, let’s move on to the next step: resetting the lamp hours.
Step 7: Reset the lamp hours
Resetting the lamp hours on your Panasonic projector is an essential step to ensure accurate tracking of the lamp’s usage and avoid any unnecessary warnings or errors. Follow these instructions to reset the lamp hours:
- Turn on the projector and wait for it to fully boot up.
- Access the projector’s menu by pressing the “Menu” button on either the projector’s control panel or the remote control.
- Navigate through the menu options using the arrow keys, and find the “Settings” or “Lamp Settings” menu.
- Select the “Lamp Counter” or “Lamp Timer” option within the Settings menu.
- Choose the “Reset” or “Reset Lamp Hours” option to initiate the reset process. You may need to enter a confirmation code or password, depending on your projector’s security settings.
- Confirm the reset action and wait for the confirmation message that the lamp hours have been successfully reset.
- Exit the menu and power off the projector.
It’s important to note that the specific steps and menu options may vary depending on your Panasonic projector model. Refer to the user manual for detailed instructions and to ensure you follow the correct process for your specific projector model.
By resetting the lamp hours, you’re ensuring accurate tracking of the lamp’s usage and optimizing the performance of your Panasonic projector. Now, it’s time for the final step: plugging in and turning on the projector.
Step 8: Plug in and turn on the projector
After successfully resetting the lamp hours, you’re now ready to plug in and turn on your Panasonic projector. Follow these final steps to complete the process:
- Locate the power cord that came with your projector.
- Plug the power cord firmly into the projector’s power input port.
- Ensure the other end of the power cord is securely connected to a functioning power outlet.
- Press the power button or the appropriate button on the projector’s control panel or remote control to turn on the projector.
- Wait for the projector to initialize and fully boot up. This may take a few moments.
- Once the projector is powered on, check the lamp status indicators on the projector or access the lamp information in the menu to confirm that the lamp hours have been reset and are displaying accurately.
If you encounter any issues during the power-up process, double-check all the connections and ensure the lamp and lamp cover are properly installed. If the problem persists, refer to the user manual for troubleshooting steps or contact Panasonic’s customer support for further assistance.
Congratulations! You have successfully reset the lamp hours on your Panasonic projector and are ready to enjoy crisp, quality projection with your newly installed lamp.
Remember to periodically check the lamp status and reset the hours as needed to maintain accurate usage tracking and optimize the performance of your projector.
Conclusion
Resetting the lamp hours on your Panasonic projector is a necessary task to ensure accurate tracking of lamp usage and maintain optimal performance. By following the step-by-step instructions outlined in this guide, you can easily reset the lamp hours and maximize the lifespan of your projector lamp.
Remember to always refer to the user manual provided with your specific Panasonic projector model for any model-specific instructions or precautions. Each projector may have slight variations in design and menu options, so it’s important to consult the manual for the most accurate information.
Throughout this process, it is crucial to handle the lamp and projector components with care. Take necessary precautions to prevent any damage to the lamp or the projector itself. Ensure that the projector is turned off and unplugged before beginning any maintenance procedures.
Regularly resetting the lamp hours and replacing the lamp when necessary will help you maintain the best possible image quality and avoid unexpected failures during important presentations or movie nights.
By properly resetting the lamp hours and following the manufacturer’s guidelines, you can ensure consistent performance from your Panasonic projector and enjoy vibrant and clear projections for years to come.
Remember, if you encounter any issues or difficulties during the process or have any concerns about your projector’s performance, it’s always best to reach out to Panasonic’s customer support for assistance.
Now that you have the knowledge and confidence to reset the lamp hours on your Panasonic projector, go ahead and give it a try. Enjoy your bright and captivating projection experience!