Introduction
Replacing the battery in your ultrabook is an essential task that you may need to undertake at some point. Over time, the battery performance may diminish, leading to shorter battery life and power issues. Fortunately, replacing the battery in an ultrabook is a relatively straightforward process that you can do yourself, saving time and money.
In this guide, we will walk you through the step-by-step process of replacing the battery in your ultrabook. Whether you have a Dell, HP, Lenovo, or any other brand of ultrabook, the general procedure remains the same. We will cover everything from gathering the necessary tools to reconnecting all the cables and powering on your device.
Before we begin, it is crucial to note that ultrabooks vary in their design, so the placement and removal of the battery may differ slightly between models. Therefore, we recommend consulting your ultrabook’s user manual or manufacturer’s website for specific instructions related to your device. With that said, let’s dive into the necessary steps for replacing the battery in your ultrabook.
Step 1: Gather the necessary tools
Before you can begin the battery replacement process for your ultrabook, it’s essential to gather all the tools you will need. Having the right tools on hand will ensure a smooth and efficient battery replacement. Here’s a list of the tools you’ll need:
- Screwdriver: Most ultrabooks use small screws to secure the battery cover, so having a precision screwdriver set with various sizes will be helpful.
- Anti-static wrist strap: This strap is a safeguard against static electricity that can potentially damage sensitive electronic components. It’s a good idea to wear an anti-static wrist strap throughout the battery replacement process.
- Replacement battery: Make sure you have the correct replacement battery for your specific ultrabook model. Check the battery’s voltage, capacity, and compatibility with your ultrabook before making a purchase.
- Clean cloth: You’ll want to keep a clean cloth nearby to wipe away any dust or debris you may encounter during the battery replacement process.
- Optional: Suction cup or spudger: Some ultrabooks have adhesive securing the battery, and using a suction cup or spudger can help in gently prying it loose. This tool is not always required, but it can be useful.
Once you have gathered all the necessary tools, you’ll be ready to proceed with replacing the battery in your ultrabook. It’s important to have these tools readily available to ensure a successful battery replacement without any delays or complications.
Step 2: Prepare your workspace
Before you embark on replacing the battery in your ultrabook, it’s important to set up a dedicated workspace that provides a clean, well-lit, and organized environment. This will ensure that you have enough space and all the necessary resources within reach. Follow these steps to prepare your workspace:
- Clean the area: Clear the workspace of any clutter, dust, or debris that may interfere with the battery replacement process. A clean surface will help prevent damage to delicate components and make it easier to locate small screws or parts.
- Provide adequate lighting: Ensure that your workspace is well-lit, either by natural sunlight or a bright lamp. Sufficient lighting will help you see the intricate details of your ultrabook and make it easier to navigate through the battery replacement process.
- Use an anti-static mat: Consider using an anti-static mat or the static-free surface provided in an anti-static kit. This will help prevent accidental static discharge that could damage electronic components. Place your ultrabook on the mat to provide an extra layer of protection.
- Organize your tools: Lay out all the necessary tools in front of you, ensuring they are easily accessible. Having your tools organized will save you time and minimize the risk of misplacing or losing small components during the battery replacement process.
- Have a small container: Keep a small container nearby to hold screws and other small components that you remove from your ultrabook. This will prevent them from rolling off the workspace and getting lost.
By preparing your workspace properly, you’ll create an ideal environment for a successful battery replacement. Remember to take your time and be mindful of your surroundings to minimize the risk of damaging any components or losing important screws during the process.
Step 3: Power off your ultrabook and disconnect all cables
Before you begin the battery replacement process for your ultrabook, it is crucial to power off the device and disconnect all cables. This will ensure your safety and prevent any accidental damage to the ultrabook or its components. Follow these steps to properly power off and disconnect your ultrabook:
- Save your work and close all applications: Before shutting down your ultrabook, make sure to save any ongoing work and close all applications. This will prevent the loss of unsaved data and reduce the risk of file corruption.
- Shut down your ultrabook: Locate the power button on your ultrabook and press and hold it until the device shuts down completely. Depending on your operating system, you may need to select the “Shut Down” option from the Start menu or power options.
- Disconnect the power adapter: Unplug the power adapter from your ultrabook and disconnect it from the power source. This step is crucial to ensure your safety during the battery replacement process.
- Remove any peripherals: Disconnect all external devices and peripherals, such as USB drives, headphones, or external monitors, from your ultrabook. This will give you more freedom of movement and prevent any potential damage to these devices during the battery replacement.
- Disconnect all cables: Carefully unplug any remaining cables, such as the Ethernet cable or HDMI cable, from your ultrabook. Take your time and ensure that all cables are fully disconnected before proceeding.
By powering off your ultrabook and disconnecting all cables, you create a safe and stable environment for the battery replacement process. This ensures that you can work on your ultrabook without the risk of electrical shocks or damage to the internal components. Now that your ultrabook is properly prepared, you can move on to the next step of the battery replacement process.
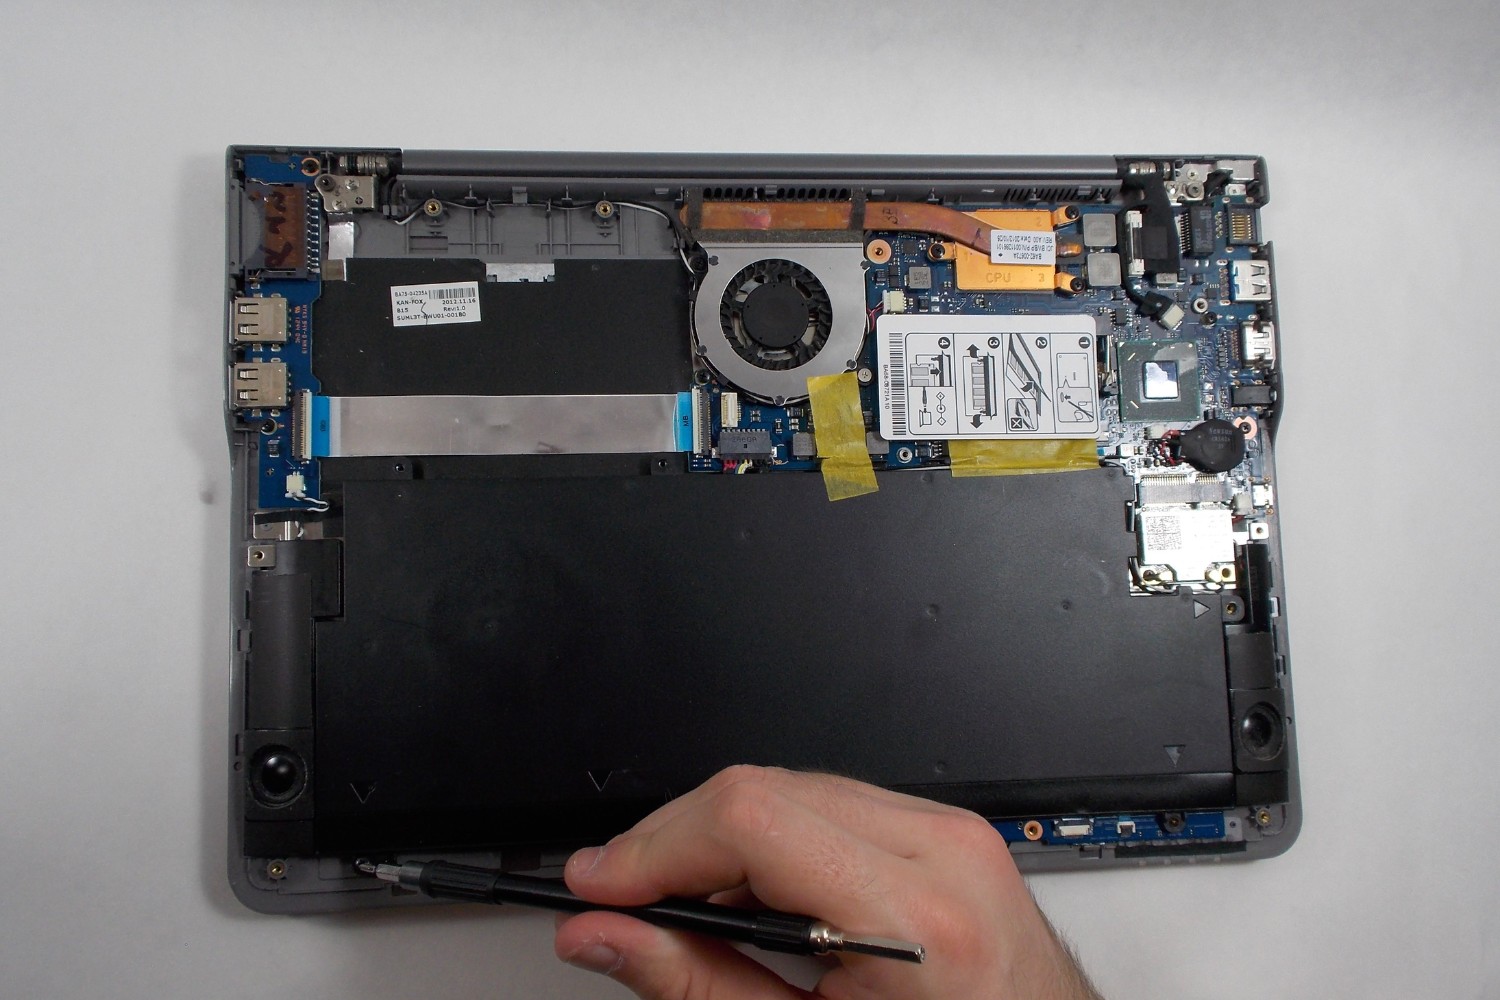
Step 4: Locate the battery compartment
In order to replace the battery in your ultrabook, you need to locate the battery compartment. The exact location of the battery compartment can vary depending on the make and model of your ultrabook. Follow these steps to locate the battery compartment:
- Consult the user manual: If you have the user manual for your ultrabook, it will provide specific instructions on how to locate the battery compartment. It may also include diagrams or illustrations to help you find it.
- Check the back or bottom of your ultrabook: In many cases, the battery compartment is located on the back or bottom of the ultrabook. Look for a panel that is secured with screws or clips.
- Inspect the sides and edges: Some ultrabooks have the battery compartment located on the sides or edges of the device. Carefully examine these areas for any removable panels or covers.
- Look for battery icons or labels: On some ultrabooks, there may be battery icons or labels near the battery compartment. These can indicate where the battery is located and how to access it.
- Search online: If you are unable to find the battery compartment on your own, search online for your ultrabook’s model number or name along with the term “battery replacement.” This can lead you to user forums or websites with detailed instructions or videos.
Once you have located the battery compartment, take note of how it is secured. Some ultrabooks require the use of screws or clips to hold the battery in place, while others may have adhesive strips or connectors. Understanding the method of securing the battery will help you in the subsequent steps of the battery replacement process.
Step 5: Remove the battery cover
With the battery compartment located, the next step in replacing the battery in your ultrabook is to remove the battery cover. The battery cover is the panel that secures the battery in place and may be held in position by screws, clips, or adhesive. Follow these steps to remove the battery cover:
- Use the appropriate tool: Depending on the type of fastening used, use the appropriate tool, such as a screwdriver or prying tool, to loosen or remove the screws, clips, or adhesive securing the battery cover.
- Take your time: Be patient and gentle as you remove the battery cover. Avoid applying excessive force that could damage the cover, screws, or surrounding components.
- Set aside the screws: If the battery cover is held in place by screws, carefully set them aside in a secure location, such as a small container or magnetic mat. Ensuring that you keep track of the screws will make reassembly easier.
- Check for any additional clips or latches: Some ultrabook models may have additional clips or latches that secure the battery cover. Look for any hidden tabs or levers that need to be released before the cover can be fully removed.
- Gently lift the battery cover: Once all the fasteners are removed or released, carefully lift the battery cover to reveal the battery compartment. Take care not to damage any cables or connectors that may be attached to the cover.
Remember to inspect the removed battery cover for any signs of damage, such as cracks or bends. If you notice any significant damage, it may be necessary to replace the battery cover along with the battery. Now that the battery cover is removed, you can proceed to the next step of disconnecting the battery cables.
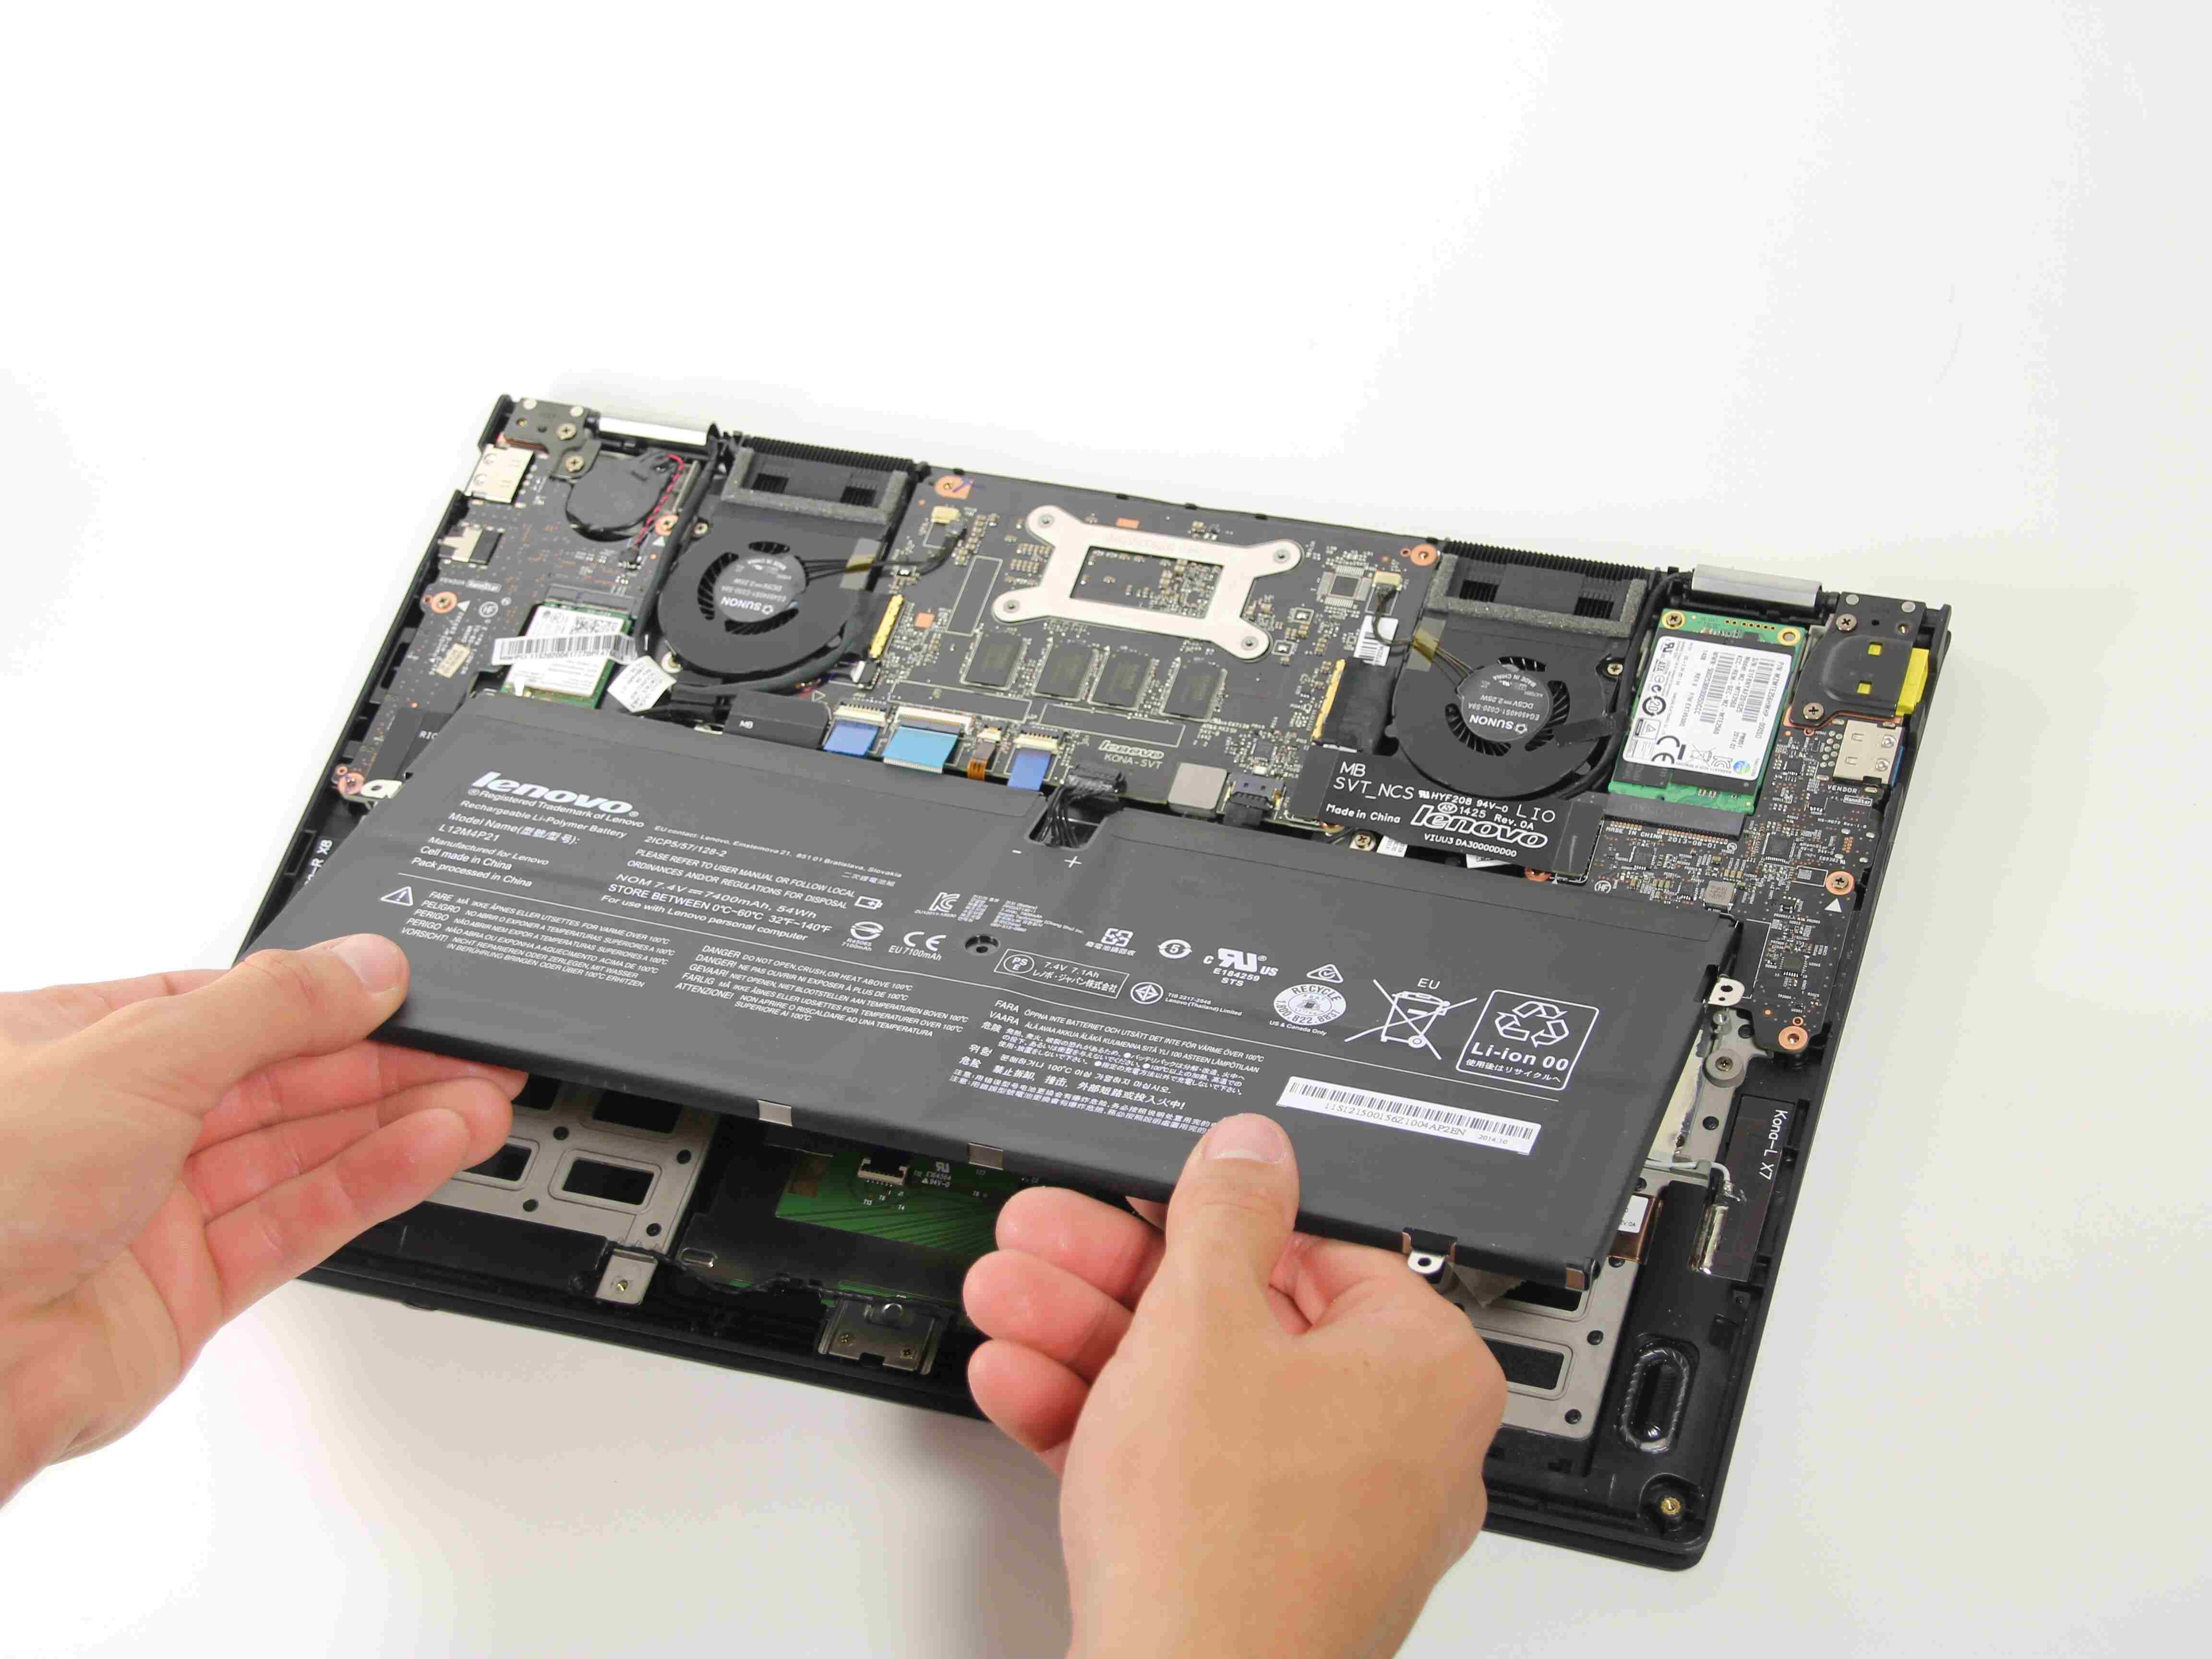
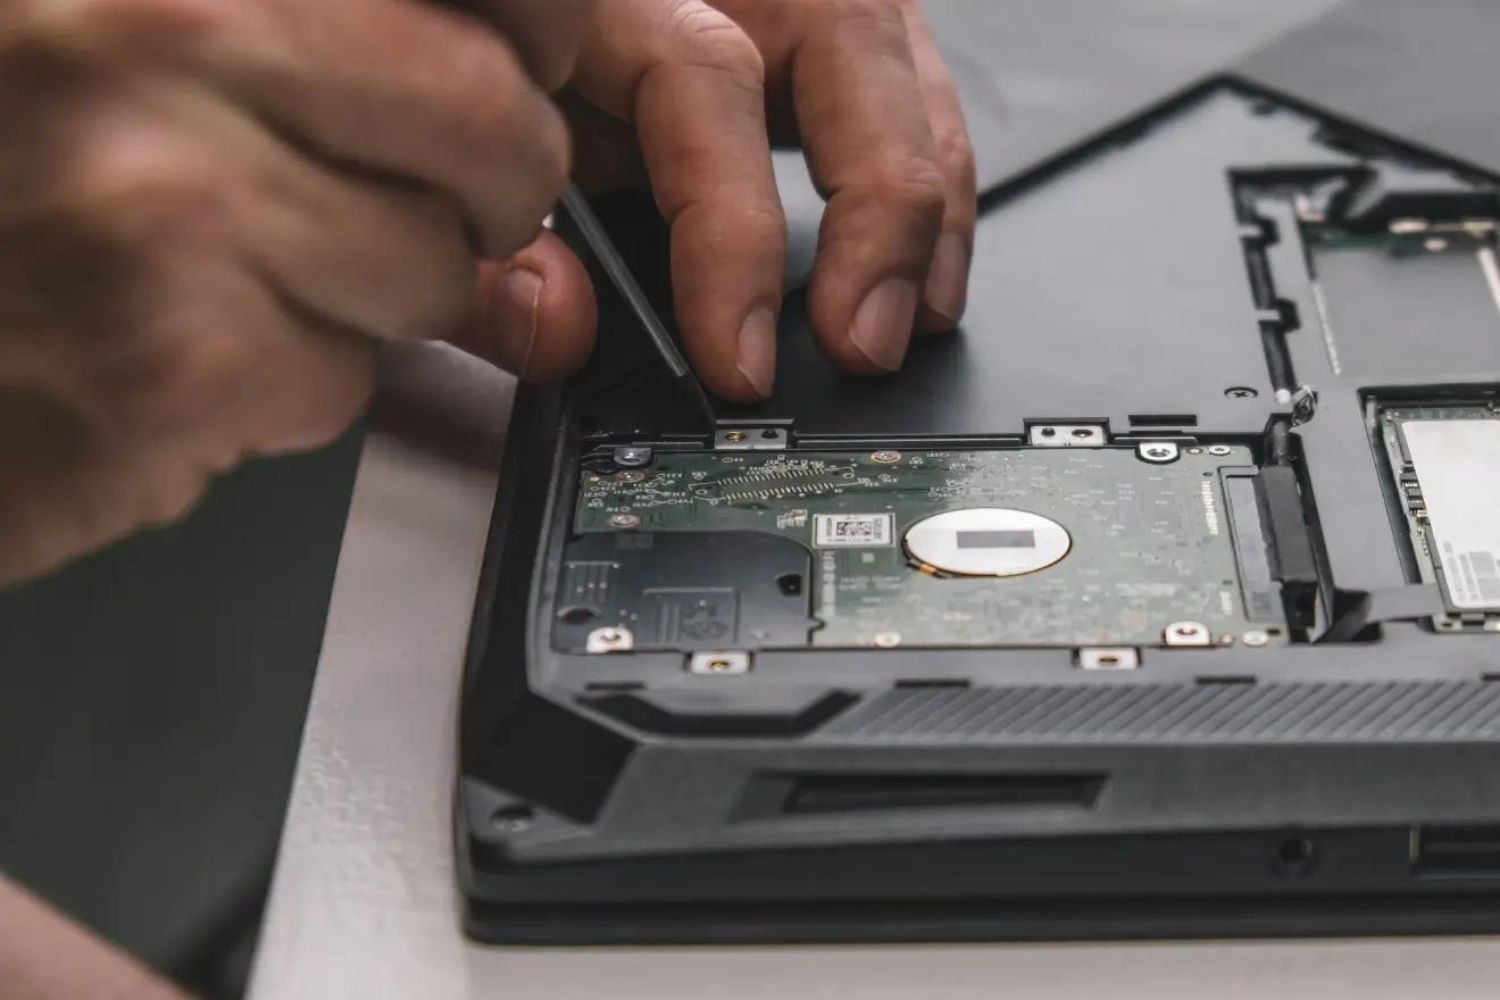
Step 6: Disconnect the battery cables
Once the battery cover is removed, the next step in replacing the battery in your ultrabook is to disconnect the battery cables. The battery cables are the connections that provide power from the battery to the motherboard or other components. Follow these steps to safely disconnect the battery cables:
- Identify the battery cables: Inside the battery compartment, locate the battery cables that are connected to the battery. They are usually ribbon-like cables with connectors attached to the end.
- Identify the connectors: Take note of how the connectors are attached to the battery. They may have a latch, clip, or lever that secures them in place. This varies depending on the manufacturer and model of your ultrabook.
- Safely disconnect the connectors: Gently and carefully detach the connectors from the battery. If there is a latch or clip, release it before pulling the connector away. Take your time to avoid applying excessive force or pulling at an awkward angle.
- Avoid pulling on the cables: When disconnecting the battery cables, be cautious not to pull on the cables themselves. Instead, firmly grasp the connectors and gently disconnect them from the battery.
It’s common for ultrabooks to have multiple battery cables, so repeat the above steps for each individual cable. Take note of the order in which the cables are connected, as this will make reconnecting them later easier. If the cables are color-coded or labeled, remember their respective positions.
During the process, also pay attention to any adhesive or tape that may be securing the cables in place. Take care not to damage or tear the cables or any necessary insulating material.
With the battery cables disconnected, you are now ready to proceed to the next step of removing the old battery from your ultrabook.
Step 7: Remove the old battery
Once the battery cables are safely disconnected, it’s time to remove the old battery from your ultrabook. This step is crucial to make way for the installation of the new battery. Follow these steps to remove the old battery:
- Take note of the battery’s position: Observe how the old battery is positioned inside the battery compartment. Note the orientation and any guides or slots that hold it in place.
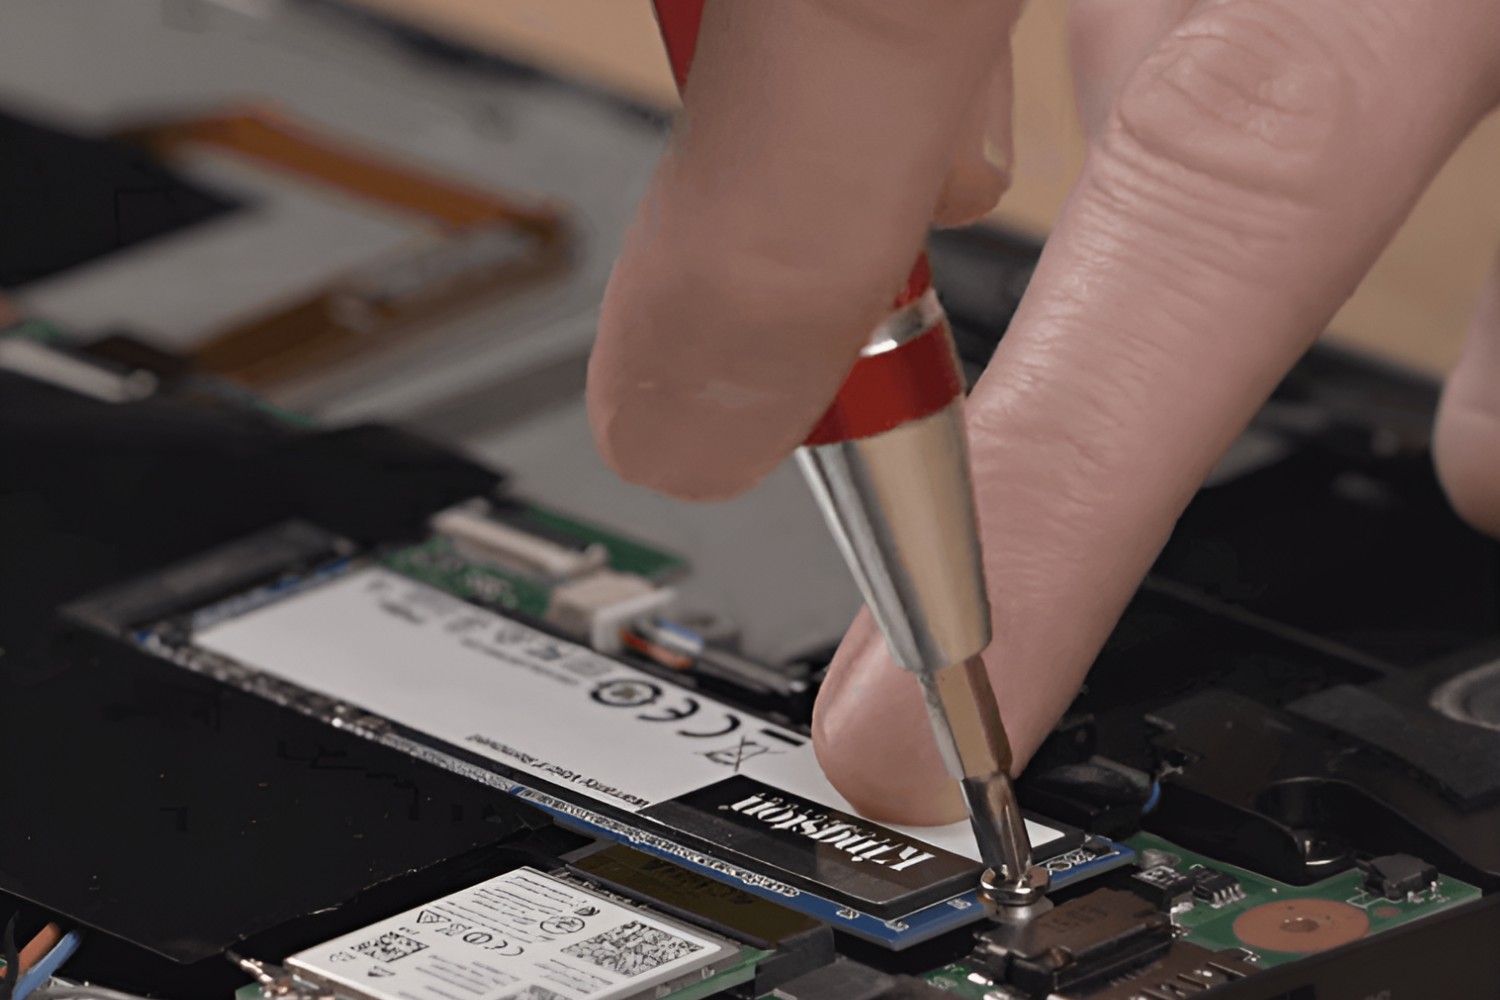
- Check for any additional screws or fasteners: Some ultrabook models may have additional screws or fasteners securing the battery in place. If you find any, carefully remove them using the appropriate tool.
- Handle with care: Batteries are delicate and can be sensitive to physical damage. Hold the old battery with both hands and avoid applying excessive force or bending it.
- Gently lift and remove the old battery: Slowly lift the old battery out of the battery compartment. If the battery is held in place with adhesive, gently pry it loose using a suction cup or spudger. Take your time to avoid damaging any other components.
- Inspect the old battery: While not mandatory, it’s recommended to inspect the old battery for any signs of swelling, leakage, or damage. If you notice any significant issues, handle it with extra caution and dispose of it according to local regulations.
- Set the old battery aside: Place the old battery in a safe and designated location for proper recycling or disposal. It’s important to handle and dispose of batteries responsibly to protect the environment.
Removing the old battery is a critical step in the battery replacement process. Take your time and exercise caution to avoid any accidental damage to your ultrabook or its components. With the old battery out of the way, you can now move on to inserting the new battery in the next step.
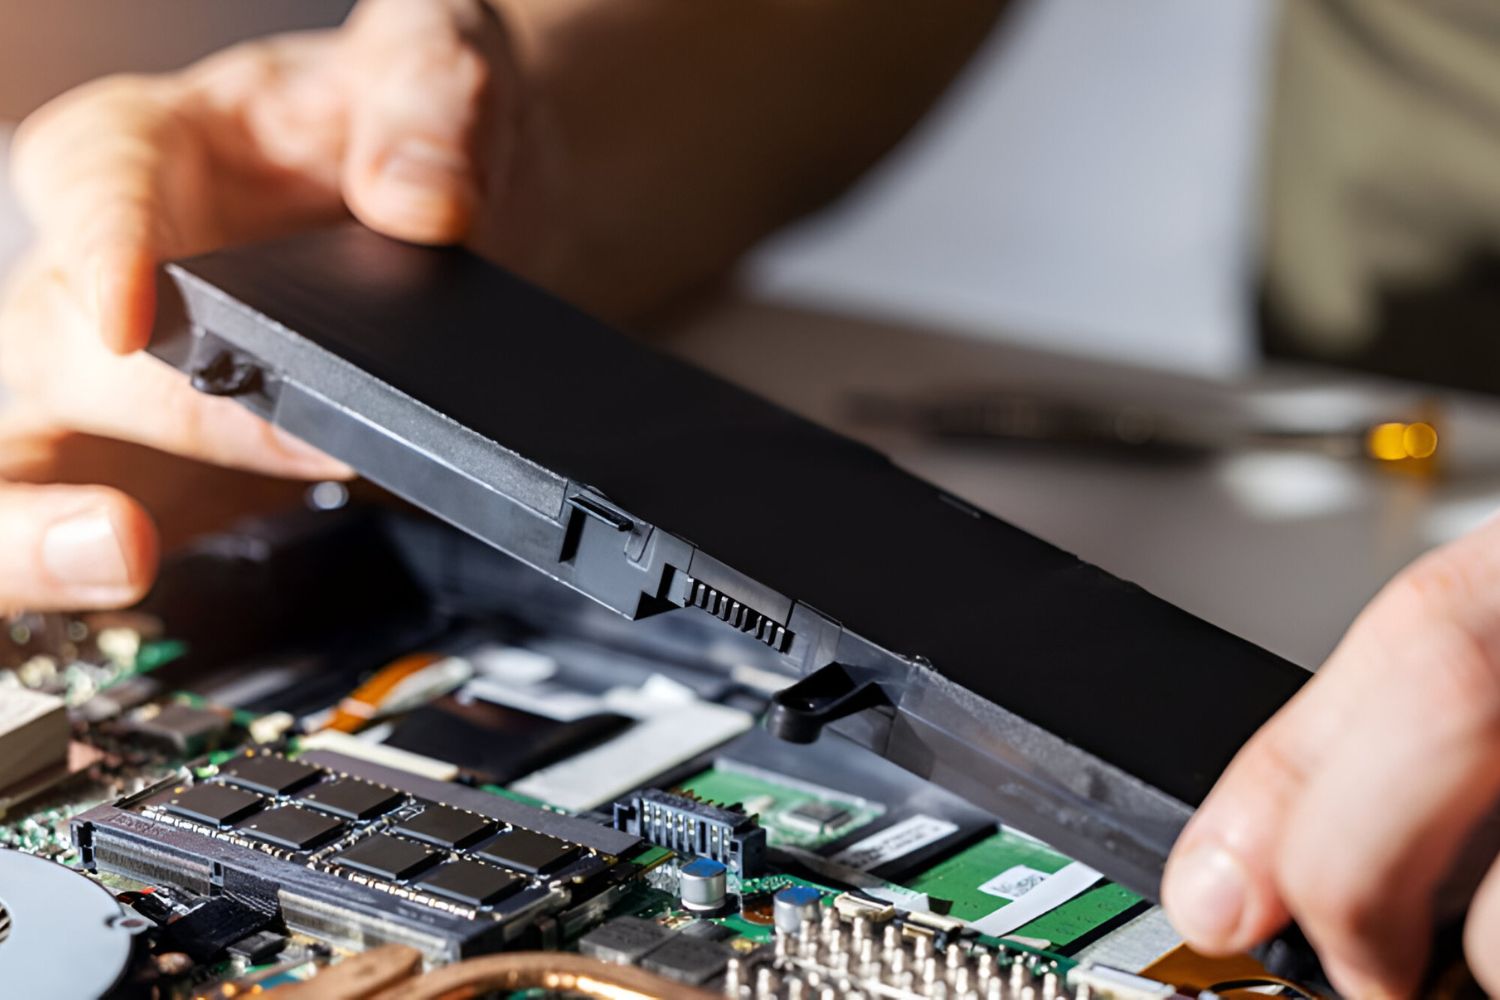
Step 8: Insert the new battery
Now that the old battery has been removed, it’s time to insert the new battery into your ultrabook. Follow these steps to properly insert the new battery:
- Check the orientation: Examine the new battery to ensure that you are inserting it in the correct orientation. Look for any labels, markings, or guides that indicate the proper alignment.
- Align the battery: Align the new battery with the connectors or slots in the battery compartment. Take care to match any notches or grooves to ensure a secure fit.
- Gently press and lower the battery: Slowly and gently press down on the new battery, guiding it into place. Ensure that all edges and corners are properly seated within the battery compartment. Avoid applying excessive force or bending the battery.
- Check for secure placement: Once the new battery is inserted, check that it is securely positioned and does not move or wobble. It should fit snugly within the battery compartment.
- Secure the battery (if applicable): If your ultrabook has additional screws or fasteners to secure the battery, use the appropriate tool to reattach them. Follow any specific instructions from the manufacturer to ensure proper fastening.
It’s important to note that some ultrabooks may have batteries that are permanently attached or non-removable. In such cases, it may be necessary to consult the manufacturer or seek professional assistance for battery replacement.
After inserting the new battery, check for any labels or indicators that may need to be removed before reconnecting the battery cables. These labels are typically placed to protect the battery during shipping or storage and should be removed before use.
With the new battery securely inserted, you’re now ready to proceed to the next step of reconnecting the battery cables.
Step 9: Reconnect the battery cables
Now that the new battery is in place, the next step in replacing the battery in your ultrabook is to reconnect the battery cables. These cables provide the necessary power to your ultrabook and must be securely connected to ensure functionality. Follow these steps to safely reconnect the battery cables:
- Take note of the cable positions: Recall the order and positions of the battery cables before disconnecting them. If necessary, consult any labels or documentation that indicate the correct orientation of the cables.
- Align the connectors: Match the connectors on the battery cables to their respective ports on the ultrabook. Take care to align the connectors properly before pushing them in.
- Attach the connectors: Firmly and carefully insert the connectors into their respective ports. Use gentle pressure to avoid bending or damaging the connectors or ports. You may need to push or slide the connectors until they are fully seated.
- Ensure a secure connection: Once the connectors are inserted, double-check that they are securely seated. They should fit snugly without any gaps or looseness. If there are latches or clips, ensure they are properly engaged.
It is important to handle the battery cables with care to avoid any accidental damage or disconnection. Take your time to ensure that the connectors are correctly aligned and securely attached. Mistakenly connecting the cables in the wrong order or orientation can lead to malfunctions or power issues.
Remember to be mindful of the surrounding components and cables while reconnecting the battery. Avoid applying excessive force or bending the cables, as they are delicate and could be easily damaged.
With the battery cables reconnected, you can move on to the next step of replacing the battery cover.
Step 10: Replace the battery cover
With the new battery in place and the battery cables securely connected, it’s time to replace the battery cover. The battery cover helps protect the battery and ensures that it stays in position within the ultrabook. Follow these steps to properly replace the battery cover:
- Position the battery cover: Align the battery cover over the battery compartment in the same orientation as before. Take care to align any screw holes or clips with their corresponding slots or openings on the ultrabook.
- Press down gently: Apply gentle pressure and press down on the battery cover, ensuring that it is seated properly. Avoid using excessive force that could damage the cover or the ultrabook’s frame.
- Secure the battery cover: If the battery cover is secured with screws, use the appropriate tool to reattach them to their original positions. Tighten the screws to a snug but not overly tight level. If your ultrabook uses clips or latches, ensure they are engaged and hold the battery cover securely.
- Verify a flush fit: Check that the battery cover sits flush with the rest of the ultrabook’s body. There should be no obvious gaps or unevenness. A proper fit ensures the ultrabook’s structural integrity and protects internal components.
Take your time during this step to ensure that the battery cover is correctly aligned and securely fastened. Make sure all screws are tightened evenly, without over-tightening to avoid damaging the ultrabook’s casing. It’s important to note that some ultrabooks may have battery covers with adhesive strips that secure the cover in place. If that’s the case, be sure to apply even pressure to ensure a secure adhesion.
Once the battery cover is replaced and secured, you’re now ready to move on to the final step of reconnecting all cables and powering on your ultrabook.
Step 11: Reconnect all cables and power on your ultrabook
With the battery in place and the battery cover securely fastened, the final step in replacing the battery in your ultrabook is to reconnect all the cables and power on the device. Follow these steps to properly reconnect all cables and power on your ultrabook:
- Reconnect all cables: Begin by reconnecting all the cables that were disconnected earlier, such as the power adapter, peripherals, and any external devices. Double-check that each cable is properly inserted into its respective port.
- Connect the power adapter: Plug the power adapter back into your ultrabook and connect it to a power source. Ensure that the connection is secure and that the charging indicator light or LED comes on if applicable.
- Power on your ultrabook: Press the power button on your ultrabook to turn it on. You should see the screen light up, and the device should begin its startup process. Wait for the operating system to load and the desktop or login screen to appear.
- Verify battery charging (if applicable): If your ultrabook has a visual battery indicator or battery charging LED, check that it shows the battery is charging. This indicates that the new battery is properly detected and being charged for use.
- Perform a system check: Once your ultrabook is powered on, perform a quick system check to ensure that everything is functioning correctly. Check the battery status, make note of the battery life, and verify that your ultrabook is operating normally.
It’s important to take your time during this step to ensure that all cables are properly connected and secured. Double-check each connection to avoid any loose or partially inserted cables. If you encounter any issues or error messages after powering on your ultrabook, refer to the manufacturer’s documentation or seek professional assistance.
By reconnecting all cables and powering on your ultrabook, you have successfully completed the battery replacement process. Enjoy the improved battery life and performance of your ultrabook with the new battery!
Conclusion
Congratulations! You have successfully replaced the battery in your ultrabook. By following the step-by-step process outlined in this guide, you were able to gather the necessary tools, prepare your workspace, disconnect all cables, locate the battery compartment, remove the battery cover, disconnect the battery cables, remove the old battery, insert the new battery, reconnect the battery cables, replace the battery cover, and finally, reconnect all cables and power on your ultrabook.
Replacing the battery in your ultrabook is not only cost-effective but also allows you to extend the lifespan and improve the overall performance of your device. With a fresh battery, you can enjoy longer battery life, better power efficiency, and reduced downtime, ensuring uninterrupted productivity wherever you go.
Remember, while the procedure outlined in this guide provides general instructions for replacing the battery in an ultrabook, it’s essential to consult your specific ultrabook’s user manual or manufacturer’s website for model-specific guidelines. Ultrabooks vary in design, and there may be slight variations in the battery replacement process between different models.
In conclusion, replacing the battery in your ultrabook is an achievable task that can be done with the right tools, proper workspace setup, and careful attention to detail. By following the steps outlined in this guide, you have successfully completed the battery replacement process and can now enjoy extended battery life and improved performance on your ultrabook.