Introduction
Welcome to the era of stunning visual entertainment! With the advancement of technology, LED TVs have become the centerpiece of our living rooms, offering incredible picture quality and immersive viewing experiences. However, to truly unlock the full potential of your sharp LED TV, it is essential to optimize its picture settings.
Optimizing the picture settings on your LED TV ensures that you can enjoy vivid colors, sharp details, and lifelike images while watching your favorite movies, shows, and sporting events. This article will guide you through the process of optimizing the picture on your sharp LED TV, so you can experience the true visual brilliance it has to offer.
Whether you’ve just purchased a new sharp LED TV or want to enhance the picture quality on your existing one, this guide will equip you with the knowledge and techniques to make the most out of your viewing experience. From choosing the right picture mode to adjusting the contrast, brightness, color settings, and sharpness, we’ll cover all the essential steps to help you achieve a picture that truly shines on your LED TV.
But before we dive into the specifics of optimizing the picture on your sharp LED TV, it’s important to note that the exact menu options and settings may vary between different models and brands. Therefore, we recommend referring to your TV’s instruction manual or the manufacturer’s website for model-specific instructions and guidelines.
Now, let’s embark on this visual journey together and unlock the full potential of your sharp LED TV by optimizing its picture settings! Discover the incredible depth, clarity, and richness that awaits you as we delve into the world of picture optimization.
Choosing the Right Picture Mode
One of the first steps in optimizing the picture on your sharp LED TV is selecting the right picture mode. Picture modes are pre-set configurations that adjust various settings to optimize the picture quality for different viewing scenarios. Most TVs offer a range of picture modes, such as Standard, Movie, Sports, Game, and Vivid.
When choosing a picture mode, consider the environment in which you’ll be watching TV. For a dimly lit room, the Movie or Cinema mode is often recommended as it enhances contrast, reduces glare, and provides a more cinematic experience. This mode is ideal for enjoying movies or immersive TV series.
If you’re watching sports or playing fast-paced video games, the Sports or Game mode may be more suitable. These modes typically prioritize fast motion handling, reducing motion blur and ensuring smooth action sequences. The Game mode might also include features like low input lag, giving you a competitive edge in gaming.
For a brightly lit room or when you want a vibrant and eye-catching image, the Vivid mode might be your best choice. However, keep in mind that this mode can sometimes appear exaggerated or unnatural, so it may not be ideal for all types of content.
While the default picture mode may offer a good starting point, it’s worth experimenting with the different modes to find the one that suits your preferences and viewing conditions best. Remember that the picture mode can always be adjusted later to fine-tune the settings.
Additionally, some TVs offer a Custom or User mode, allowing you to manually adjust settings and create a personalized picture profile. This can be a great option if you prefer to have full control over specific picture settings like contrast, brightness, and color temperature.
Choosing the right picture mode is the foundation for optimizing the picture on your sharp LED TV. Take the time to explore the available options and experiment with different modes to find the one that enhances your viewing experience and brings out the best in your content.
Adjusting the Picture Settings
Once you’ve selected the appropriate picture mode, it’s time to fine-tune the picture settings on your sharp LED TV. These settings allow you to adjust specific elements of the picture quality, such as contrast, brightness, color, and sharpness, to achieve the desired visual balance.
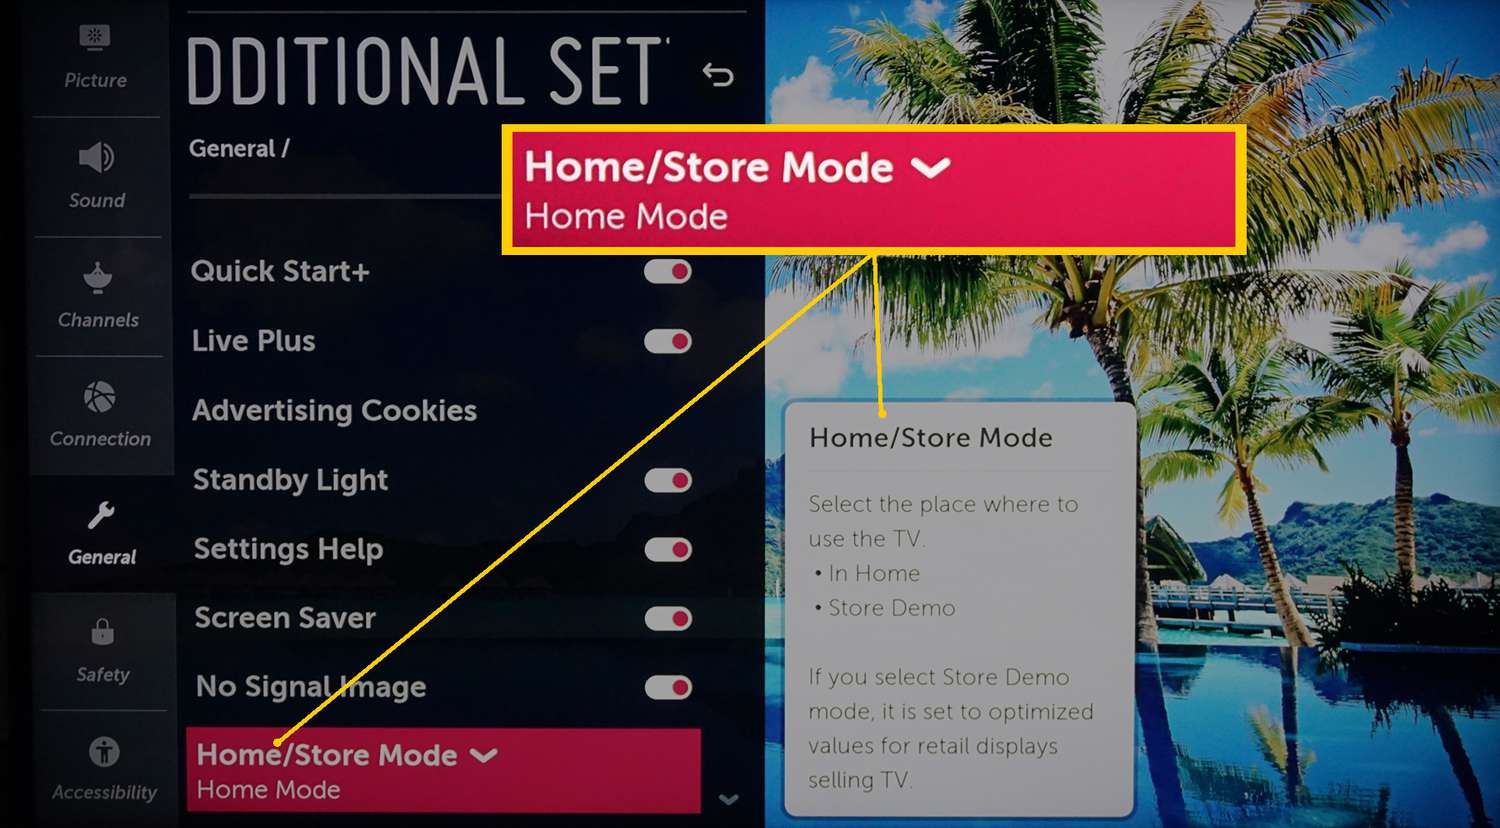
In most TVs, these settings can be accessed through the on-screen menu. Locate the settings menu, which is typically indicated by an icon that resembles a gear or a wrench, and navigate to the picture settings submenu.
Here are the key picture settings you should focus on:
- Contrast: This setting controls the difference between the brightest whites and the darkest blacks in the picture. Adjusting the contrast to a higher value can enhance the overall visual impact, while reducing it can bring out more details in dark scenes.
- Brightness: The brightness setting determines the overall light output of the TV. Turning it up can make the picture appear brighter, while reducing it can improve details in darker areas of the screen.
- Color Saturation: This setting controls the vibrancy and intensity of the colors on the screen. Increasing the color saturation can make the colors more vivid, but be careful not to overdo it as it may result in an unrealistic image.
- Color Temperature: This setting adjusts the warmth or coolness of the white balance. Opt for a warmer color temperature for a cozy and inviting look, or a cooler color temperature for a more clinical and neutral appearance.
As you adjust these settings, it’s recommended to use test patterns or reference images to help you visualize and fine-tune the picture accurately. You can find calibration videos or images online or use dedicated calibration discs for more precise adjustments.
Remember, the optimal picture settings may vary depending on personal preferences and the specific lighting conditions in your viewing environment. Take the time to experiment with different settings and find the right balance that suits your taste and enhances your overall viewing experience.
With the picture settings adjusted to your preferences and the viewing conditions, you’re on your way to enjoying a visually stunning experience on your sharp LED TV. The next step is to fine-tune other aspects, such as contrast and sharpness, to further enhance the picture quality.
Calibrating the Contrast and Brightness
After adjusting the basic picture settings, it’s time to focus on calibrating the contrast and brightness on your sharp LED TV. These two settings play a crucial role in achieving optimal picture quality and enhancing the overall viewing experience.
The contrast setting controls the difference between the brightest whites and the darkest blacks in the picture. A higher contrast value can make the image appear more vibrant, while a lower value can enhance the details in darker scenes. To calibrate the contrast, follow these steps:
- Access the picture settings menu on your TV.
- Find the contrast setting and begin with the default value.
- Play a movie or show with dark and bright scenes.
- Gradually adjust the contrast setting until you achieve a balance where bright scenes look bright and detailed, but not overly washed out, and dark scenes retain shadow details without appearing too dark.
The brightness setting, on the other hand, determines the overall light output of the TV. It’s important to calibrate this setting to ensure that the picture appears neither too dark nor too bright. Follow these steps to calibrate the brightness:
- Access the picture settings menu on your TV.
- Find the brightness setting and begin with the default value.
- Play a movie or show with different lighting conditions.
- Gradually adjust the brightness setting until you achieve a balance where the image appears well-lit and retains details in both dark and bright areas of the screen.
When calibrating the contrast and brightness, it’s important to refer to reference images or test patterns to ensure accuracy. These can be found online or through dedicated calibration discs. Additionally, consider the lighting conditions in your viewing environment as they can affect the perceived brightness and contrast of the picture.
By properly calibrating the contrast and brightness settings on your sharp LED TV, you can ensure that the image quality is optimized, and the visual details are accurately displayed. This calibration step sets the foundation for a visually immersive and satisfying viewing experience.
Fine-tuning the Color Settings
While the contrast and brightness settings are essential for optimal picture quality, fine-tuning the color settings on your sharp LED TV is equally important. Adjusting the color settings allows you to achieve vibrant and accurate colors, bringing your favorite movies, shows, and games to life.
Here are some key color settings you should focus on:
- Color Saturation: This setting controls the intensity and vibrancy of the colors on the screen. Increase the saturation for a more vivid and vibrant picture, but be careful not to overdo it, as it can result in an unnatural or oversaturated image.
- Tint/Hue: The tint or hue setting adjusts the balance between red and green tones in the picture. This setting is usually calibrated correctly from the factory, so it’s recommended to leave it at the default setting. However, if you notice a color imbalance, you can make slight adjustments to achieve natural skin tones and accurate colors.
- Color Temperature: This setting adjusts the overall warmth or coolness of the color palette. Opting for a warmer color temperature creates a cozy and inviting atmosphere, while a cooler temperature gives a more clinical and neutral look. Experiment with different color temperature presets and choose the one that best suits your preferences and viewing environment.
When fine-tuning the color settings, it can be helpful to reference images or test patterns that display a wide range of colors. This will allow you to accurately adjust the color saturation, hue, and temperature based on what you see on the screen. Calibration discs or online resources can provide these reference materials.
Remember that personal preference plays a significant role when fine-tuning the color settings on your sharp LED TV. It’s essential to find a balance that not only captures accurate colors but also enhances your overall viewing experience.
By properly fine-tuning the color settings, you can ensure that the colors on your sharp LED TV appear vibrant, lifelike, and true to the original content. Take the time to experiment with different settings and find the color balance that satisfies your visual preferences.
Adjusting the Sharpness
Sharpness is a key aspect of picture quality that can significantly enhance the visual clarity and detail on your sharp LED TV. While it may seem intuitive to increase the sharpness setting to the maximum level, it’s important to find the right balance to avoid introducing artifacts and unnatural edge enhancements.
Here are some steps to help you adjust the sharpness setting on your TV:
- Access the picture settings menu: Navigate to the menu on your TV and locate the sharpness setting. It is usually listed under the picture or display settings.
- Consider the source material: Different sources, such as Blu-ray discs, streaming services, or cable/satellite channels, may have variation in picture quality and sharpness. Keep in mind that increasing the sharpness setting too high may exaggerate the noise or imperfections in lower-quality sources.
- Use a reference image or test pattern: Display a reference image or test pattern on your TV, such as a grid or fine details, to help you accurately adjust the sharpness setting. This will allow you to find the right balance where the details appear crisp without introducing unwanted artifacts.
- Gradually adjust the sharpness setting: Begin with the default sharpness setting, and gradually increase it until you start noticing an improvement in detail. Then, slowly decrease the sharpness until any artificial enhancements or jagged edges are no longer visible, resulting in a balanced and natural-looking picture.
It’s important to note that the appropriate sharpness setting may vary depending on the content you’re watching and personal preference. While some may prefer a sharper image, others may prefer a slightly softer look. Experiment with different sharpness settings to find the one that suits your visual preferences and enhances the detail without sacrificing the overall picture quality.
By properly adjusting the sharpness setting on your sharp LED TV, you can achieve a clearer and more defined picture, enhancing the overall viewing experience. Take the time to find the right balance, and enjoy the razor-sharp details on your screen.
Reducing Motion Blur
Motion blur refers to the blurring or trailing effect that can occur when there is fast movement on the screen. This can be particularly noticeable during fast-paced action sequences in movies or sports events. However, you can minimize motion blur on your sharp LED TV by adjusting the appropriate settings and enabling specific features.
Here are some steps to help you reduce motion blur:
- Access the picture settings menu: Navigate to the menu on your TV and locate the motion blur or motion enhancement settings. The terminology may vary depending on the manufacturer or model, but common terms include motion smoothing, motion interpolation, or motion clarity.
- Disable motion enhancement features: Some TVs come with motion enhancement features, such as motion interpolation or motion smoothing, which attempt to create smooth motion by inserting additional frames. However, these features can often introduce artificial effects or make the video appear too smooth, causing the “soap opera effect.” It is generally recommended to disable these features to reduce motion blur and maintain the original cinematic look.
- Enable motion blur reduction features: Many modern TVs offer specific motion blur reduction features or technologies. These technologies, such as black frame insertion or backlight scanning, work by reducing the persistence of each frame, making the motion appear sharper. Enable these features in the TV settings to minimize motion blur.
- Adjust the response time: Some TVs allow you to adjust the response time, which controls how quickly the pixels transition from one color to another. Experiment with different response time settings to find the one that reduces motion blur without introducing ghosting or artifacts.
It’s important to note that reducing motion blur is a matter of personal preference. While some people prefer a sharper and more detailed motion, others may enjoy a more natural and film-like appearance. Additionally, keep in mind that reducing motion blur may also result in a slight loss of brightness.
By adjusting the appropriate settings and enabling motion blur reduction features on your sharp LED TV, you can enjoy smoother and more fluid motion, minimizing the blurring effect, and enhancing your overall viewing experience. Experiment with the settings and find the right balance that suits your visual preferences and the content you’re watching.
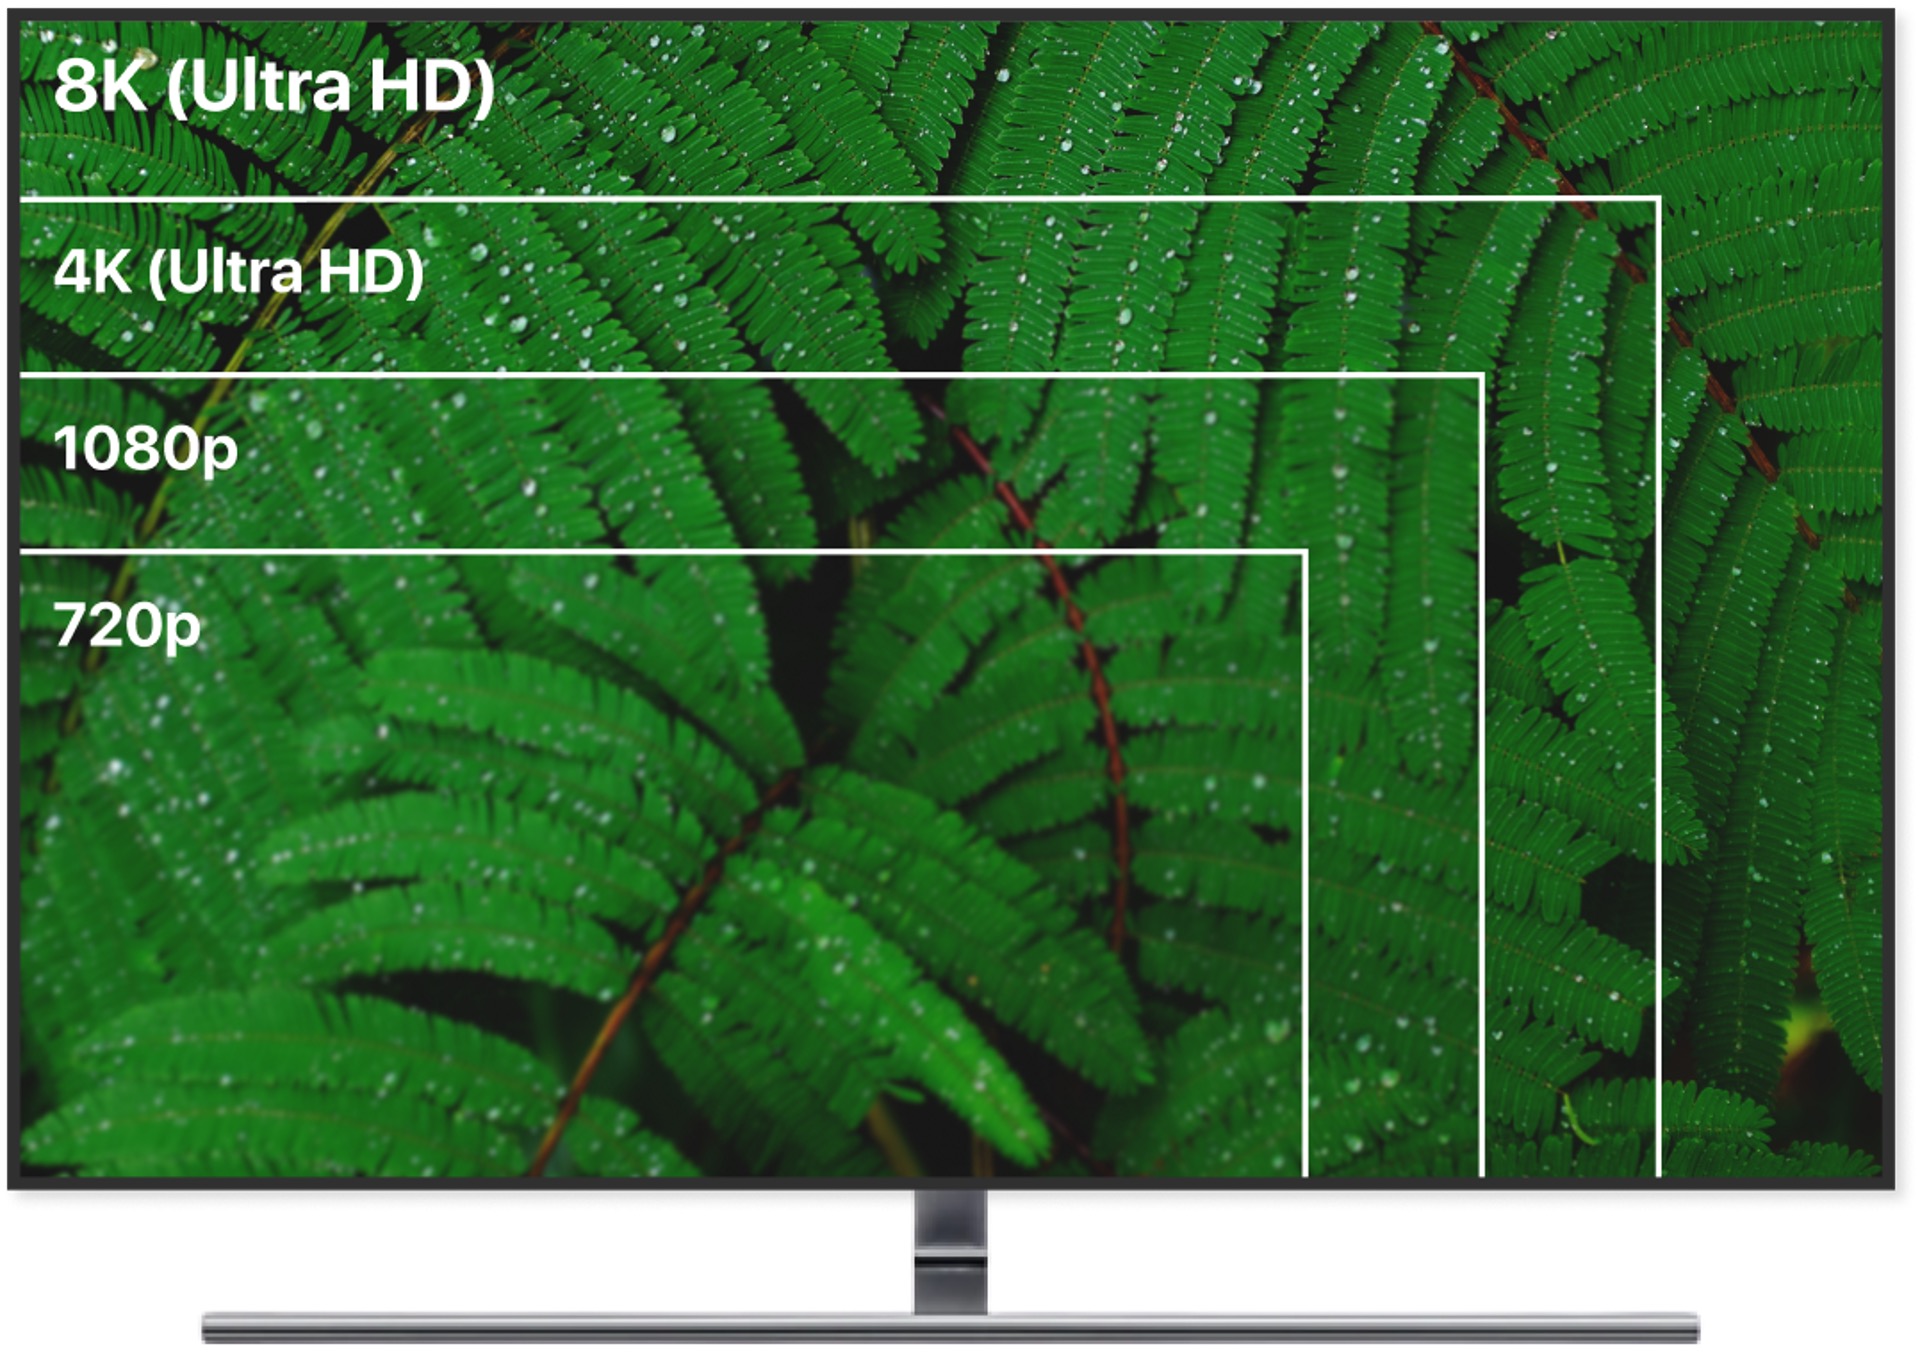
Enabling HDR and Upscaling
To fully maximize the potential of your sharp LED TV and enhance the picture quality, it’s important to take advantage of features such as High Dynamic Range (HDR) and upscaling. HDR allows for a wider range of colors, improved contrast, and greater detail in both bright and dark areas of the image. Upscaling, on the other hand, enhances the visual quality of lower-resolution content by optimizing it for your TV’s native resolution.
Here are some steps to enable HDR and upscaling on your sharp LED TV:
- Confirm HDR compatibility: First, make sure that your sharp LED TV supports HDR. Check the manufacturer’s specifications or consult the user manual for confirmation. If your TV is HDR-compatible, you can proceed to the next step.
- Enable HDR mode: Access the picture settings menu on your TV and look for the HDR mode setting. Enable this mode to take full advantage of the enhanced brightness, color accuracy, and contrast offered by HDR content.
- Select the appropriate HDR settings: Depending on your TV model, you may have different HDR settings available. These settings may include options such as HDR10, Dolby Vision, or Hybrid Log-Gamma (HLG). Choose the setting that corresponds to the HDR format supported by your content source, such as a Blu-ray player or streaming device.
- Enable upscaling: Most modern sharp LED TVs come equipped with upscaling technology, which enhances the visual quality of lower-resolution content. This feature interpolates the pixels to match the higher native resolution of your TV. Ensure that the upscaling option is enabled in the picture settings menu to optimize the display of standard-definition or HD content.
By enabling HDR and upscaling on your sharp LED TV, you can significantly improve the overall picture quality and enjoy a more immersive viewing experience. HDR content will exhibit enhanced detail, vibrant colors, and greater contrast, while upscaling will ensure that lower-resolution content appears sharper and more refined on your high-resolution display.
It’s important to note that HDR and upscaling are most effective when used with compatible content. Look for movies, shows, or games specifically labeled as HDR-enabled or designed for high-resolution displays. This will ensure that you are truly experiencing the benefits of these features.
Take advantage of the HDR and upscaling capabilities of your sharp LED TV to unlock a new level of visual excellence and enjoy your favorite content in stunning detail and realism.
Using the Advanced Picture Options
When optimizing the picture on your sharp LED TV, it’s worth exploring the advanced picture options available in the settings menu. These options provide additional customization and fine-tuning capabilities to further enhance the visual quality and tailor it to your personal preferences.
Here are some advanced picture options you may find on your TV:
- Gamma Correction: The gamma correction setting adjusts the luminance curve, affecting the brightness levels of different shades. It can help improve the visibility of details in dark scenes or prevent washed-out highlights. Experiment with different gamma settings to find the one that provides the most balanced and visually appealing image.
- Black Level: The black level setting determines the depth and richness of black areas in the picture. It is often recommended to set the black level to match the capabilities of your content source, such as a Blu-ray player or gaming console. This ensures that details in dark scenes are accurately represented without appearing crushed or washed out.
- Local Dimming: If your sharp LED TV has local dimming capabilities, this feature adjusts the backlight behind different areas of the screen to enhance contrast and improve black levels. Experiment with the local dimming settings to find the level that effectively enhances the picture without causing distracting halo effects or blooming.
- Noise Reduction: The noise reduction option reduces digital noise or artifacts that can be present in lower-quality content. However, be cautious when using high levels of noise reduction, as it can result in loss of detail or a softening effect.
- Color Space: Some TVs offer color space options, such as RGB, YCbCr, or DCI-P3. Each color space has a different range and depth of colors. Select the color space that matches your content source and ensures accurate color reproduction.
These advanced picture options provide you with the ability to fine-tune and customize the visual settings on your sharp LED TV to suit your preferences and viewing environment. It’s recommended to make subtle adjustments and observe the effects on the picture before making further changes.
Keep in mind that the availability and terminology of these advanced settings may vary depending on your TV model and manufacturer. Refer to your TV’s user manual or manufacturer’s website for specific guidance on the advanced picture options offered by your TV.
By utilizing the advanced picture options, you can take your picture optimization to the next level and tailor the visuals on your sharp LED TV to match your specific preferences and viewing needs.
Conclusion
Optimizing the picture on your sharp LED TV is essential for achieving a truly immersive and visually stunning viewing experience. By following the steps outlined in this guide, you can unlock the full potential of your TV and enjoy vibrant colors, sharp details, and lifelike images.
Start by choosing the right picture mode that suits your viewing environment and preferences. Experiment with different modes to find the one that enhances your content and provides the desired visual impact.
Next, adjust the picture settings such as contrast, brightness, color, and sharpness. Fine-tune these settings using reference images or test patterns to achieve the optimal balance and bring out the best in your content.
Calibrating the contrast and brightness settings ensures that the picture appears balanced and retains details in both bright and dark areas. Customizing the color settings brings vibrant and accurate colors to life, enhancing the overall visual experience.
Don’t forget to adjust the sharpness setting to achieve a clear and defined picture without introducing unwanted artifacts. Additionally, reducing motion blur through appropriate settings and features enhances the fluidity and smoothness of fast-paced action sequences.
Take advantage of features like HDR and upscaling to enjoy enhanced color accuracy, contrast, and detail in your content. Enable these features and optimize the settings to fully utilize your TV’s capabilities and improve the visual quality of both high-resolution and lower-resolution content.
Lastly, explore the advanced picture options available in your TV’s settings menu to further customize the visuals to your liking. These options provide additional fine-tuning capabilities and help you achieve the perfect balance and color accuracy.
Remember that the specific menu options and settings may vary depending on your TV model and manufacturer. Consult your TV’s user manual or manufacturer’s website for model-specific instructions and guidance.
By following these steps and taking the time to optimize the picture on your sharp LED TV, you can transform your viewing experience and bring the magic of cinema into your living room. Dive into a world of vibrant colors, stunning details, and immersive visuals, all at the touch of a button on your optimized sharp LED TV.