Introduction
Welcome to this step-by-step guide on how to open the 2017 HP Probook 450 G4 15.6 Business Ultrabook. Whether you’re looking to upgrade the hardware, clean the internals, or fix any issues, opening up your laptop is the first step. Opening your laptop may seem daunting, but don’t worry, we’ve got you covered!
The HP Probook 450 G4 is a powerful and reliable business ultrabook that offers great performance for professionals on the go. However, there may come a time when you need to access the internal components for maintenance or upgrades. This guide will walk you through the process of safely opening your laptop and gaining access to the internals.
Before we begin, it’s important to note that opening the laptop may void the warranty, so proceed at your own risk. If your laptop is still under warranty, it’s best to consult the manufacturer or an authorized service center for any repairs or upgrades.
Now, let’s dive in and go through the steps necessary to open your HP Probook 450 G4!
Step 1: Prepare for opening the HP Probook 450 G4
Before you begin opening your HP Probook 450 G4, it’s important to gather the necessary tools and create a suitable workspace. Here’s what you’ll need:
- Tools: Start by gathering a set of precision screwdrivers that fit the screws on your laptop. Make sure to have a small Phillips head screwdriver, as well as a flat-head screwdriver, if needed.
- Workspace: Find a clean, well-lit area where you can comfortably work on your laptop. Ideally, choose a flat surface with enough space to lay out the screws and components as you remove them.
- Static Protection: Static electricity can damage sensitive electronic components, so it’s crucial to take precautions. Wear an anti-static wrist strap, or at least touch a grounded metal object before handling any internal parts.
Once you have the tools and workspace prepared, it’s time to shut down your laptop and unplug any power sources. This step will help ensure your safety and prevent any accidental damage during the disassembly process. Make sure to save all your work and safely shut down your operating system before proceeding.
Additionally, it’s advisable to remove any peripherals or accessories connected to your Probook 450 G4, such as USB devices or external cables. This will prevent any tangles and make the disassembly process easier and smoother.
Now that you’re fully prepared, take a moment to mentally map out the process of opening your laptop. Familiarize yourself with the location of the screws and any specific areas that may require extra attention. This proactive approach will help prevent any unnecessary challenges and ensure a successful disassembly.
With your tools, workspace, and preparations in place, you’re now ready to move on to the next step: removing the battery and unplugging any power sources.
Step 2: Removing the battery and unplugging any power source
Before proceeding with opening your HP Probook 450 G4, it’s essential to remove the battery and disconnect any power sources to ensure your safety and prevent potential damage. Here’s how you can do it:
- Shut down the laptop: Begin by shutting down your laptop properly. Save any open documents and close all running applications before initiating the shutdown process.
- Unplug the power adapter: Locate the power adapter cable that is connected to your laptop and carefully unplug it from the power outlet.
- Disconnect external devices: If you have any external devices or peripherals connected to your laptop, such as USB drives or HDMI cables, disconnect them.
- Remove the battery: Flip your laptop over and locate the battery release latch or switch. Slide or press the latch to release the battery, then carefully remove it from the laptop.
- Check for residual power: Press and hold the power button for a few seconds to discharge any residual power left in the laptop’s circuitry. This step helps to ensure there is no remaining charge that could pose a risk during the disassembly process.
By removing the battery and disconnecting the power sources, you effectively eliminate any electrical current traveling through the laptop. This step is crucial as it minimizes the risk of electric shocks and protects both you and your laptop’s internal components.
Remember to handle the battery with care and avoid placing it on metal surfaces or exposing it to extreme temperatures. If you plan on storing the battery while working on your laptop, keep it in a cool, dry place that is easily accessible for reinstallation later.
Now that all power sources have been disconnected, you can proceed to the next step: removing the cover screws to gain access to the laptop’s internal components.
Step 3: Removing the cover screws
With the battery removed and power sources disconnected, you can now move on to removing the cover screws to gain access to the internal components of your HP Probook 450 G4. Follow these steps to proceed:
- Flip the laptop upside down: Turn your laptop over so that the bottom cover is facing upwards. Place it on a soft, non-scratch surface to prevent any damage.
- Identify the cover screws: Take a close look at the bottom cover of your laptop to locate the screws. They are usually marked with small icons resembling a cylinder or a rectangle.
- Use the appropriate screwdriver: Choose the appropriate precision screwdriver that fits the size and type of screw that secures the cover. Typically, a small Phillips head screwdriver is used for most laptops.
- Start unscrewing: Begin unscrewing the cover screws one by one, while keeping track of their placement. It’s a good idea to lay them out in an organized manner so you can easily reassemble everything later.
- Remove the cover: Once all the screws have been removed, gently lift and remove the bottom cover of your laptop. Be careful not to force it or apply excessive pressure to avoid damaging any internal components.
During the process, take note of any screws that appear different or have varying lengths. These screws are often used to secure specific components, such as the hard drive or memory modules. It’s essential to keep track of their location to ensure proper reassembly later on.
Remember to handle the cover screws with care, as losing or misplacing them can cause difficulties when reassembling the laptop. If needed, you can use a small container or magnetic mat to keep the screws organized and prevent them from rolling away.
Now that the cover screws are removed, you are one step closer to accessing the internal components. In the next step, we will discuss how to open up the bottom cover of your HP Probook 450 G4.
Step 4: Opening the bottom cover
With the cover screws removed, you can now proceed to open the bottom cover of your HP Probook 450 G4 to gain access to its internal components. Here’s how to open it:
- Apply gentle pressure: Locate the small notches or tabs on the sides or corners of the laptop’s bottom cover. These notches indicate where you can start applying gentle pressure to separate the cover from the main chassis.
- Using a prying tool: To prevent any damage to the cover or the internal components, it’s recommended to use a non-metallic prying tool, such as a plastic spudger or a guitar pick. Insert the tool into the notch and carefully pry the cover away from the chassis.
- Work your way around: Slowly and gently move the prying tool along the edges of the bottom cover, releasing any clips or hooks that hold it in place. Take your time and apply even pressure to avoid any sudden movements that could cause damage.
- Be patient: Opening the bottom cover may require some patience, as laptops vary in their design and the number of clips or hooks that hold the cover in place. If you encounter resistance, double-check that all the screws have been removed and continue prying carefully.
- Remove the bottom cover: Once all the clips or hooks have been released, you can gently lift and remove the bottom cover from the chassis. Set it aside in a safe place, making sure to keep it free from any dust or debris.
As you open the bottom cover, be mindful of any cables or connectors that may be attached to it. Carefully detach them by gently pulling or using a small pair of tweezers to avoid causing any damage.
Remember to keep track of the orientation and alignment of the bottom cover for proper reassembly later on. Additionally, take note of any specific areas or compartments labeled for certain components, as this will come in handy when accessing and replacing parts in the next steps.
Now that the bottom cover is successfully removed, you are ready to move on to the next step: accessing the internal components of your HP Probook 450 G4.
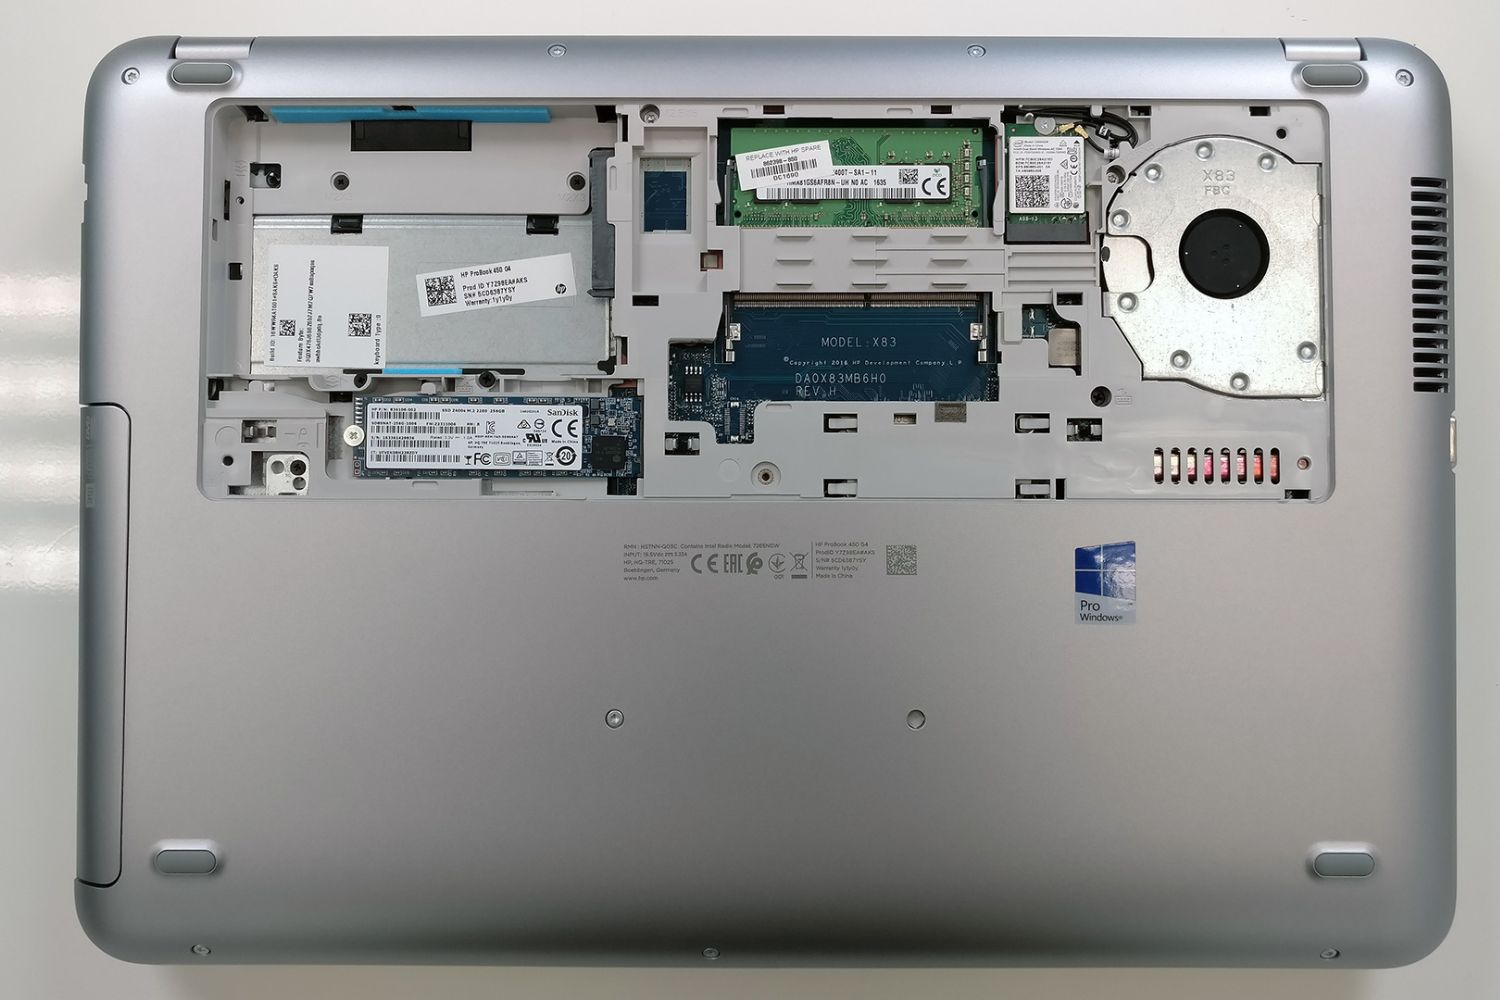
Step 5: Accessing the internal components
Now that you have successfully opened the bottom cover of your HP Probook 450 G4, you are ready to access the internal components of the laptop. Follow these steps to proceed:
- Take precautionary measures: Before diving into the internal components, it’s crucial to ground yourself by using an anti-static wrist strap or by frequently touching a grounded metal object. This helps prevent static discharge that could harm the sensitive electronic parts inside.
- Familiarize yourself with the layout: Take a moment to familiarize yourself with the internal layout of your laptop. Look for the main components such as the memory modules, hard drive, battery connector, and any other hardware that may be visible or easily accessible.
- Disconnect any cables or connectors: Carefully detach any cables or connectors attached to the internal components. Use gentle forceps or your fingertips to disconnect them, being cautious not to apply too much pressure or twist the cables excessively.
- Remove the screws: Identify and remove any screws securing the specific components you wish to access or replace. Keep track of the number and placement of screws as they may differ based on the component being removed.
- Remove and replace components: Once the screws are removed, you can lift and remove the desired components. Handle them with care and only touch them by their edges or designated areas to avoid damage from static discharge or accidental touching of sensitive parts.
When accessing the internal components, it’s important to note that not all components are user-replaceable. Some components, like the processor or graphics card, may require professional assistance or specialized tools to handle properly. If you are unsure about a specific component, it’s best to consult the laptop’s documentation or seek assistance from a qualified technician.
Throughout the process, it’s advisable to take note of each step and any specific configurations. This will help with reassembly, ensuring that you can put everything back together correctly without encountering any issues or compatibility problems.
With the internal components now accessible, you can proceed with any necessary maintenance, upgrades, or repairs. Take your time, handle the components with care, and refer to the appropriate documentation or guides for specific instructions on replacing or upgrading each component.
In the next step, we will discuss how to reassemble the HP Probook 450 G4 once you have completed your tasks on the internal components.
Step 6: Reassembling the HP Probook 450 G4
After completing the necessary maintenance, upgrades, or repairs on the internal components of your HP Probook 450 G4, it’s time to reassemble your laptop. Reassembling the laptop involves carefully putting all the components back in their respective places and securing them. Here’s how to do it:
- Verify component placement: Double-check that all internal components are in their correct positions and properly aligned. Ensure that any cables or connectors are reconnected securely without any twists or bends.
- Replace screws: Begin reassembling by replacing the screws that secure the components. Align the screw holes and gently tighten the screws, being careful not to overtighten and potentially damage the components or screw threads.
- Reattach cables and connectors: Carefully reconnect any cables and connectors that were previously detached. Ensure they are seated properly and fully inserted, exerting gentle pressure until you feel them snap or latch into place.
- Align the bottom cover: Align the bottom cover with the laptop’s chassis, making sure it fits snugly. Take note of any guides or tabs that assist in alignment and engagement.
- Secure the cover screws: Gradually insert and tighten the cover screws in their respective locations. Start with one corner and work your way around, using a consistent and gentle tightening force.
During the reassembly process, pay attention to any specific instructions or configurations that may be mentioned in the laptop’s documentation or guides. Following these guidelines ensures that all components are properly secured and the laptop functions optimally after reassembly.
Once you have completed reassembling the HP Probook 450 G4, double-check that all screws are tightened but not overly tightened. Ensure that the bottom cover is securely attached and aligned with the laptop’s chassis.
Before testing your laptop, it’s a good idea to perform a quick visual inspection to confirm that everything is in order. Make sure there are no loose components, cables, or screws left behind inside the laptop.
Now you can proceed to power on your laptop and test its functionality. If all components are installed correctly, your HP Probook 450 G4 should boot up and operate smoothly as before.
Congratulations! You have successfully reassembled your HP Probook 450 G4, allowing you to enjoy the benefits of the maintenance, upgrades, or repairs you performed. Remember to take your time, be gentle, and refer to the appropriate documentation or guides to ensure a successful reassembly process.
Conclusion
Opening up and accessing the internal components of your HP Probook 450 G4 may seem like a daunting task, but with the right tools, knowledge, and precautions, it can be a straightforward and rewarding process. Throughout this guide, we have walked you through each step, from preparing for the disassembly to reassembling your laptop with care.
By following this guide, you have learned how to prepare for opening the HP Probook 450 G4, remove the battery and unplug any power sources, remove the cover screws, open the bottom cover, access the internal components, and finally, reassemble the laptop. This knowledge will empower you to perform maintenance, upgrades, or repairs on your own, saving you time and money.
Remember to always take precautionary measures, such as grounding yourself and handling components with care to avoid static discharge and accidental damage. Keep track of the placement of screws and components during the disassembly process to ensure a hassle-free reassembly. And if you ever feel unsure or uncomfortable, don’t hesitate to seek professional assistance or guidance from an authorized technician.
Now that you possess the skills and knowledge to open and access the internal components of your HP Probook 450 G4, you can unleash its full potential. Whether it’s upgrading the memory, replacing a faulty component, or simply giving it a thorough cleaning, you have the ability to keep your laptop running smoothly and performing at its best.
Enjoy the freedom and confidence that comes with being able to maintain and upgrade your own laptop. With this newfound skill, you can extend the lifespan of your HP Probook 450 G4 and ensure it continues to meet your needs for years to come.
Best of luck with your future maintenance and upgrades, and may your HP Probook 450 G4 serve you well!