Introduction
Having a secure and reliable Wi-Fi network is essential in today’s interconnected world. However, there are times when you may encounter unwanted devices hogging your bandwidth and slowing down your internet speed. Whether it’s a neighbor using your Wi-Fi without permission or an unfamiliar device that has somehow connected to your network, it’s important to know how to remove them and regain control over your network.
In this article, we’ll explore several effective methods to kick devices off your Wi-Fi network. By implementing these strategies, you can ensure that only authorized devices can access and utilize your network, thereby improving both your internet speed and security.
Before we dive into the various techniques, it’s important to note that the steps outlined here may vary depending on your specific router model and configuration. It’s always a good idea to consult your router’s user manual or contact your internet service provider for guidance tailored to your specific situation.
Now, let’s get started on reclaiming your Wi-Fi network.
Check Your Network
The first step in reclaiming control of your Wi-Fi network is to thoroughly examine your network to identify any unauthorized devices. Here are a few ways to do this:
- Access your router’s admin panel: Open a web browser and enter your router’s IP address in the address bar. Typically, the IP address is mentioned in the router’s manual or can be found by running the “ipconfig” command in the Command Prompt (for Windows) or the “ifconfig” command in Terminal (for Mac).
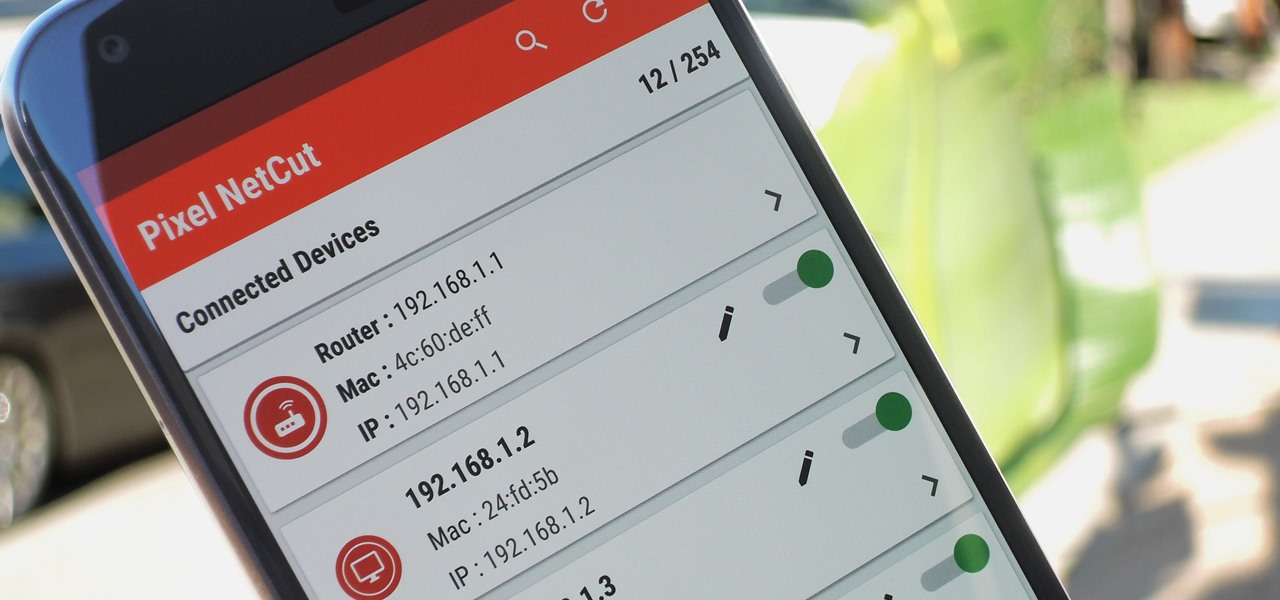
- View connected devices: Once you’re logged in to your router’s admin panel, look for a section that displays the list of connected devices. This may be labeled as “Connected Devices,” “Device List,” or something similar. Take note of the devices that you recognize and those that seem unfamiliar or suspicious.
- Check device names and IP addresses: Pay attention to the names and IP addresses of the connected devices. Authorized devices should have recognizable names assigned by you, while unknown devices may have generic names or strange IP addresses.
- Monitor network activity: Some routers allow you to view the real-time network activity of connected devices. This can help you identify any suspicious or excessive data usage by certain devices.
By thoroughly checking your network and scrutinizing the list of connected devices, you can quickly identify any unauthorized devices that may be using your Wi-Fi network without your permission. Once you have gathered this information, you can proceed to take the necessary steps to remove these devices and secure your network.
Change Your Wi-Fi Password
One of the most effective ways to kick unauthorized devices off your Wi-Fi network is to change your Wi-Fi password. By doing so, you effectively revoke access for any devices that were previously connected using the old password. Here’s how you can change your Wi-Fi password:
- Access your router’s admin panel: Open a web browser and enter your router’s IP address in the address bar. Log in using your administrative credentials.
- Find the Wi-Fi settings: Look for a section within the admin panel that is dedicated to managing Wi-Fi settings. This section may be named “Wireless Settings,” “Wi-Fi Network,” or something similar.
- Change the password: Locate the field that allows you to change the Wi-Fi password. Enter a strong, unique password that includes a combination of letters, numbers, and special characters. Avoid using common or easily guessable passwords.
- Save the changes: After entering the new password, save the changes in the admin panel. Your router will apply the new password and disconnect any devices currently connected to your network.
Once you have changed your Wi-Fi password, make sure to update the password on all authorized devices that need access to your network. This ensures that only authorized devices can reconnect and use your Wi-Fi network. If unfamiliar devices attempt to connect using the old password, they will be denied access.
Remember to periodically change your Wi-Fi password to maintain the security of your network. By doing so, you can keep unauthorized devices at bay and enjoy a secure and reliable Wi-Fi connection.
Enable MAC Address Filtering
Another effective method to prevent unauthorized devices from connecting to your Wi-Fi network is by enabling MAC address filtering. MAC address filtering allows you to create a whitelist of specific devices that are allowed to connect, while blocking all others. Here’s how you can enable MAC address filtering:
- Access your router’s admin panel: Open a web browser and enter your router’s IP address in the address bar. Provide the necessary login credentials to access the admin panel.
- Enable MAC address filtering: Look for a section in the admin panel that pertains to MAC address filtering. This section may be labeled as “MAC Filtering,” “Access Control,” or similar.
- Add allowed MAC addresses: Locate the option to add MAC addresses to the allowed list. You can typically find this option under the MAC address filtering settings. Enter the MAC addresses of the devices you want to allow on your network.
- Save the changes: After adding the MAC addresses to the allowed list, save the changes in the admin panel. Your router will now only allow connections from the specified MAC addresses.
MAC addresses are unique identifiers assigned to every network device. By enabling MAC address filtering, you can ensure that only devices with authorized MAC addresses can connect to your Wi-Fi network. It adds an extra layer of security, as even if someone knows your Wi-Fi password, their device won’t be able to connect unless its MAC address is on the allowed list.
Keep in mind that adding MAC addresses to the allowed list can be a bit more time-consuming, especially if you frequently have new devices connecting to your network. However, it provides a highly secure method of controlling which devices can access your Wi-Fi network.
Use the Router’s Admin Settings
Most routers come equipped with various administrative settings that allow you to control and manage your Wi-Fi network. These settings can be accessed through the router’s admin panel, and they offer additional options to help you kick devices off your network. Here are some ways to utilize the router’s admin settings:
- Access the router’s admin panel: Open a web browser and enter your router’s IP address in the address bar. Log in using your administrative credentials to access the router’s settings.
- Adjust the signal strength: Some routers allow you to adjust the signal strength, which can limit the range of your Wi-Fi network. By reducing the range, you can ensure that only devices within a certain distance can connect to your network.
- Set time limits: Certain routers have the option to set time limits for devices connected to your network. This can be useful if you want to restrict access for certain devices during specific hours or limit the timeframe for certain users.
- Enable guest network: If your router supports guest network functionality, consider enabling it for visitors or temporary access. By providing a separate network for guests, you can keep them isolated from your main network and easily revoke access if needed.
- Update firmware: Regularly check for firmware updates for your router and install them when available. Firmware updates often include security patches and improvements that can help protect your network from unauthorized access.
Using the router’s admin settings can give you more control and options to manage your Wi-Fi network effectively. By adjusting signal strength, setting time limits, enabling guest networks, and keeping your router’s firmware up to date, you can enhance your network’s security and ensure that only authorized devices are allowed to connect. Explore your router’s settings and take advantage of these features to safeguard your Wi-Fi network.
Limit Network Access
In addition to changing your Wi-Fi password and enabling MAC address filtering, you can further restrict access to your network by implementing methods to limit network access. Here are a few options to consider:
- Use a firewall: Many routers come with built-in firewall features that allow you to control incoming and outgoing traffic. By configuring the firewall settings, you can block specific IP addresses or ranges, preventing unwanted devices from accessing your network.
- Enable port filtering: Port filtering allows you to specify which ports or services can be accessed on your network. By selectively enabling or disabling ports, you can limit network access for certain services or applications.
- Set up virtual private networks (VPNs): A VPN allows you to create a secure connection between your device and the network. By using a VPN, you can encrypt the data sent between your device and the network, making it more difficult for unauthorized users to intercept or access your network.
- Utilize parental controls: If you have children or want to restrict access on certain devices, consider using parental control features offered by your router. These features allow you to set usage limits, block certain websites or content, and manage access schedules.
Implementing these methods to limit network access adds an extra layer of security to your Wi-Fi network. By securing your network at different levels, you can effectively control who can connect and access your network resources. It’s important to note that configuring these settings may require a deeper understanding of networking concepts, so it’s recommended to consult the router’s manual or seek assistance from a technical professional if needed.
Remember that the goal is to create a secure and efficient Wi-Fi network that meets your specific needs. By combining different methods and tailoring them to your requirements, you can ensure that only authorized devices have access to your network, providing a reliable and secure browsing experience.
Disable DHCP
Another technique to consider when attempting to kick unwanted devices off your Wi-Fi network is disabling the DHCP (Dynamic Host Configuration Protocol) feature of your router. DHCP is responsible for assigning IP addresses to devices connected to your network. By disabling DHCP, only devices with a manually assigned IP address will be able to connect to your network. Here’s how you can disable DHCP:
- Access your router’s admin panel: Open a web browser and enter your router’s IP address in the address bar. Log in using your administrative credentials.
- Find the DHCP settings: Look for a section within the admin panel that is related to DHCP. This section may be labeled as “DHCP Settings,” “LAN Settings,” or something similar.
- Disable DHCP: Within the DHCP settings, you should find an option to disable the DHCP feature. By turning off DHCP, your router will no longer automatically assign IP addresses to devices connecting to your network.
- Manually assign IP addresses: Once DHCP is disabled, you’ll need to manually assign IP addresses to the devices you want to connect to your network. This can be done through the device’s network settings or via the router’s admin panel (under LAN settings).
Disabling DHCP can be an effective way to restrict access to your Wi-Fi network since devices without a valid IP address will not be able to connect. However, it’s important to note that this method requires manually assigning IP addresses to each device, which can be time-consuming if you have a large number of devices or frequently connect new devices to your network.
Additionally, it’s crucial to have a good understanding of IP address configuration and network settings before disabling DHCP. If in doubt, consult your router’s user manual or seek assistance from a knowledgeable technician to ensure you don’t mistakenly disrupt your network connectivity.
Remember to re-enable DHCP or update the IP address assignments if you want to connect new devices or allow guests to connect to your network in the future.
Conclusion
Securing and managing your Wi-Fi network is crucial for maintaining a fast and stable internet connection. With the proliferation of devices and the potential for unauthorized access, it’s important to take steps to kick devices off your Wi-Fi network as needed. By following the techniques outlined in this article, you can enhance the security and control of your network.
Start by checking your network and identifying any unfamiliar or suspicious devices connected to your network. This will give you a clear understanding of which devices need to be removed. Changing your Wi-Fi password is a simple yet effective way to disconnect all devices and prevent unauthorized access. Enabling MAC address filtering provides an additional layer of security by allowing only specific devices to connect to your network.
Utilizing your router’s admin settings allows you to customize and control various aspects of your network. Adjusting signal strength, setting time limits, and enabling guest networks are all valuable options to manage and enhance your network security. Additionally, features such as firewalls, port filtering, and VPNs further limit network access and protect your data.
Finally, disabling DHCP can be an advanced approach to block unwanted devices, by requiring manual IP address configuration. However, this method may require additional knowledge and configuration time.
Remember, maintaining a secure Wi-Fi network is an ongoing process. Regularly updating your router’s firmware, periodically changing your Wi-Fi password, and routinely checking your network settings for any suspicious activity are all important measures to ensure the ongoing security and performance of your network.
By implementing these methods and staying proactive in managing your Wi-Fi network, you can enjoy a secure and reliable internet connection, free from the interference of unwanted devices.