Introduction
Welcome to our guide on how to install two thermostats on one furnace. If you’re looking to have separate temperature controls for different zones in your home or want to divide your living space into multiple areas with different climate settings, installing two thermostats on one furnace can provide the solution you need.
Traditionally, a single thermostat controls the heating and cooling system of a home. However, by installing two thermostats, you can gain more control over the temperature in different areas, improving comfort and energy efficiency. For example, you may want to have different temperature settings for the upstairs and downstairs areas or create separate zones for specific rooms.
This installation process allows you to connect two thermostats to one furnace, enabling independent control over the system for each thermostat. With this setup, you can customize the temperature to suit each area’s unique needs without requiring separate heating or cooling systems.
Before we dive into the step-by-step guide, it’s essential to note that this installation process requires some knowledge of electrical wiring and HVAC systems. If you’re unfamiliar with these areas, it’s best to consult a professional to ensure a safe and successful installation.
Now that you understand the benefits and considerations of installing two thermostats on one furnace, let’s move on to the list of things you’ll need for this project.
Why Install Two Thermostats on One Furnace?
There are several reasons why you might consider installing two thermostats on one furnace. Let’s explore these reasons to understand the benefits and applications of this setup:
1. Zoned Heating and Cooling: Installing two thermostats allows you to create different climate zones within your home. This is especially useful if you have multiple floors or areas that require different temperature settings. For example, you can have one thermostat controlling the heating and cooling on the main level and another thermostat for the upper level, ensuring optimal comfort for each area.
2. Energy Efficiency: With zoned heating and cooling, you can save energy by only heating or cooling the areas that are occupied. Instead of heating or cooling the entire house, you can focus on the zones that need it, resulting in reduced energy consumption and lower utility bills.
3. Personalized Comfort: Each person has different temperature preferences, and installing two thermostats allows for individualized comfort in different areas of the home. For instance, if someone prefers a cooler temperature in the bedroom while others prefer it warmer in the living room, having separate thermostats makes it possible to cater to everyone’s needs.
4. Room-specific Control: In homes with multiple rooms that serve different purposes, such as an office, nursery, or workout room, having two thermostats provides precise control over the temperature in these spaces. This ensures that each room maintains its ideal climate conditions, creating a more comfortable and productive environment for its intended use.
5. Improved HVAC System Performance: By dividing your home into different zones, you can prevent your HVAC system from overworking. Each zone can be controlled independently, giving your furnace a break when a particular area doesn’t require heating or cooling. This can help prolong the lifespan of your HVAC system and reduce the need for costly repairs or replacements.
Now that you understand the advantages of installing two thermostats on one furnace, let’s move on to the next section, where we’ll discuss the tools and materials you’ll need for this project.
Things You Will Need
Before you begin installing two thermostats on one furnace, gather the following tools and materials:
1. Two Thermostats: Purchase two compatible thermostats that suit your needs. Make sure they are designed for the type of heating system you have and have separate zoning capabilities.
2. Screwdriver Set: Have a set of screwdrivers ready, including flathead and Phillips-head screwdrivers, to remove and install the thermostats.
3. Voltage Tester: Use a voltage tester to ensure the power is off before starting any electrical work. Safety should always be a priority.
4. Wire Labels: Get a set of wire labels or markers to identify the wiring connections for each thermostat. This step will simplify the installation process and prevent confusion later.
5. Wiring and Thermostat Wire: Depending on the distance between your thermostats and furnace, you may need additional wiring. Measure the required length and purchase thermostat wire accordingly.
6. Mounting Hardware: Check if the thermostats come with mounting brackets or backplates. If not, or if you prefer a different mounting option, purchase the necessary hardware, such as double-sided tape or screws.
7. Drill and Drill Bits: If you need to mount the thermostats on the wall, have a drill and the appropriate drill bits on hand.
8. Wire Strippers and Cutters: Prepare wire strippers and cutters to remove the insulation from the wires and trim them to the appropriate lengths during the installation process.
9. Level: To ensure your thermostats are straight and properly aligned on the wall, use a level during the mounting process.
10. Safety Equipment: Lastly, don’t forget to have basic safety equipment, such as gloves and safety glasses, to protect yourself during the installation.
With these tools and materials gathered, you’re ready to begin the step-by-step process of installing two thermostats on one furnace. In the next section, we’ll guide you through the installation process, so let’s get started!
Step-by-Step Guide to Installing Two Thermostats on One Furnace
Follow these step-by-step instructions to install two thermostats on one furnace:
- Shut Off the Power: Begin by turning off the power to your furnace at the main electrical panel. This ensures your safety while working with the wiring.
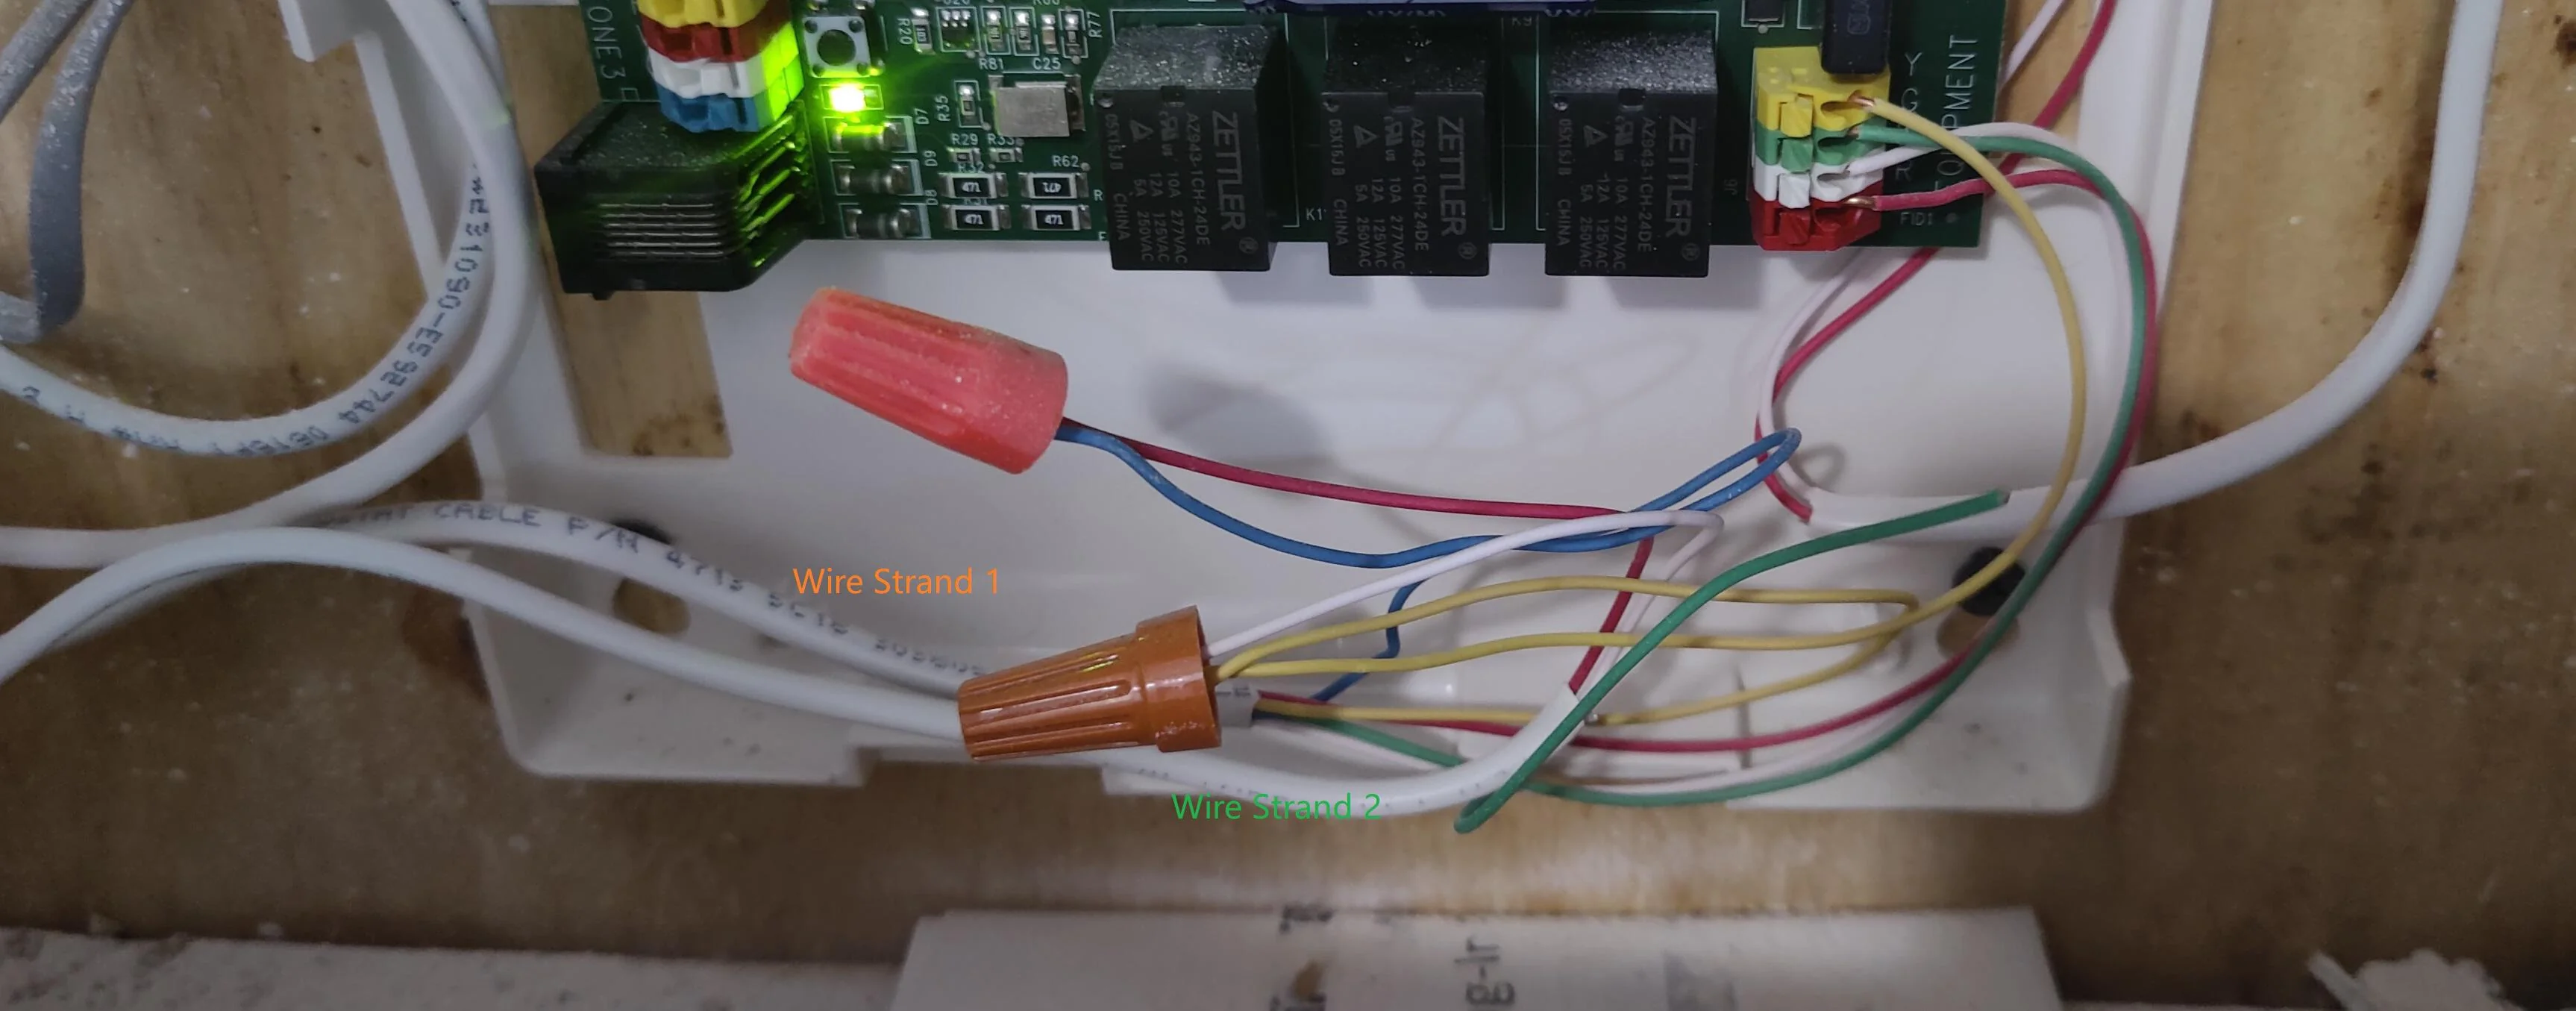
- Remove the Old Thermostat: If you already have a thermostat installed, remove it from the wall. Take note of the wiring connections and label them using wire labels or markers for easy identification later.
- Install the First Thermostat: Mount the first thermostat on the desired wall using the appropriate mounting brackets or backplate. Use a level to ensure it is straight. If necessary, drill holes and insert anchors before attaching the thermostat.
- Connect Thermostat Wiring: Once the first thermostat is securely mounted, refer to your thermostat’s installation manual to properly connect the wiring. Match the labeled wires from the furnace to the corresponding terminals on the thermostat. Use wire connectors to join the wires securely.
- Install the Second Thermostat: Repeat the process for the second thermostat, ensuring it is installed in the desired location and mounted securely.
- Connect Wiring for the Second Thermostat: Similar to the first thermostat, follow the installation manual to connect the labeled wires from the furnace to the appropriate terminals on the second thermostat. Use wire connectors to make secure connections.
- Test the Thermostats: With both thermostats installed and wired correctly, turn on the power to the furnace. Test each thermostat by adjusting the temperature settings and ensuring the furnace responds accordingly. Verify that each thermostat controls its designated zone effectively.
It’s worth noting that the specific steps may vary depending on the type of thermostats and furnace you have. Always refer to the manufacturer’s instructions for detailed installation guidelines.
Now that you’ve successfully installed two thermostats on one furnace, you can enjoy the benefits of zoned heating and cooling in your home. Take some time to familiarize yourself with the programming and settings of each thermostat, allowing you to optimize comfort and energy efficiency in different areas of your home.
Remember, if you feel uncertain or uncomfortable during any step of the installation process, it’s best to consult a professional HVAC technician to ensure a safe and effective installation.
Shut Off the Power
Before you start working on installing two thermostats on one furnace, it is crucial to ensure your safety by shutting off the power. Follow these steps:
Step 1: Locate your main electrical panel. It is typically located in a utility room or basement.
Step 2: Open the panel door to access the circuit breakers. You may need a screwdriver or simply lift the latch, depending on the type of panel.
Step 3: Look for the breaker that controls the power to your furnace. Most furnaces have their own dedicated circuit breaker labeled accordingly.
Step 4: Flip the breaker switch to the “Off” position. This completely cuts off the power supply to your furnace, ensuring your safety while working on the thermostat installation.
Step 5: To double-check, go to your furnace and attempt to turn on the heating or cooling system. If the power is off, it should not respond or activate.
It is important to keep in mind that shutting off the power ensures your safety when working with electrical connections. Remember to take precautions and treat all wiring as if it were live until you verify that the power is indeed off.
Once the power to your furnace is shut off, you can proceed with confidence to the next steps of the installation process.
In the next section, we will discuss how to remove the old thermostat as part of the installation process.
Remove the Old Thermostat
Before installing two thermostats on one furnace, you need to remove the old thermostat from the wall. Follow these steps to safely remove the old thermostat:
Step 1: Double-check that the power to the furnace is turned off at the main electrical panel. This ensures your safety during the removal process.
Step 2: Take a moment to observe how the old thermostat is mounted on the wall. Look for any screws or clips that hold it in place.
Step 3: Carefully remove the cover of the thermostat. The cover may be secured with screws or simply snapped onto the base.
Step 4: Once the cover is removed, you will see the base of the thermostat. Again, look for any screws or clips that keep the base attached to the wall.
Step 5: Unscrew or unclip the base of the thermostat from the wall. Take care not to damage the wires coming out of the wall.
Step 6: After removing the base, you will see the wiring connections. Take note of the labeled wires and their corresponding terminals on the base.
Step 7: If necessary, use wire labels or markers to identify each wire according to its corresponding terminal. This will make the installation process easier and prevent confusion later.
Step 8: Once you have noted the wiring connections, disconnect the wires from the terminals. Carefully unscrew or detach each wire, making sure they do not fall back into the wall.
Step 9: Once all the wires are disconnected, remove the old thermostat base from the wall completely.
Now that you have successfully removed the old thermostat, you can proceed to install the new thermostats. Take care to keep the wires easily accessible and organized for the upcoming steps of the installation process.
In the next section, we will guide you through the process of installing the first thermostat.
Install the First Thermostat
Now that the old thermostat has been removed, it’s time to install the first thermostat for your two-thermostat setup. Follow these steps to install the first thermostat:
Step 1: Choose the location where you want to install the first thermostat. Consider factors such as accessibility and visibility for convenient temperature control.
Step 2: If the first thermostat requires a mounting bracket or backplate, attach it to the wall using screws or adhesive, following the manufacturer’s instructions. Use a level to ensure the bracket is straight.
Step 3: Take the first thermostat and carefully align it with the mounting bracket or backplate. Gently push it onto the bracket until it snaps into place or secure it with screws, depending on the model.
Step 4: Ensure the first thermostat is level by using a bubble level. Adjust the position if necessary to maintain a straight and aesthetically pleasing installation.
Step 5: Depending on the type of thermostat, it may require batteries for power. If so, follow the manufacturer’s instructions to insert the batteries into the thermostat.
Step 6: Refer to the installation manual provided with the thermostat to identify the terminal designations on the base. Common terminals usually include R (power), C (common), W (heat), Y (cooling), and G (fan).
Step 7: Connect the wires from your furnace to their corresponding terminals on the first thermostat. Use wire connectors to join the wires securely. Ensure that each wire is connected to the appropriate terminal as labeled during the removal process.
Step 8: Carefully tuck the excess wiring into the wall cavity behind the thermostat, ensuring it does not interfere with the placement of the thermostat cover.
Step 9: Attach the thermostat cover by snapping it into place or securing it with screws, depending on the model.
With the first thermostat successfully installed, you are one step closer to achieving independent temperature control in different zones of your home. In the next section, we will guide you through connecting the wiring for the first thermostat.
Connect Thermostat Wiring
Now that you have installed the first thermostat, it’s time to connect the wiring correctly. Follow these steps to ensure proper connection of the thermostat wiring:
Step 1: Refer to the installation manual provided with the first thermostat to identify the terminal designations on the base. This will help you properly connect the wires from your furnace to the appropriate terminals.
Step 2: Take note of the labeled wires and their corresponding terminals on the first thermostat’s base, which you have identified during the removal of the old thermostat.
Step 3: Carefully match each labeled wire to its designated terminal on the first thermostat’s base. Ensure a secure connection by tightening the terminal screws just enough to hold the wires in place.
Step 4: Double-check each wire connection to ensure they are snugly secured. Make sure no exposed wires are touching each other or any metal parts.
Step 5: Once all the wires are properly connected, gently push any excess wire into the wall cavity behind the thermostat. This will help keep the area neat and prevent interference with the thermostat cover.
Step 6: Carefully attach the thermostat cover by aligning it with the base and snapping it into place or securing it with screws, depending on the model.
Step 7: With the wiring connected, the first thermostat is ready for operation. Restore the power to the furnace by turning on the breaker you previously shut off.
Step 8: Verify that the first thermostat is functioning properly by adjusting the temperature settings and observing the response of the furnace. The heating or cooling system should activate according to your commands.
Properly connecting the thermostat wiring is crucial for the overall functionality and effectiveness of your two-thermostat setup. Take your time to ensure accurate wiring connections and always refer to the manufacturer’s instructions for detailed guidance.
In the next section, we will guide you through installing the second thermostat for your two-thermostat setup.
Install the Second Thermostat
With the first thermostat installed and wired correctly, it’s time to move on to installing the second thermostat for your two-thermostat setup. Follow these steps to install the second thermostat:
Step 1: Select the desired location for the second thermostat. Consider factors such as the layout of your home and the area you want to control separately.
Step 2: Check if the second thermostat requires a mounting bracket or backplate. If so, attach it to the wall using screws or adhesive, following the manufacturer’s instructions. Ensure it is level using a bubble level.
Step 3: Take the second thermostat and align it with the mounting bracket or backplate. Gently push it onto the bracket until it snaps into place or secure it with screws as per the model’s instructions.
Step 4: Check that the second thermostat is level using a bubble level. Adjust its position if needed to maintain a straight installation.
Step 5: Refer to the installation manual provided with the second thermostat to identify the terminal designations on the base. Common terminals typically include R (power), C (common), W (heat), Y (cooling), and G (fan).
Step 6: Connect the wires from your furnace to their corresponding terminals on the second thermostat. Ensure each wire is connected to the appropriate terminal as labeled during the removal of the old thermostat.
Step 7: Securely tighten the terminal screws to maintain proper wire connections. Confirm that there are no exposed wires touching each other or any metal parts.
Step 8: Tuck any excess wiring into the wall cavity behind the second thermostat, keeping the area organized and free from interference with the thermostat cover.
Step 9: Attach the second thermostat cover by snapping it into place or securing it with screws, depending on the model’s instructions.
With the second thermostat installed, both thermostats are now in place for your two-thermostat setup. The next step is connecting the wiring for the second thermostat, which we will guide you through in the following section.
Remember to refer to the manufacturer’s instructions and specifications for your specific thermostat model throughout the installation process.
Connect Wiring for the Second Thermostat
Now that you have installed the second thermostat, it’s time to connect the wiring to ensure proper functionality. Follow these steps to connect the wiring for the second thermostat:
Step 1: Refer to the installation manual provided with the second thermostat to identify the terminal designations on the base. This will help you correctly connect the wires from your furnace to the appropriate terminals.
Step 2: Take note of the labeled wires and their corresponding terminals on the second thermostat’s base, which you have identified during the removal of the old thermostat.
Step 3: Carefully match each labeled wire to its designated terminal on the second thermostat’s base. Securely tighten the terminal screws to ensure good connections.
Step 4: Double-check each wire connection to ensure they are properly secured. Make sure there are no exposed wires touching each other or any metal parts.
Step 5: Gently push any excess wiring into the wall cavity behind the second thermostat, keeping the area clean and preventing interference with the thermostat cover.
Step 6: Attach the thermostat cover by snapping it into place or securing it with screws, following the manufacturer’s instructions.
Step 7: Now, it’s time to test the operation of both thermostats. Turn on the power to the furnace by switching on the breaker you previously turned off.
Step 8: Adjust the temperature settings on each thermostat to confirm that the heating or cooling system responds correctly in their respective zones.
Step 9: Monitor the functioning of each thermostat and listen for any unusual noises or issues. If any problems arise, consult the manufacturer’s troubleshooting guide or seek professional assistance.
By connecting the wiring for the second thermostat correctly, you have completed the installation of both thermostats on your one furnace system. The next step is to test and ensure that each thermostat is functioning as intended.
Remember to always refer to the manufacturer’s instructions and follow their guidelines for your specific thermostat model throughout the installation and wiring process.
Test the Thermostats
After installing and connecting the wiring for both thermostats, it’s crucial to test their functionality to ensure they are operating correctly. Follow these steps to test the thermostats:
Step 1: Turn on the power to the furnace by flipping the breaker switch to the “On” position. This restores power to the heating and cooling system.
Step 2: With the power restored, adjust the temperature settings on the first thermostat. Observe if the furnace responds by activating the heating or cooling system in the designated zone.
Step 3: Monitor the operation of the first thermostat for a while to ensure the temperature control works properly, and the desired zone reaches the desired temperature. Make any necessary adjustments if needed.
Step 4: Repeat the same process with the second thermostat. Adjust the temperature settings and observe if the furnace responds accordingly in the second designated zone.
Step 5: Monitor the operation of the second thermostat as well, ensuring it accurately controls the temperature and maintains the desired climate in its zone.
Step 6: Check for any unusual noises, incorrect temperature readings, or other issues during the testing process. If you notice any problems, consult the thermostat’s user manual or contact a professional for assistance.
Step 7: Verify that each thermostat can independently control its designated zone. Adjust the temperature settings in one zone without affecting the other, ensuring each thermostat functions autonomously.
Step 8: Take note of any specific programming or scheduling features of the thermostats and familiarize yourself with their operation. This allows you to optimize comfort and energy efficiency in your home.
Step 9: If satisfied with the performance of both thermostats, you can have peace of mind knowing that you have successfully installed and tested the functionality of two thermostats on one furnace.
By thoroughly testing the thermostats, you can ensure that each zone of your home is adequately controlled and comfortable. You can now enjoy the benefits of independent temperature settings and improved energy efficiency.
In the next section, we will conclude this installation guide, summarizing the key points of installing two thermostats on one furnace.
Conclusion
Installing two thermostats on one furnace provides the flexibility to control temperature settings in different zones of your home, improving comfort and energy efficiency. By following the step-by-step guide outlined in this article, you can successfully complete the installation process.
First, ensure your safety by shutting off the power at the main electrical panel. Remove the old thermostat and proceed to install the first thermostat, making sure it is securely mounted and wired correctly. Connect the wiring for the first thermostat according to the labeled wires and terminals.
Next, install the second thermostat in your desired location and connect the wiring by matching the labeled wires to the appropriate terminals on the second thermostat’s base. Secure the wiring connections and test the operation of both thermostats by adjusting the temperature settings and observing the furnace’s response in each zone.
Throughout the installation process, refer to the manufacturer’s instructions and guidelines for your specific thermostat models. If you encounter any issues or are unsure about any step, consult a professional HVAC technician for assistance.
With two thermostats installed and tested, you have gained the benefits of zoned heating and cooling in your home. Each thermostat provides independent control over its respective zone, allowing for personalized comfort and energy-efficient temperature regulation.
Remember to familiarize yourself with the programming and scheduling features of the thermostats. This knowledge enables you to optimize comfort and energy efficiency further, tailoring the climate settings of each zone to your specific preferences and needs.
Enjoy the improved comfort, energy savings, and convenience that come with installing two thermostats on one furnace. Take advantage of the individualized temperature control and enhanced zoning capabilities to create the perfect climate in every area of your home.