Introduction
Welcome to our step-by-step guide on how to install an SSD in your Alienware 17 laptop. Upgrading to a solid-state drive (SSD) can significantly improve the performance and speed of your laptop, giving you faster boot times and quicker application loading. Whether you’re a gamer looking for faster loading times or a professional in need of a more efficient work environment, installing an SSD is a worthwhile investment.
In this guide, we will walk you through the process of installing an SSD in your Alienware 17. We will cover all the necessary steps, tools, and precautions required to successfully complete the upgrade.
Before we dive into the installation process, it’s important to emphasize the importance of backing up your data. While we will take precautions to minimize the risk of data loss, it’s always best to be prepared. Make sure to create a backup of all your important files and documents before proceeding with the SSD installation.
Additionally, it’s essential to ensure compatibility between the SSD and your Alienware 17 laptop. Refer to the manufacturer’s specifications or your laptop’s documentation to determine the supported SSD types and sizes. Selecting a compatible SSD will guarantee a smooth installation process and optimal performance.
Now that we’ve set our expectations and emphasized the importance of data backup and compatibility, let’s move on to the specific requirements and tools you’ll need to complete the SSD installation in your Alienware 17.
Requirements
Before you begin the process of installing an SSD in your Alienware 17, there are a few requirements you need to take into consideration. Ensuring that you have the necessary tools and components will help make the installation process smooth and efficient. Here’s what you’ll need:
- Alienware 17 Laptop: Make sure you have the Alienware 17 laptop model that you plan to upgrade. Different laptop models may have slightly different internal layouts, so it’s important to have the correct equipment.
- Compatible SSD: Choose an SSD that is compatible with your Alienware 17 laptop. Look for one that matches the form factor and interface of your current hard drive. Common interfaces include SATA, M.2, or PCIe.
- Screwdriver Kit: You’ll need a small screwdriver kit with different types of screwdriver heads. The exact size and type of screwdriver required may vary based on your laptop model, so having a variety of screwdriver heads will ensure you have the right one.
- Data Backup: Before proceeding with the installation, it’s crucial to back up all your important data. While the installation process itself shouldn’t affect your data, it’s always better to be safe than sorry. Backup options include cloud storage, an external hard drive, or using a backup software.
- Anti-static wrist strap: To protect your components from potential damage caused by static electricity, it’s recommended to wear an anti-static wrist strap during the installation process. This will help dissipate any static charges and prevent accidental discharge.
- Clean workspace: Ensure you have a clean and spacious workspace to carry out the installation. A clutter-free area will help you stay organized and prevent any small components from getting misplaced or lost during the process.
It’s important to note that your specific requirements may vary depending on the Alienware 17 model and the SSD you choose. Always refer to the manufacturer’s guidelines and consult the laptop’s documentation for any additional requirements or recommendations.
Now that you have a clear understanding of the requirements and tools needed, let’s move on to the step-by-step process of installing an SSD in your Alienware 17 laptop.
Step 1: Gather the necessary tools
Before you begin the installation process, it’s important to gather all the necessary tools and components. Having everything at hand will save you time and ensure a smooth installation. Here are the tools you’ll need:
- Screwdriver kit: The Alienware 17 laptop typically requires a Phillips screwdriver to remove the screws securing the back panel. Make sure you have the appropriate size and type of screwdriver to avoid damaging the screws or your laptop.
- Anti-static wrist strap: Wearing an anti-static wrist strap will help protect your laptop and components from potential damage due to static electricity. Connect one end of the strap to your wrist and the other to a grounded object.
- Clean, lint-free cloth: Use a soft, lint-free cloth to clean the laptop’s exterior and components. This will help prevent dust or debris from interfering with the installation and ensure a clean and professional-looking result.
- SSD: Ensure you have the compatible SSD that you plan to install. Confirm that it matches the interface and form factor required for your Alienware 17 laptop.
- Data backup: It’s crucial to have a recent backup of all your important files and documents. While the installation process itself shouldn’t affect your data, it’s always better to be safe than sorry in case of any unforeseen issues.
Having all these tools and components ready will help streamline the installation process and minimize the risk of any delays or complications. Double-check that you have everything before moving on to the next step.
With all the necessary tools in hand, you’re now ready to prepare your Alienware 17 for the installation. In the next step, we’ll guide you through the process of preparing your laptop for the SSD installation.
Step 2: Prepare the Alienware 17 for installation
Before diving into the installation process, it’s crucial to properly prepare your Alienware 17 laptop. This step will involve shutting down the laptop, removing the battery (if applicable), and safely disconnecting any external power sources. Follow these instructions to prepare your laptop:
- Save your work and shut down the laptop: Make sure to save any open files or projects and properly shut down your Alienware 17. This will prevent any data loss or potential damage during the installation process.
- Disconnect the power adapter: Unplug the power adapter from the laptop. This will ensure that there is no external power source connected during the installation and minimize the risk of electrical damage.
- Remove the battery (if applicable): If your Alienware 17 has a removable battery, carefully remove it. Refer to your laptop’s user manual for specific instructions on how to remove the battery safely.
- Ground yourself: Before proceeding, it’s important to ground yourself to prevent any static electricity discharge that could damage sensitive components. Wear an anti-static wrist strap or touch a grounded object to discharge any built-up static charge.
Preparing your laptop is crucial to ensure that you can safely handle the internal components during the installation process. By following these steps, you’ll minimize the risk of electrical damage and ensure a smooth installation.
Once you have properly prepared your Alienware 17, you can move on to the next step: locating and removing the old hard drive.
Step 3: Locate and remove the old hard drive
Now that your Alienware 17 is properly prepared, it’s time to locate and remove the old hard drive. Follow these steps to complete this task:
- Remove the bottom panel: Turn your Alienware 17 laptop over and locate the screws that secure the bottom panel. Use a Phillips screwdriver to remove these screws. Set the screws aside in a safe place as you will need them later.
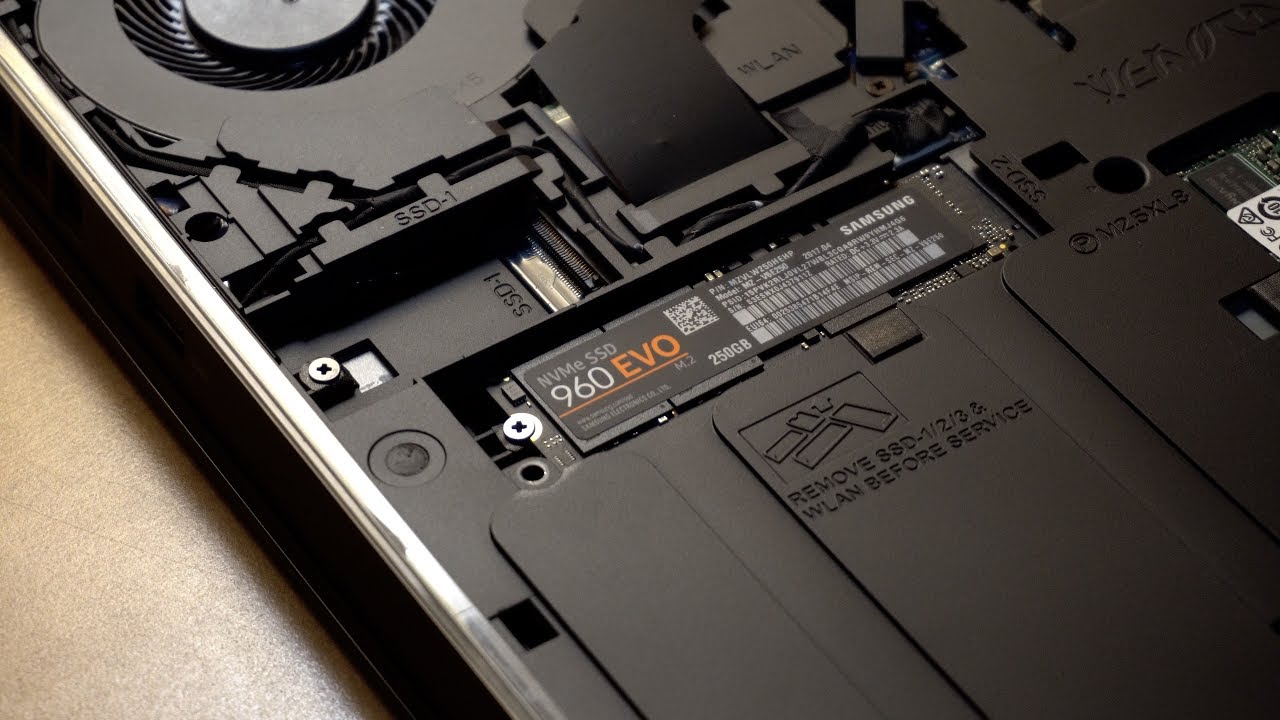
- Locate the hard drive: After removing the bottom panel, you should be able to locate the hard drive. It is typically located near the center of the laptop, but the exact placement may vary depending on your specific Alienware 17 model.
- Disconnect the cables: Carefully disconnect the cables connected to the old hard drive. These cables may include data cables (SATA or M.2) and power cables. Use your fingers or a small tool to gently detach the cables, making sure not to put excessive force on them.
- Remove the mounting bracket or screws: Depending on your laptop model, the hard drive may be secured in place by a mounting bracket or screws. Remove the bracket or screws, carefully taking note of their placement for later reinstallation.
- Slide out the old hard drive: Once you have disconnected the cables and removed any mounting brackets or screws, you can now slide out the old hard drive from its slot. Hold it by the sides and gently pull it out, ensuring not to damage any other components or cables in the process.
By following these steps, you will successfully locate and remove the old hard drive from your Alienware 17 laptop. Be sure to handle all components with care, as they are delicate and sensitive to mishandling.
In the next step, we will guide you through the process of installing the SSD into your Alienware 17.
Step 4: Install the SSD into the Alienware 17
With the old hard drive removed, it’s time to install the new SSD into your Alienware 17 laptop. Follow these steps to complete the installation:
- Align the SSD: Take your new SSD and align it with the empty slot in your laptop. Ensure that the connectors on the SSD are facing the correct direction for proper installation.
- Slide the SSD into the slot: Carefully slide the SSD into the empty slot, making sure it is inserted all the way in. Do not force it; it should slide in smoothly without any resistance. If you encounter any resistance, double-check the alignment and try again.
- Secure the SSD: Depending on your laptop model, you may need to use a mounting bracket or screws to secure the SSD in place. Consult the laptop’s documentation to determine the specific securing method for your Alienware 17.
- Attach the cables: Once the SSD is securely in place, reattach the cables that were previously connected to the old hard drive. Connect the appropriate data cable (SATA or M.2) and power cable, ensuring they are properly aligned and firmly connected.
By following these steps, you will successfully install the new SSD into your Alienware 17 laptop. Take your time and handle the SSD and cables with care to avoid any damage during the installation process.
Now that the SSD is installed, you’re ready to move on to the next step: securing the SSD in place.
Step 5: Secure the SSD in place
After installing the SSD into your Alienware 17, it’s important to secure it in place to prevent any movement or dislodgement. Follow these steps to ensure the SSD is properly secured:
- Mounting bracket: If your SSD requires a mounting bracket, align the bracket with the SSD and the screw holes on the laptop. Use the screws that you set aside earlier to secure the bracket in place. Make sure the SSD is snugly fit within the bracket.
- Screws: In the absence of a mounting bracket, use the appropriate screws to secure the SSD directly to the laptop. Carefully align the screw holes on the SSD with the corresponding holes on the laptop and tighten the screws gently but firmly.
Ensure that the SSD is tightly secured and doesn’t move or wiggle when you gently press on it. A properly secured SSD will prevent any damage due to vibrations or accidental dislodgement. Take your time during this step to make sure everything is secured correctly.
Once the SSD is securely in place, you’re ready to move on to the next step: reconnecting the cables.
Step 6: Reconnect the cables
With the SSD securely mounted in place, it’s time to reconnect the cables to ensure proper functionality. Follow these steps to reconnect the cables:
- Data cable: Locate the appropriate data cable for your SSD (SATA or M.2) and carefully connect it to the corresponding port on the SSD. Ensure that the cable is aligned correctly and fully inserted into the port.
- Power cable: Connect the power cable to the SSD, ensuring that it is properly aligned with the power port on the SSD. Gently push it in until it is securely connected.
Double-check the connection of both the data cable and power cable to ensure they are properly inserted and securely connected to the SSD. An improper or loose connection may result in the SSD not being detected or functioning correctly.
Once you have successfully reconnected the cables, you can move on to the final step: testing the SSD installation.
Step 7: Test the SSD installation
Congratulations! You have successfully installed the SSD in your Alienware 17. Now, it’s important to test the SSD to ensure everything is functioning properly. Follow these steps to test the SSD installation:
- Reassemble the laptop: Carefully reattach the bottom panel of your Alienware 17 and secure it with the screws you removed earlier. Make sure all screws are tightened evenly but avoid overtightening to prevent damage.
- Reconnect the power adapter: Plug in the power adapter and reattach any other external peripherals or devices that you might have disconnected during the installation process.
- Power on the laptop: Press the power button to turn on your Alienware 17. The laptop should boot up normally, but keep an eye out for any error messages or abnormal behavior.
- Check SSD detection: Once your laptop has booted up, go to the operating system’s Disk Management utility (on Windows) or Disk Utility (on macOS) to check if the SSD is detected. You should see the new SSD listed as a separate drive.
- Run speed tests: To verify the improved performance of your SSD, you can run speed tests to compare its read and write speeds with the previous hard drive. There are various software tools available that can measure the SSD’s performance.
- Test application loading times: Open a few applications or games that you frequently use to test the loading times. You should notice that the SSD provides faster application launch times and a more responsive computing experience.
If you encounter any issues during the testing phase, such as the SSD not being detected or abnormal behavior, double-check the connections and ensure that the SSD is properly installed. If the issue persists, consult the manufacturer’s documentation or seek the assistance of a professional technician.
With the SSD successfully installed and tested, you can now enjoy the improved speed and performance that your Alienware 17 laptop has gained. Happy computing!
Conclusion
Congratulations on successfully installing an SSD in your Alienware 17 laptop! By following this step-by-step guide, you have upgraded your laptop’s storage, enhancing its performance and speed.
We started by gathering the necessary tools and ensuring compatibility between the SSD and your laptop. Then, we prepared the Alienware 17 for installation by shutting it down, disconnecting the power source, and removing the battery (if applicable). Next, we located and removed the old hard drive, making way for the new SSD.
With the old hard drive out of the way, we proceeded to install the SSD into the Alienware 17, securing it in place using either a mounting bracket or screws. We then reconnected the necessary cables to ensure proper functionality.
Once the SSD was installed, we tested the drive by reassembling the laptop, reconnecting the power adapter, and powering it on. We checked if the SSD was detection, ran speed tests, and tested the loading times of various applications or games to verify the enhanced performance.
Now, you can enjoy the benefits of your SSD upgrade, including faster boot times, quicker application loading, and improved overall performance. The SSD will greatly enhance your computing experience, whether you’re a gamer, professional, or casual user.
We hope this guide has been helpful in guiding you through the process of installing an SSD in your Alienware 17 laptop. Remember to keep the old hard drive in a safe place in case you ever need to access the data stored on it.
Thank you for following along, and we wish you many years of seamless and speedy computing with your newly upgraded Alienware 17 laptop!