Introduction
Welcome to our step-by-step guide on how to install a solid state drive (SSD) in an HP Sleekbook Envy 6. Upgrading your laptop’s storage to an SSD can drastically improve its performance, providing faster boot times, quicker file transfers, and overall smoother operation.
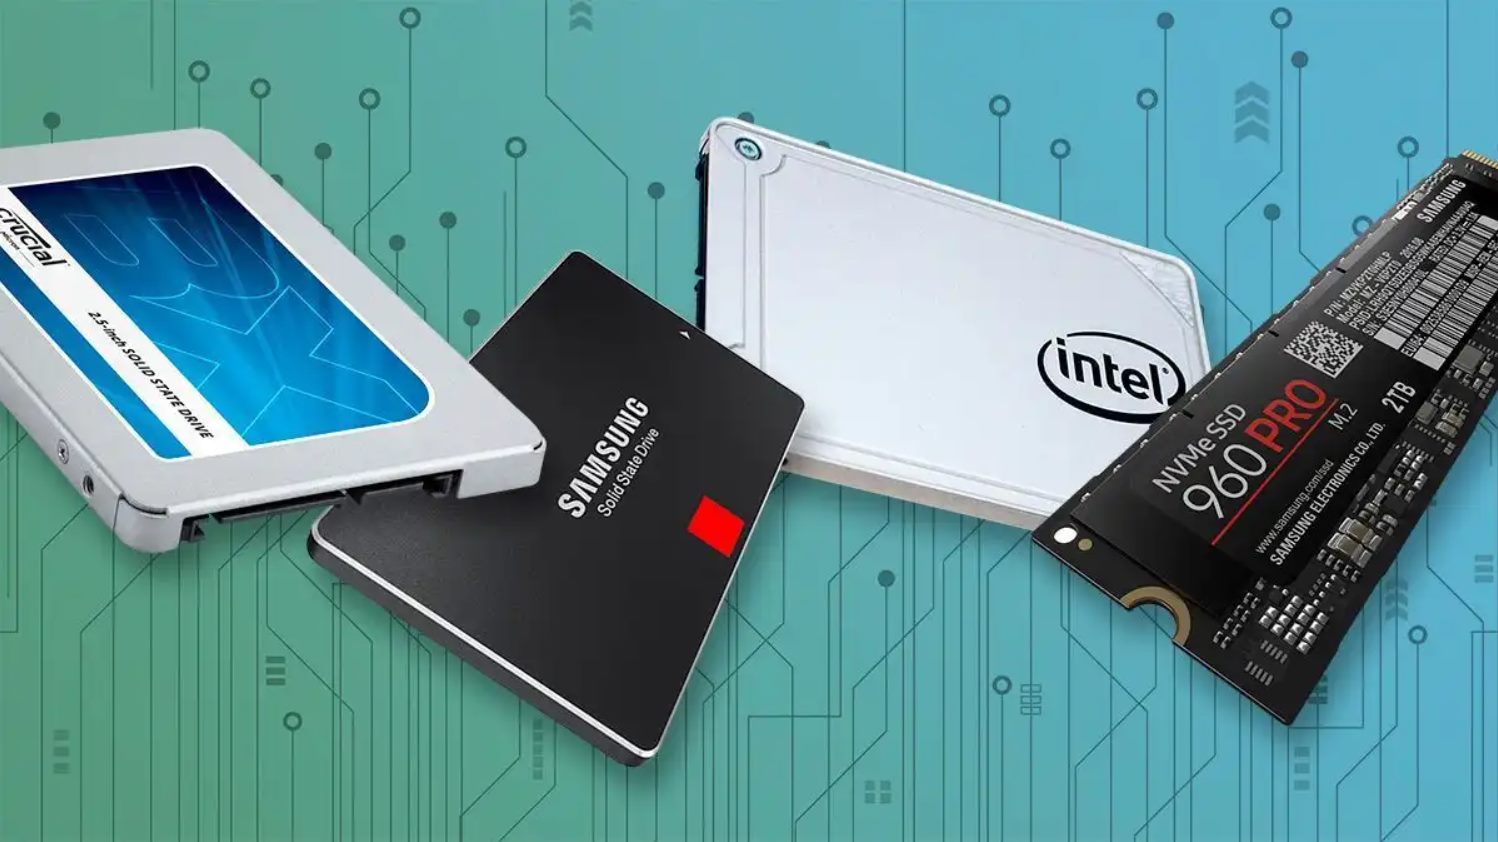
A solid-state drive is a type of storage device that uses flash memory to store data. Unlike traditional hard disk drives (HDDs), SSDs have no moving parts, which makes them more durable and less prone to mechanical failure. They also offer significantly faster read and write speeds, allowing your laptop to run more efficiently.
In this guide, we will walk you through the process of installing an SSD in your HP Sleekbook Envy 6. Whether you want to replace your existing hard drive or add a secondary storage option, this guide will provide you with the necessary steps to do so.
Before we dive into the installation process, it is important to note that the specific steps may vary slightly depending on your laptop model and SSD type. It is always recommended to consult your laptop’s user manual or manufacturer’s website for any specific instructions or precautions.
Now, let’s get started and transform your HP Sleekbook Envy 6 with a lightning-fast SSD!
Step 1: Gather the necessary tools and materials
Before you begin the installation process, it is important to gather all the necessary tools and materials. Here’s a list of items you’ll need:
- HP Sleekbook Envy 6
- Solid state drive (SSD)
- Small screwdriver set
- Anti-static wrist strap (optional but recommended)
- External storage device or cloud storage for data backup
Make sure you have the proper SSD that is compatible with your HP Sleekbook Envy 6. It is recommended to do some research or check the laptop’s manual or manufacturer’s website for compatible SSD options.
The small screwdriver set will be necessary to remove screws from the laptop’s casing and hard drive bay. It is important to have a variety of screwdriver sizes to ensure you have the right one for each screw.
An anti-static wrist strap is optional but highly recommended. This strap will help protect your laptop’s components from electrostatic discharge (ESD) damage. If you don’t have an anti-static strap, make sure to discharge any static electricity by touching a grounded metal object before handling the laptop or SSD.
Lastly, make sure you have a reliable method of backing up your important files and data. This can be an external storage device, such as a USB flash drive or an external hard drive, or utilizing cloud storage options like Google Drive or Dropbox.
Once you have gathered all the necessary tools and materials, you are ready to move on to the next step: preparing the new SSD.
Step 2: Prepare the new SSD
Now that you have gathered all the necessary tools and materials, it’s time to prepare the new solid state drive (SSD) for installation in your HP Sleekbook Envy 6. Follow these steps:
- Ensure compatibility: Before proceeding, double-check that the new SSD is compatible with your laptop. Check the specifications and compare them with the laptop’s documentation or manufacturer’s website. Pay attention to factors such as the form factor, interface, and storage capacity.
- Backup data: If you haven’t done so already, backup all your important files and data from the current hard drive. This step is essential to ensure that no data is lost during the installation process. You can use an external storage device or cloud storage to create a backup of your files.
- Static precautions: To protect the new SSD from electrostatic discharge (ESD) damage, it is important to take proper static precautions. Wear an anti-static wrist strap or ground yourself by touching a grounded metal object before handling the SSD.
- Physically inspect the SSD: Carefully examine the new SSD for any signs of physical damage or defects. Check for any loose components or bent pins. If you notice any abnormalities, contact the manufacturer for further assistance.
- Verify firmware: In some cases, it may be necessary to update the firmware of the new SSD before installation. Check the manufacturer’s website for firmware updates and follow their instructions to ensure that you have the latest version.
By taking the time to properly prepare the new SSD, you will ensure a smooth and successful installation process. Once you have completed these steps, you can move on to the next stage: backing up important files and data from your HP Sleekbook Envy 6.
Step 3: Backup important files and data
Prior to installing a solid-state drive (SSD) in your HP Sleekbook Envy 6, it is crucial to back up all your important files and data. This step ensures that you have a secure and accessible copy of your information in case of any unforeseen issues during the installation process. Follow these steps to backup your files:
- Choose a backup method: Determine how you want to back up your files. You can use an external storage device such as a USB flash drive or an external hard drive. Alternatively, you can utilize cloud storage services like Google Drive, Dropbox, or Microsoft OneDrive. Assess the size of your data and choose a method that provides enough storage space.
- Select important files: Identify the files and data that you want to back up. Consider documents, photos, videos, music, and any other data that is important to you. Create a folder or designate specific files for backup, ensuring that you don’t miss any critical information.
- Transfer files to backup location: Connect your chosen backup device (external storage or cloud storage) to your HP Sleekbook Envy 6. Copy the selected files and data to the backup location. If using an external storage device, simply drag and drop the files to the device. If using cloud storage, follow the platform’s instructions for uploading files.
- Verify backup: After transferring the files, it’s important to verify that the backup was successful. Open the backup location and ensure that all the files and data are present. Check that the files are accessible and can be opened without any errors or issues.
- Maintain a backup routine: Once you have successfully backed up your files, it is beneficial to establish a regular backup routine. Set reminders or use automated backup software to ensure that your important files are consistently backed up. This will provide peace of mind and protect your data in the future.
By following these steps to backup your important files and data, you can proceed with the SSD installation with confidence, knowing that your information is securely stored. Now that you have safeguarded your data, it’s time to move on to the next step: shutting down and disconnecting your HP Sleekbook Envy 6.
Step 4: Shut down and disconnect the HP Sleekbook Envy 6
Before you begin the physical installation of the solid-state drive (SSD) in your HP Sleekbook Envy 6, you need to shut down the laptop and disconnect it from any power sources. Following these steps will ensure your safety and prevent any potential damage to the laptop:
- Save your work and close all applications: Before shutting down the laptop, save any unsaved work and close all open applications. This will prevent data loss and ensure a smooth restart once the installation is complete.
- Power off the laptop: Click on the “Start” menu and select “Shut Down” to initiate the shutdown process. Allow the laptop a few moments to power down completely.
- Disconnect external power sources: Unplug the AC adapter from the laptop and remove any connected peripherals, such as USB devices or external monitors. This will eliminate the risk of accidentally damaging the laptop or the SSD during the installation process.
- Ground yourself and use an anti-static wrist strap: Prior to opening your laptop’s casing, it is vital to discharge any static electricity that you may have accumulated. Ground yourself by touching a grounded metal object, and if available, use an anti-static wrist strap to further protect the laptop’s internal components.
- Double-check for residual power: After unplugging the AC adapter, press and hold the power button for a few seconds to discharge any residual power in the laptop. This step ensures that there is no remaining electrical charge that could potentially damage the SSD or other internal components.
By following these steps, you have safely shut down the HP Sleekbook Envy 6 and disconnected it from any power sources. This sets the stage for the next step: removing the bottom cover of the laptop to access the internal components.
Step 5: Remove the bottom cover of the HP Sleekbook Envy 6
In order to access the internal components of your HP Sleekbook Envy 6 and proceed with the installation of the solid-state drive (SSD), you will need to remove the bottom cover. This step requires careful attention and proper tools to avoid causing any damage to the laptop. Follow these steps to remove the bottom cover:
- Prepare a suitable work area: Find a clean and flat surface to work on. It is recommended to use a non-slip mat or a soft cloth to prevent the laptop from sliding or getting scratched during the process.
- Ground yourself and use an anti-static wrist strap: Before proceeding, discharge any static electricity by touching a grounded metal object. If available, using an anti-static wrist strap will help further protect the sensitive internal components of the laptop.
- Identify the screws: Carefully inspect the bottom cover of the laptop and take note of the screws that are securing it in place. These screws are usually located along the edges and sometimes in the center of the cover. Use a small screwdriver set to match the size of the screws.
- Remove the screws: Using the appropriate screwdriver, carefully unscrew and remove each screw that is holding the bottom cover in place. Keep the screws in a safe place to ensure they don’t get lost during the installation process. Take note of any variations in screw sizes or locations for easier reassembly later.
- Detach the bottom cover: Once all the screws have been removed, gently pry open the bottom cover using a plastic spudger or a similar non-metal tool. Start from one side and work your way around, gradually releasing the cover from the laptop’s frame. Be cautious not to apply excessive force or twist the cover to prevent any damage.
- Set aside the bottom cover: Place the removed bottom cover in a safe and clean location. Make sure it is kept in a secure position to avoid any accidental damage or interference with other components.
By successfully removing the bottom cover of your HP Sleekbook Envy 6, you have gained access to the internal components, including the hard drive bay where the SSD will be installed. Now you can move on to the next step: locating the hard drive bay within the laptop.
Step 6: Locate the hard drive bay
Before you can proceed with installing the solid-state drive (SSD) in your HP Sleekbook Envy 6, you need to locate the hard drive bay where the existing hard drive is housed. This step will help you identify the area where the new SSD will be installed. Follow these steps to locate the hard drive bay:
- Refer to the HP Sleekbook Envy 6 manual: The easiest way to locate the hard drive bay is by referring to the laptop’s manual. The manual will provide detailed instructions and diagrams specific to your HP Sleekbook Envy 6 model, helping you find the exact location of the hard drive bay.
- Consult the manufacturer’s website: If you don’t have the manual on hand, you can visit the official HP website or the manufacturer’s support page to find the documentation for your specific laptop model. Look for the “Service Manual” or “Hardware Maintenance Manual,” as they usually contain information about the internal components and their locations.
- Inspect the laptop’s internals: If you prefer a hands-on approach, you can also locate the hard drive bay by visually examining the laptop’s internals. Once the bottom cover is removed, look for a rectangular metal bracket or caddy that holds the existing hard drive. The hard drive bay is typically located towards one side of the laptop.
- Look for labels and connectors: Another way to identify the hard drive bay is by looking for labels or connectors. The existing hard drive might have labels indicating its storage capacity, interface, or manufacturer. Additionally, you may see a ribbon cable or SATA connector connected to the hard drive bay, which further confirms its location.
- Take note of any screws or brackets: While locating the hard drive bay, pay attention to any screws or brackets that secure the existing hard drive in place. You will need to remove these screws and brackets to replace the old hard drive with the new SSD.
By successfully locating the hard drive bay, you are now ready to proceed with the next step: removing the existing hard drive from your HP Sleekbook Envy 6.
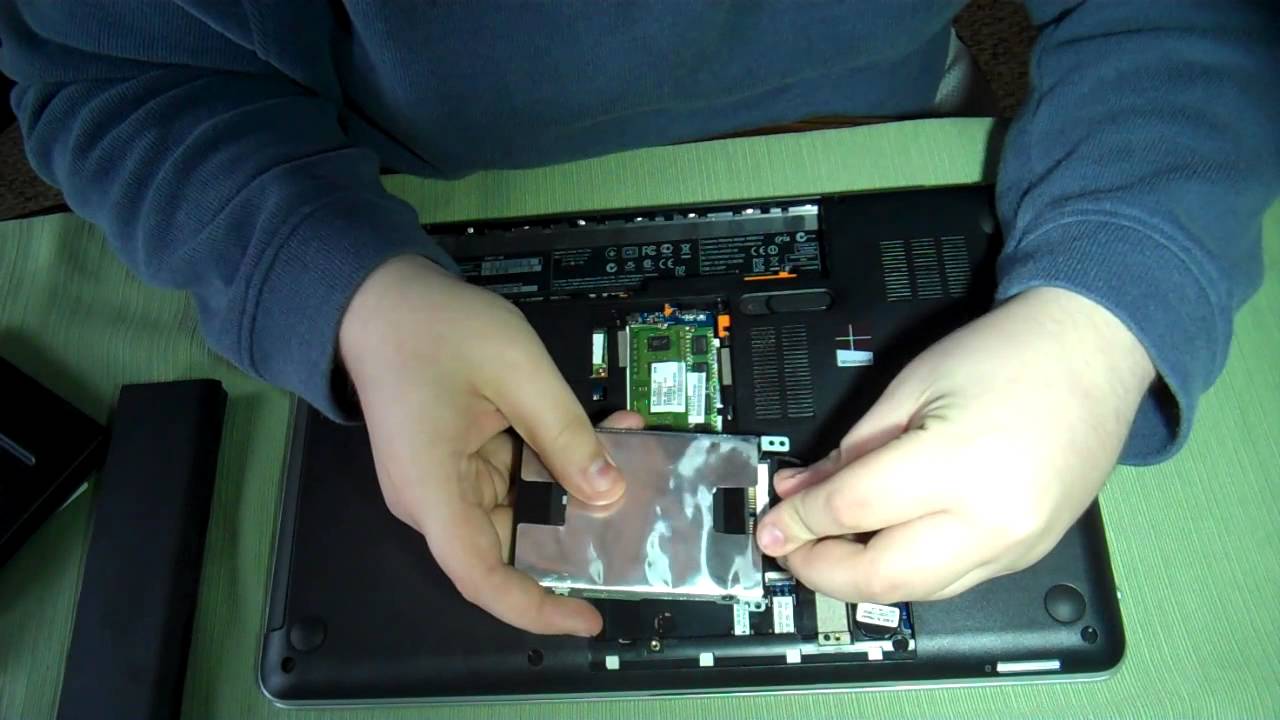
Step 7: Remove the existing hard drive
Now that you have located the hard drive bay in your HP Sleekbook Envy 6, it’s time to remove the existing hard drive to make way for the new solid-state drive (SSD). Follow these steps to safely remove the old hard drive:
- Take necessary precautions: Before handling any internal components, make sure you are grounded to prevent any electrostatic discharge. Use an anti-static wrist strap or touch a grounded metal object to discharge any static electricity from your body.
- Disconnect any cables or connectors: Look for any cables or connectors attached to the existing hard drive. Depending on the model, there may be a SATA connector or ribbon cable connected to it. Gently detach these cables by carefully unplugging them from the hard drive.
- Remove any fastening screws or brackets: Look for screws or brackets securing the existing hard drive in place. Using a suitable screwdriver, carefully remove these screws or brackets. Keep them in a safe place as you may need them when installing the new SSD.
- Slide or lift out the old hard drive: Once the screws or brackets have been removed, you can slide or lift out the existing hard drive from the hard drive bay. Use a gentle but firm grip to avoid dropping or damaging the hard drive.
- Inspect the removed hard drive: Take a moment to inspect the removed hard drive for any signs of damage or issues. This is also a good opportunity to check the specifications of the old hard drive, such as the storage capacity, interface, and form factor, so you can ensure these match when choosing the new SSD.
By following these steps, you have successfully removed the existing hard drive from your HP Sleekbook Envy 6. Now that the hard drive bay is empty, you can proceed to the next step: installing the new SSD.
Step 8: Install the new SSD into the hard drive bay
With the existing hard drive removed from your HP Sleekbook Envy 6, it’s time to install the new solid-state drive (SSD) into the empty hard drive bay. Follow these steps to properly install the new SSD:
- Prepare the new SSD: Carefully unpack the new SSD and orient it properly. Take note of any mounting screws or brackets that may be required for installation.
- Align the SSD: Position the new SSD in the hard drive bay, ensuring that the interface connector is facing towards the connector on the laptop. Align the screw holes on the SSD with the holes present in the hard drive bay.
- Secure the SSD: Depending on the laptop model, you may need to use the screws or brackets from the old hard drive to secure the new SSD in place. Gently fasten the screws or brackets, ensuring they are snug but not overly tightened to avoid damaging the SSD or the laptop.
- Connect the interface cable: If there is an interface cable or SATA connector that needs to be connected to the SSD, carefully attach it, ensuring a secure and proper connection. Be gentle to avoid bending or damaging the connector pins.
- Double-check the installation: Once the SSD is securely installed and connected, double-check that it is properly aligned and fastened in the hard drive bay. Make sure all connections are secure and no cables or connectors are blocking the SSD or impeding proper installation.
By following these steps, you have successfully installed the new solid-state drive (SSD) into the hard drive bay of your HP Sleekbook Envy 6. Now that the SSD is in place, you can proceed to the next step: reassembling the laptop.
Step 9: Reassemble the HP Sleekbook Envy 6
Now that you have installed the new solid-state drive (SSD) into the hard drive bay of your HP Sleekbook Envy 6, it’s time to reassemble the laptop. Follow these steps to put everything back together:
- Retrieve the bottom cover: Locate the bottom cover that you set aside earlier. Inspect it for any dust or debris and clean it if necessary.
- Align the bottom cover: Align the bottom cover with the laptop’s frame, being mindful of any tabs or notches that ensure proper alignment. Insert any connectors or ports into their respective openings.
- Secure the bottom cover: Once the bottom cover is properly aligned, begin fastening the screws that secure it in place. Use the small screwdriver to tighten each screw, making sure not to overtighten to avoid damaging the laptop.
- Perform a visual inspection: After tightening all the screws, visually inspect the laptop to ensure that everything is in place. Check that the bottom cover is flush with the laptop’s frame and there are no gaps or misaligned components.
- Power on the laptop: Connect the AC adapter to the laptop and press the power button to turn it on. The laptop should boot up normally, and you should be able to access the SSD without any issues.
- Verify SSD recognition: Once the laptop has booted up, verify that the SSD is recognized by the system. Open the Device Manager or Disk Management utility in the operating system to confirm that the SSD is detected and listed as a storage device.
By following these steps, you have successfully reassembled your HP Sleekbook Envy 6 after installing the new SSD. The laptop should now be ready to provide improved performance with faster boot times, quicker file transfers, and overall smoother operation. Now, you can move on to the final step: installing the operating system on the new SSD.
Step 10: Install the operating system on the new SSD
With the new solid-state drive (SSD) successfully installed in your HP Sleekbook Envy 6, it’s time to install the operating system onto the SSD. Follow these steps to complete the installation:
- Boot from installation media: Insert the installation media (such as a USB drive or DVD) containing the operating system installation files into the appropriate drive of your laptop. Restart the laptop and enter the boot menu by pressing the designated key (often Esc, F2, or F12) during startup. Select the installation media as the boot device.
- Follow the installation wizard: The operating system installation will begin, and you will be guided through a series of prompts and options by the installation wizard. Follow the on-screen instructions, making sure to select the SSD as the destination for the new installation.
- Partition and format the SSD: During the installation process, you will be prompted to partition and format the SSD. Partitioning allows you to divide the SSD into separate sections, while formatting prepares it for the operating system to be installed. Select the appropriate partition and file system settings to proceed.
- Continue with the installation: Once you have completed the partitioning and formatting, the installation will proceed. The operating system files will be copied to the SSD, and the installation process may take some time to complete. Follow any additional prompts or settings that are presented.
- Configure the operating system: After the installation is finished, you will need to go through the initial setup process of the operating system. This may include selecting language preferences, creating user accounts, and configuring system settings.
- Install necessary drivers and updates: Once the operating system is up and running, it is essential to install any necessary drivers and updates for optimal performance. Visit the official HP website or use the manufacturer’s support software to download and install the latest drivers for your specific model.
- Restore backed-up data: With the operating system installed and updated, you can restore your backed-up files and data onto the new SSD. Use your chosen backup method (external storage or cloud storage) to retrieve your files and ensure they are properly transferred to the SSD.
By following these steps, you have successfully installed the operating system onto the new SSD in your HP Sleekbook Envy 6. Enjoy the improved performance and faster response times that the SSD brings to your laptop!
Conclusion
Congratulations! You have completed the installation of a solid-state drive (SSD) in your HP Sleekbook Envy 6. By following this step-by-step guide, you have transformed your laptop into a faster and more efficient machine. The SSD will provide quicker boot times, faster file transfers, and an overall smoother experience.
Throughout this process, you have gathered the necessary tools and materials, prepared the new SSD, backed up your important files and data, shut down and disconnected the laptop, removed the bottom cover, located the hard drive bay, removed the existing hard drive, installed the new SSD, reassembled the laptop, and installed the operating system on the new SSD. Each step was crucial to ensure a successful installation and to protect your laptop from any potential damage.
Now that your HP Sleekbook Envy 6 is equipped with an SSD, you can experience the numerous benefits it brings. Enjoy faster boot times, reduced loading times for applications, and improved overall system responsiveness. The increased speed and performance will enhance your productivity and user experience.
Remember to regularly update your operating system and drivers to ensure optimal performance from your HP Sleekbook Envy 6. Additionally, it’s a good habit to maintain regular backups of your important files and data to safeguard against any unforeseen circumstances.
We hope this guide has been helpful in assisting you with the installation of an SSD in your HP Sleekbook Envy 6. If you have any further questions or encounter any issues, it is always advisable to consult the official HP resources or seek professional assistance.
Enjoy your faster and more efficient HP Sleekbook Envy 6 with its newly installed solid-state drive!