Introduction
Resetting your Samsung Galaxy A12 to its factory settings can be a useful troubleshooting technique when you are experiencing issues with your device or if you are planning to sell or give it away. By performing a factory reset, you can erase all the data, apps, and settings on your phone, restoring it to its original state.
It’s important to note that a factory reset will result in the loss of all data on your device, so it’s crucial to back up any important files or settings before proceeding. Once the reset is complete, your Samsung Galaxy A12 will be like a brand new phone, ready for you to set up and customize from scratch.
In this article, we will guide you through the step-by-step process of how to factory reset your Samsung Galaxy A12. Before we jump into the instructions, make sure to follow the steps carefully and double-check that you have all the necessary information and backups.
Step 1: Backup your data
Before proceeding with the factory reset, it’s essential to backup all the data on your Samsung Galaxy A12. This step is crucial to ensure that you don’t lose any important files, contacts, messages, or app data during the reset process.
There are several methods you can use to back up your data:
- Cloud backup: One of the easiest ways to backup your data is by utilizing a cloud storage service. Samsung devices come with Samsung Cloud, which offers free storage for backing up your contacts, messages, settings, app data, and more. Open the Settings app, navigate to Accounts and backup > Backup and restore > Back up data, and follow the prompts to back up your data to Samsung Cloud.
- Google account backup: If you have a Google account, you can use Google’s backup service to save your app data, Wi-Fi passwords, contacts, calendar entries, and more. Ensure that your device is connected to the internet, go to Settings > Accounts and backup > Backup and restore > Google Account, and enable the desired backup options.
- External storage: If you prefer to have a physical backup, you can connect your Samsung Galaxy A12 to a computer via USB and copy your files manually. Ensure that you have enabled File Transfer mode on your device, navigate to the internal storage, and copy the necessary files to your computer.
Regardless of the backup method you choose, it’s important to verify that your data has been successfully backed up to ensure a smooth transition after the factory reset. Take some time to review the backup settings and confirm that all the necessary data has been included in the backup.
Step 2: Power off the phone
Once you have backed up your data, the next step is to power off your Samsung Galaxy A12. Follow these simple instructions:
- Press and hold the power button located on the right side of your device.
- A power menu will appear on the screen with options like Power off, Restart, and Emergency mode.
- Select the “Power off” option by tapping on it.
- Your device will initiate the shutdown process, and the screen will turn off once it is powered off.
Ensure that your Samsung Galaxy A12 is completely powered off before proceeding to the next step. This step is vital to ensure a proper factory reset without any interruptions. Double-check that the screen is blank and there are no signs of power or activity.
Now that your device is powered off, you’re ready to move on to the next step in the factory reset process.
Step 3: Boot into recovery mode
Booting your Samsung Galaxy A12 into recovery mode allows you to access a dedicated system menu where you can perform various system-level operations, including the factory reset. Follow the steps below to enter recovery mode:
- Press and hold the volume up button located on the left side of your device.
- While still holding the volume up button, press and hold the power button as well.
- Continue holding both buttons until the Samsung logo appears on the screen.
- Once the logo appears, release both buttons to access the recovery menu.
Note: If you are having trouble entering recovery mode using the above method, try the alternate method below:
- Power off your device completely.
- Press and hold the volume up and volume down buttons simultaneously.
- While still holding the volume buttons, press and hold the power button as well.
- Keep holding all three buttons until the Samsung logo appears, and then release them to enter recovery mode.
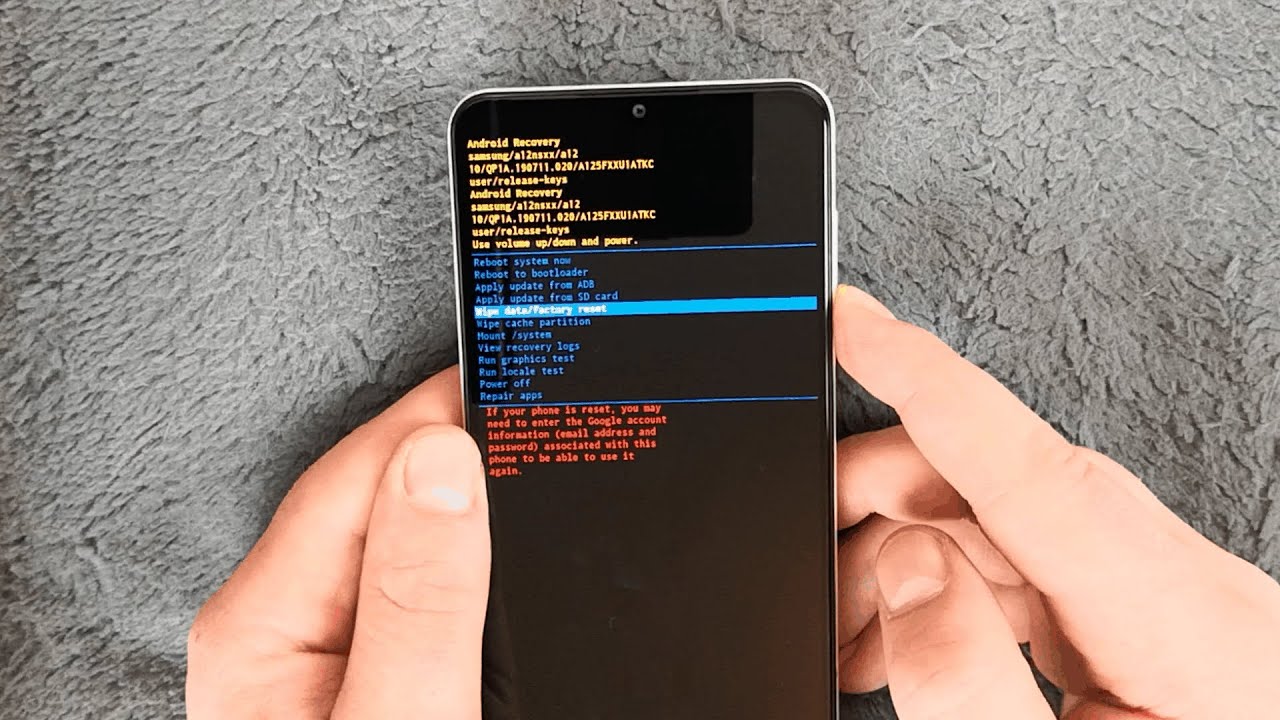
Once you have successfully entered recovery mode, you will see a menu with several options.
Now that you are in recovery mode, you can proceed to the next step of the factory reset process.
Step 4: Wipe data/factory reset
Now that you have successfully entered recovery mode on your Samsung Galaxy A12, it’s time to perform the actual factory reset. Follow these steps:
- Use the volume down button to navigate through the menu options, and highlight the “Wipe data/factory reset” option.
- Once the option is selected, press the power button to confirm your choice.
- A warning message will appear on the screen informing you that all data will be erased. Make sure you have backed up your data beforehand, as this action cannot be undone.
- Use the volume down button again to highlight the “Yes” option, and press the power button to proceed with the factory reset.
The factory reset process may take a few minutes to complete, as it wipes all data and restores your Samsung Galaxy A12 to its original factory settings.
It’s worth noting that some devices may provide additional options, such as wiping the cache partition or performing a system update. If you see these options, you can choose to wipe the cache partition to clear any temporary files and improve system performance. However, be cautious not to accidentally select the option to perform a system update, as this may interrupt the factory reset process.
Once the factory reset is completed, you’re ready to proceed to the next step.
Step 5: Confirm the reset
After performing the factory reset on your Samsung Galaxy A12, you need to confirm the reset before proceeding with the final steps. Follow these instructions to confirm the reset:
- In the recovery menu, use the volume down button to navigate to the “Reboot system now” option.
- Once the option is highlighted, press the power button to select it.
- Your device will now reboot and begin the process of starting up with the factory settings.
During the initial setup, you will be prompted to enter your preferred language, Wi-Fi connection details, and other settings. This is similar to the setup process when you first got your device.
It’s important to note that the rebooting process may take a few minutes, so be patient and refrain from interrupting the process.
Once your Samsung Galaxy A12 has successfully rebooted, you have completed the factory reset process. Your device is now restored to its original factory settings, free from any previous data or settings.
From here, you can begin customizing your device and reinstalling apps and data from your backup. Take this opportunity to set up your device with fresh settings and start anew.
Step 6: Reboot the device
After confirming the factory reset on your Samsung Galaxy A12, the final step is to reboot the device and complete the reset process. Here’s what you need to do:
- In the recovery menu, use the volume down button to navigate to the “Reboot system now” option.
- Once the option is highlighted, press the power button to select it.
- Your device will now initiate the reboot process, and you will see the Samsung logo on the screen.
- Wait for a few moments while your Samsung Galaxy A12 restarts.
Upon reboot, your device will start up with the factory settings. This means that all your personal data, apps, and settings have been erased, and your device is now in its original state.
From here, you can begin setting up your Samsung Galaxy A12 afresh, configuring your desired language, connecting to Wi-Fi, and customizing the settings to your preferences.
It’s a good idea to take this opportunity to update your device to the latest software version if available. This ensures that you have the latest security patches and bug fixes installed.
Congratulations! You have successfully completed the factory reset process on your Samsung Galaxy A12. Enjoy using your device with a fresh start!
Conclusion
Resetting your Samsung Galaxy A12 to its factory settings can be a powerful tool for resolving software issues, preparing to sell or give away your device, or simply starting anew. By following the step-by-step guide outlined in this article, you can confidently perform a factory reset and restore your device to its original state.
Remember to always back up your data before initiating a factory reset to prevent any data loss. Whether you choose to utilize cloud backup services, your Google account, or external storage options, make sure all your important files, contacts, messages, and app data are safely stored.
Once your data is backed up, proceed with powering off your Samsung Galaxy A12 and booting it into recovery mode. From there, you can easily navigate to the factory reset option and confirm your choice. After the reset is complete, reboot your device to finalize the process.
Keep in mind that a factory reset erases all personal data, apps, and settings on your device, returning it to its original state. Take the opportunity to set up your device with fresh preferences, update to the latest software version, and enjoy a streamlined experience.
We hope this guide has empowered you to perform a factory reset on your Samsung Galaxy A12 with confidence. Should you encounter any issues or need additional assistance, consult the official Samsung support resources or seek professional help to ensure a smooth reset process.
Now, go ahead and give your Samsung Galaxy A12 a fresh start!


