Introduction
Welcome to the world of iPads, where you can enjoy seamless connectivity and access to a wealth of information and entertainment. One of the first things you’ll want to do is connect your iPad to a Wi-Fi network so that you can browse the web, stream videos, download apps, and more. Whether you’re a tech-savvy individual or a newbie to the iPad world, this article will guide you through the simple steps to connect to Wi-Fi on your iPad.
Connecting to Wi-Fi on your iPad opens up a whole new realm of possibilities. You’ll be able to stay connected with friends and family through social media, catch up on emails, play multiplayer games, and much more. And the best part is, you can enjoy all of this without draining your cellular data.
Before we dive into the steps, make sure you’re in an area with a Wi-Fi network available. This could be in your home, at a café, or any other location with Wi-Fi access. Once you’re ready, let’s get started!
Step 1: Go to Settings
The first step to connect to Wi-Fi on your iPad is to locate the Settings app on your device. The Settings app is represented by a gray icon with gears, and it can usually be found on your home screen or in your app library.
To open the Settings app, simply tap on the icon. This will bring you to the main settings menu, where you can customize various aspects of your iPad’s functionality.
Once you’re in the Settings app, you’ll see a list of different options. These options are organized in sections, such as “General,” “Display & Brightness,” “Wi-Fi,” and more. To connect to Wi-Fi, we’ll need to navigate to the Wi-Fi settings.
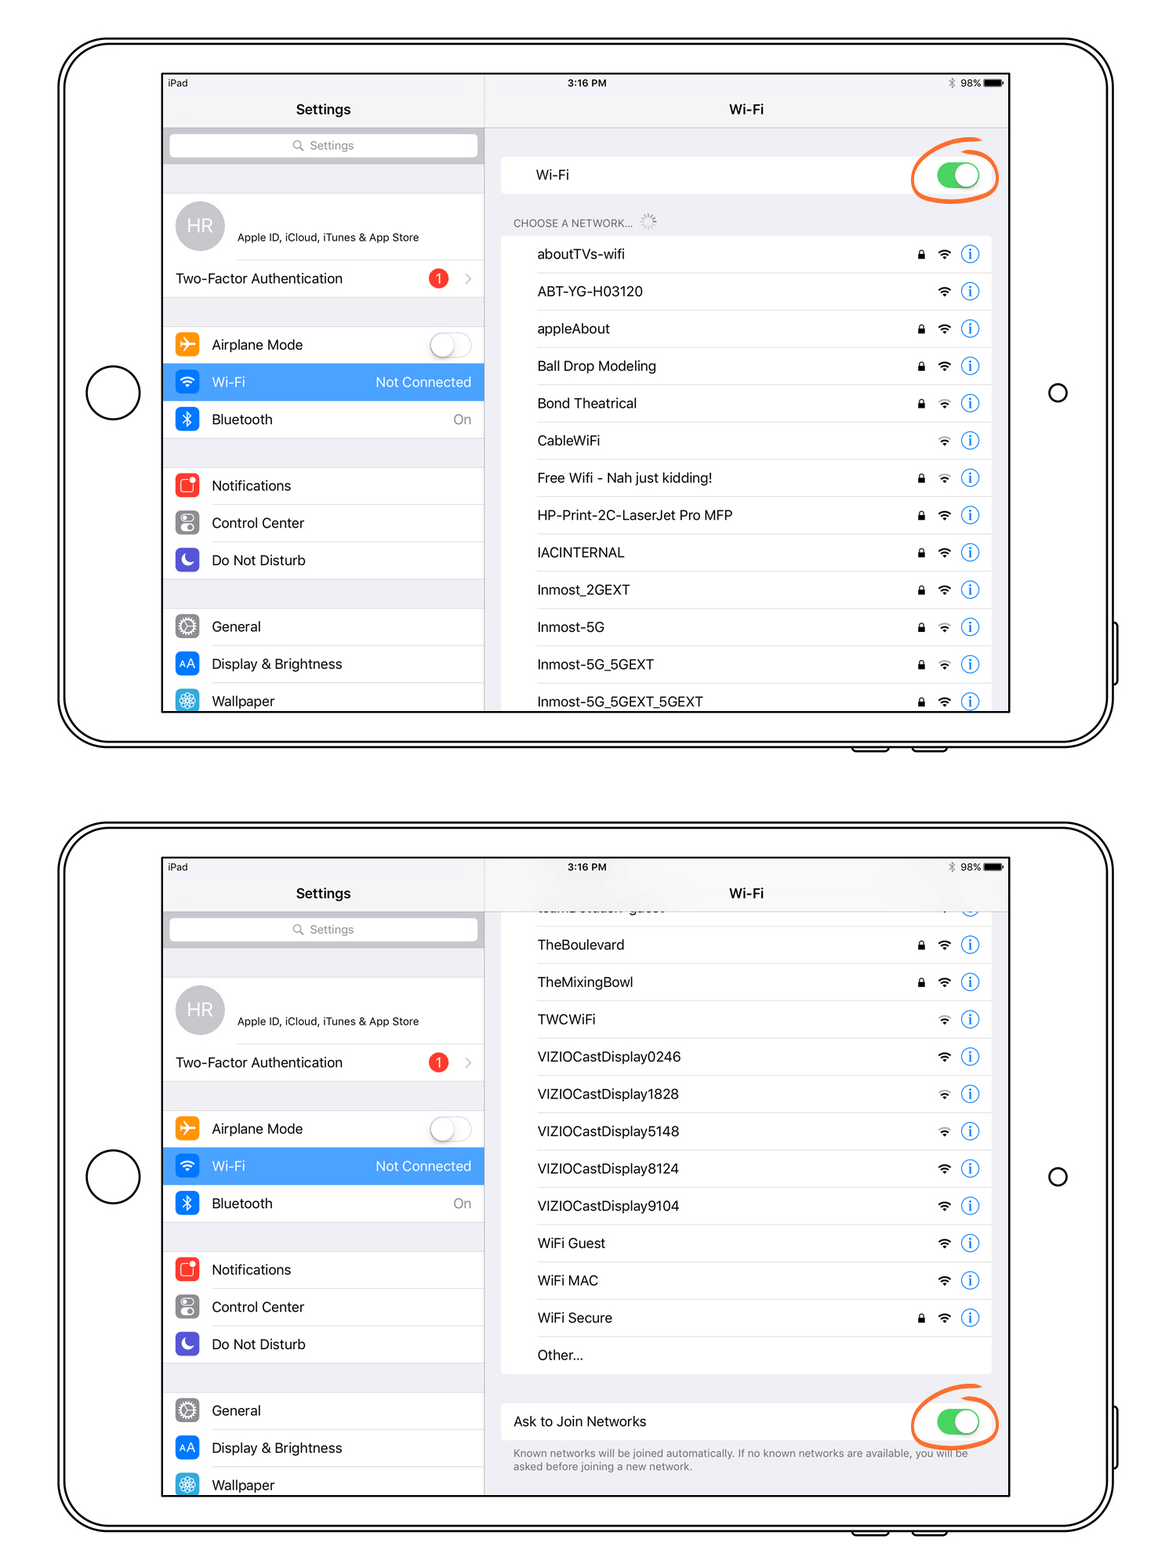
Scroll down the list of options until you find the “Wi-Fi” option. It should be located towards the top of the list, right below the “Bluetooth” option. When you see the Wi-Fi option, give it a tap to access the Wi-Fi settings.
After tapping on the Wi-Fi option, you’ll be presented with a screen that shows the Wi-Fi networks available in your area. This screen will display a list of networks with their respective names, signal strengths, and security features. If you’re in an area with multiple Wi-Fi networks, you may need to scroll to find the one you want to connect to.
Now that we’ve successfully navigated to the Wi-Fi settings, we’re ready to move on to the next step: turning on Wi-Fi.
Step 2: Tap on Wi-Fi
Now that you’re in the Wi-Fi settings screen, you’ll need to tap on the Wi-Fi option to proceed with connecting to a network.
On this screen, you’ll see a switch at the top that indicates whether Wi-Fi is turned on or off. If Wi-Fi is turned off, it will be displayed in gray and positioned to the left. To turn on Wi-Fi, simply tap on the switch once, and it will slide to the right, turning green and indicating that Wi-Fi is now enabled.
By enabling Wi-Fi, your iPad will start scanning for available Wi-Fi networks in the vicinity. The list of networks will appear below the switch, and you’ll notice that each entry displays the network name, signal strength, and a lock icon if the network requires a password.
It’s important to note that some public places may have open Wi-Fi networks that don’t require a password to connect. These networks are labeled as “Open” and can be accessed without any additional steps. However, if you’re connecting to a private network or a network that requires authentication, you’ll need to provide the necessary credentials.
Now that you’ve successfully turned on Wi-Fi and have access to the list of available networks, it’s time to move on to the next step: selecting a network to connect to.
Step 3: Turn on Wi-Fi
After tapping on the Wi-Fi option in the Settings app, you’ll be taken to a screen that displays the available Wi-Fi networks in your area.
At the top of the screen, you’ll see a switch that allows you to turn on or off the Wi-Fi functionality of your iPad. If the switch is set to off, which is indicated by a gray color and a position to the left, you won’t be able to connect to any Wi-Fi networks.
To turn on Wi-Fi, simply tap on the switch once. The switch will slide to the right, turning green and indicating that Wi-Fi is enabled. Once Wi-Fi is turned on, your iPad will start scanning for available networks in the vicinity.
Keep in mind that if you’re in an area with a lot of Wi-Fi networks, it may take a moment for your iPad to complete the scanning process and display the available networks. Be patient, and you’ll soon see a list of networks on the screen.
It’s important to note that the Wi-Fi switch in the Settings app applies to all apps and functions on your iPad. If Wi-Fi is turned off, you won’t be able to connect to the internet, browse websites, or use any internet-dependent apps.
On the other hand, if Wi-Fi is turned on, you’ll be able to connect to the internet and enjoy a faster and more stable connection compared to using cellular data. Additionally, using Wi-Fi instead of cellular data can help you save on your data costs, especially if you have limited data available.
Now that you’ve successfully turned on Wi-Fi on your iPad, it’s time to proceed to the next step: selecting a Wi-Fi network to connect to.
Step 4: Select a network
After turning on Wi-Fi on your iPad, you’ll be presented with a list of available Wi-Fi networks. This list will include both public and private networks in your vicinity.
To select a network to connect to, simply tap on the name of the network that you want to join.
When choosing a network, it’s essential to consider a few factors. Firstly, you’ll want to select a network that is secure and trustworthy. Public networks, such as those found in cafes or airports, may be convenient, but they can also be susceptible to security risks.
It’s advisable to connect to a network that you recognize or trust. This can be a network in your home, workplace, or a network provided by a reputable establishment. These networks are typically password protected, ensuring a higher level of security for your data.
Once you tap on a network, your iPad will attempt to connect to it. You may see a loading icon next to the network name, indicating the connection process. If successful, your iPad will establish a connection with the selected network.
It’s worth noting that if you’re connecting to a private network, you may be prompted to enter a password. The password is usually provided by the network owner or administrator and is necessary to access the network.
If you’re connecting to a public network, you may be redirected to a login or signup page where you’ll need to agree to terms and conditions or provide additional information before gaining access to the network.
Now that you’ve selected a network and initiated the connection process, it’s time to move on to the next step: entering the network password (if required).
Step 5: Enter network password (if required)
When connecting to a private Wi-Fi network, you may be required to enter a password to authenticate and gain access. This step ensures that only authorized users can connect to the network.
If the network you’ve selected requires a password, a prompt will appear on your iPad screen, asking you to enter the password.
To enter the network password, tap on the password field. The on-screen keyboard will open up, allowing you to type in the password. Make sure to enter it carefully, as passwords are case-sensitive and any mistakes will prevent your connection attempt from being successful.
If you’re unsure about the password, you can reach out to the network owner or administrator for assistance. They should be able to provide you with the correct password.
Keep in mind that some networks may have complex passwords containing a combination of letters, numbers, and special characters. Take your time to enter the password accurately, as incorrectly entered passwords will result in a failed connection attempt.
If you’re connecting to a network that you frequently use, you can enable the “Auto-Join” option. This option allows your iPad to automatically connect to the network whenever it is within range, without requiring you to enter the password each time. However, exercise caution when enabling this option, especially when connecting to public networks, as it can compromise your device’s security.
Once you’ve entered the network password, tap on the “Join” button. Your iPad will now attempt to authenticate using the provided password and establish a secure connection to the network.
If the password you entered is correct, your iPad will successfully connect to the network. A checkmark symbol or connected status should appear next to the network name in the Wi-Fi settings.
Now that you’ve entered the network password (if required) and established a connection, it’s time to move on to the next step: connecting to the network.
Step 6: Connect to the network
After successfully entering the password (if required) and establishing a connection, your iPad is now ready to connect to the Wi-Fi network.
To connect to the network, simply tap on the “Connect” button next to the network name in the Wi-Fi settings. Your iPad will then initiate the connection process.
During the connection process, you may see a loading icon next to the network name, indicating that your iPad is establishing a secure connection with the network. The time it takes to connect may vary depending on the network’s strength and other factors.
Once the connection is established, your iPad will display a confirmation message or a checkmark symbol next to the network name, indicating that you are now connected to the Wi-Fi network.
With a successful connection, your iPad can now take advantage of all the benefits of being connected to Wi-Fi. You can browse the internet, stream videos, download apps, and enjoy various online activities without using your cellular data.
It’s important to note that your iPad will automatically attempt to connect to known networks whenever you’re within range. This makes it convenient to connect to networks you’ve used before, as your iPad will remember the network and connect automatically without requiring you to go through the setup process again.
However, if you’re connecting to a new network or a network you haven’t used in a while, you may need to repeat the previous steps to connect.
Now that you’ve successfully connected to the Wi-Fi network, it’s time to move on to the final step: testing the connection to ensure it’s working properly.
Step 7: Test the connection
Once you’ve successfully connected to a Wi-Fi network on your iPad, it’s crucial to test the connection to ensure that everything is working properly. Testing the connection allows you to verify that you can access the internet, browse websites, and use online services without any issues.
To test the Wi-Fi connection, open your preferred web browser on your iPad. You can use Safari, Google Chrome, or any other browser you have installed.
Enter a website address or search for something in the search bar to initiate a browsing session. If the website loads and you can navigate through different pages, it indicates that your Wi-Fi connection is functioning correctly.
While testing the connection, you can also check the speed and stability of your Wi-Fi by opening websites with rich media content, such as streaming videos or playing online games. Smooth playback and quick loading times are positive indicators of a robust Wi-Fi connection.
If you encounter any issues during the testing phase, such as slow loading times, error messages, or inability to connect to certain websites, there are a few troubleshooting steps you can try:
- Restart your iPad: Sometimes, a simple restart can resolve temporary connectivity issues.
- Move closer to the Wi-Fi router: If you’re experiencing weak signal strength, moving closer to the router can improve the connection’s stability and speed.
- Forget and reconnect to the network: In the Wi-Fi settings, you can choose to forget the network you’re currently connected to and then reconnect to it. This can fix certain connectivity issues.
- Reset the network settings: If the problem persists, you can try resetting the network settings on your iPad. Keep in mind that this will delete saved Wi-Fi networks and passwords, so you’ll need to reconnect to them manually.
- Contact your internet service provider (ISP): If none of the above steps work, it may be necessary to reach out to your ISP to ensure there are no issues with your internet connection.
By testing the connection and taking the appropriate troubleshooting measures, you can ensure that your Wi-Fi connection on your iPad is reliable and allows you to enjoy uninterrupted internet access.
Congratulations! You have successfully connected to a Wi-Fi network on your iPad and tested the connection. Now you can fully enjoy all the benefits and possibilities that come with a seamless Wi-Fi experience.
Conclusion
Connecting to a Wi-Fi network on your iPad is a straightforward process that opens up a world of possibilities. By following the simple steps outlined in this guide, you can quickly and easily connect to Wi-Fi and enjoy fast and reliable internet access on your device.
Remember, the first step is to locate the Settings app on your iPad and navigate to the Wi-Fi settings. From there, you can turn on Wi-Fi, select a network, enter the password (if required), connect to the network, and finally, test the connection to ensure everything is working as expected.
Connecting to Wi-Fi on your iPad allows you to enjoy browsing the web, streaming videos, downloading apps, and engaging in various online activities without draining your cellular data. It also provides a more stable and faster internet connection, especially when compared to relying solely on cellular networks.
Throughout the process, be mindful of the network you connect to, opting for secure networks that you trust. If you encounter any issues, remember that there are troubleshooting steps you can take, such as restarting your iPad, repositioning yourself closer to the router, or resetting the network settings.
By successfully connecting to a Wi-Fi network and testing the connection, you can ensure that your iPad is always ready to connect to the internet and take advantage of all the features and benefits it offers.
Now that you have the knowledge and confidence to connect to Wi-Fi on your iPad, go ahead and explore the online world with ease and convenience!


