Introduction
Welcome to the world of wireless networking! Connecting to the internet wirelessly has become an essential part of our daily lives. And when it comes to wireless routers, Asus is a brand that stands tall among the competition.
Asus wireless routers are known for their reliability, speed, and advanced features that cater to the needs of both home users and businesses. Whether you’re setting up a new Asus router or trying to connect to an existing one, this article will guide you through the process.
Setting up your Asus wireless router might seem like a daunting task at first, but with a few simple steps, you’ll be able to enjoy a seamless internet experience in no time. In this article, we will walk you through the necessary steps to connect to your Asus wireless router and get you up and running.
Before we dive into the technical details, make sure you have the necessary equipment ready. You’ll need an Asus wireless router, a modem, an Ethernet cable, and a device with Wi-Fi capabilities such as a laptop, smartphone, or tablet. Once you have everything you need, let’s get started!
Note: The steps outlined in this article are intended for general Asus wireless router models. Some models may have slight variations in terms of setup and configuration, but the fundamental principles remain the same.
Step 1: Connecting the router to a power source
The first step in setting up your Asus wireless router is to connect it to a power source. This will provide the necessary electrical power to run the router and ensure its functionality.
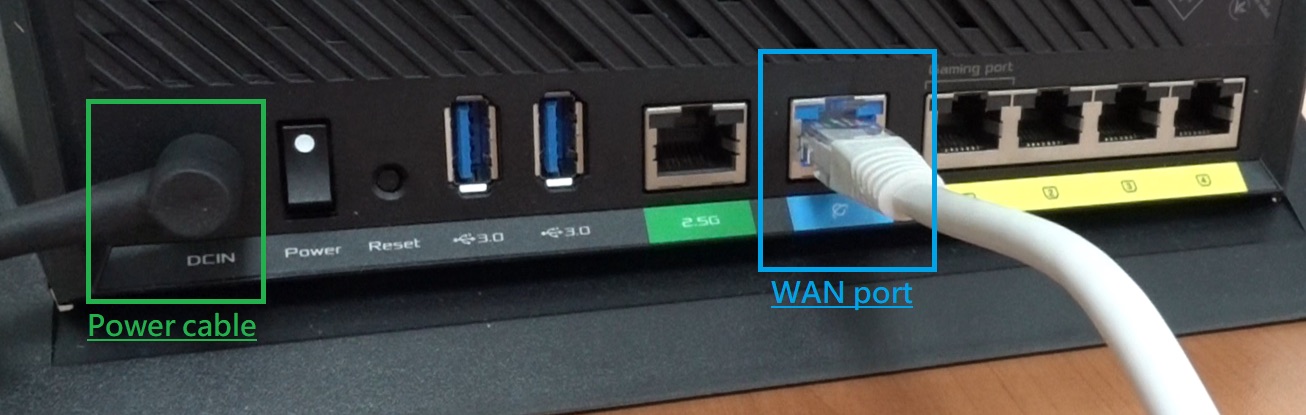
Locate the power adapter that came with your Asus router. Plug one end of the power adapter into the designated port on the back of the router. The port is usually labeled “Power” or indicated with a lightning bolt symbol.
Next, find a suitable power outlet near the location where you want to set up your router. Ensure that the outlet is easily accessible and not obstructed by any furniture or objects. Plug the other end of the power adapter into the power outlet.
Once the router is connected to the power source, you should see lights or indicators on the front panel of the router. These lights indicate that the router has power and is functioning properly.
Give the router a few moments to initialize and boot up. During this time, the lights on the router may flash or blink as it goes through the startup process. Be patient and wait for the lights to stabilize.
It’s important to note that you should not forcefully turn off or unplug the router while it’s booting up or in use. This can lead to potential damage or data loss. If you ever need to power off the router, make sure to do so properly by using the power button or unplugging it only when it’s idle.
By following this simple step, you have successfully connected your Asus wireless router to a power source. Now, let’s move on to the next step of connecting your router to your modem.
Step 2: Connecting the router to your modem
Once you’ve connected your Asus wireless router to a power source, the next step is to establish a connection between the router and your modem. This connection will allow the router to receive internet signals from the modem and distribute them to your devices wirelessly.
Locate the Ethernet cable that came with your Asus router. One end of the cable should have an RJ-45 connector, which looks similar to a larger telephone cable connector. Plug one end of the Ethernet cable into the yellow or WAN port on the back of the router. The WAN port is specifically designed to connect to your modem.
Next, locate the LAN port on your modem. It is usually labeled as “LAN” or “Ethernet” and is typically colored differently from the other ports. Plug the other end of the Ethernet cable into the LAN port on your modem.
Now that the physical connections are established, power on your modem. Wait for it to fully boot up and establish a connection with your internet service provider. This process may take a few minutes, so be patient.
As the modem establishes a connection, the router will automatically detect it and establish a connection of its own. Pay attention to the lights on both the modem and router. Once the lights stabilize or indicate a successful connection, you can move on to the next step.
It’s important to ensure that your modem is compatible with your router. Check the specifications and requirements of both devices. If you encounter any issues with the connection, you may need to consult the user manuals or contact the manufacturer’s customer support for further assistance.
With the router successfully connected to your modem, you’re one step closer to enjoying a wireless internet connection. In the next step, we will guide you through the process of connecting to your router’s wireless network.
Step 3: Connecting to the router’s wireless network
Now that your Asus wireless router is connected to your modem, it’s time to connect to the router’s wireless network. This will allow you to access the internet wirelessly on your devices.
On your device with Wi-Fi capabilities, such as a laptop, smartphone, or tablet, open the Wi-Fi settings. This can usually be found in the settings app or system tray of your device. Look for the Wi-Fi icon, which is typically represented as a series of signal bars.
In the list of available Wi-Fi networks, you should see the name or SSID (Service Set Identifier) of your Asus router’s network. The default SSID is often a combination of the manufacturer’s name and model number, or it may be labeled on a sticker on the router itself.
Select your Asus router’s network from the list. If prompted, enter the Wi-Fi password or network key. The default password is usually printed on a sticker on the router, but it’s recommended to change it for security reasons. If you have previously set up a custom password, enter that instead.
After entering the correct password, your device will attempt to connect to the router’s wireless network. You may see a spinning icon or progress bar as the connection is established. Once connected, the Wi-Fi icon on your device will indicate a successful connection.
If you encounter any issues connecting to the wireless network, make sure you’re within range of the router and that there are no physical obstructions interfering with the signal. You may also try restarting your device and router to resolve any temporary connectivity issues.
Congratulations! You are now connected to your Asus wireless router’s network. In the next step, we will guide you through the process of logging into the router’s settings page to configure the wireless settings.
Step 4: Logging into the router’s settings page
After connecting to your Asus wireless router’s network, the next step is to log into the router’s settings page. This will allow you to configure various settings and customize your wireless network according to your preferences.
Open a web browser on your device that is connected to the router’s network. In the address bar, enter the default IP address for Asus routers, which is often “192.168.1.1” or “192.168.0.1”. Press Enter or Return on your keyboard to access the router’s login page.
You will be prompted to enter a username and password to log in. By default, the username is usually “admin” and the password is either “admin” or “password”. If you have previously changed these credentials, enter your custom username and password.
Once you have entered the login credentials, click on the “Login” or “Submit” button to proceed. If the credentials are correct, you will be granted access to the router’s settings page. If you encounter any issues with the login process, consult the router’s user manual or contact the manufacturer’s support for assistance.
It is highly recommended to change the default login credentials for security purposes. Unauthorized access to your router’s settings page can lead to unwanted changes or unauthorized access to your network. Look for the “Administration” or “Management” section in the settings page to change the username and password.
Now that you have successfully logged into the router’s settings page, you can proceed to the next step of configuring the wireless settings to optimize your network performance and security.
It’s important to note that making changes to the router’s settings should be done with caution. Incorrect configuration can disrupt your network connection or cause other issues. If you’re unsure about any settings or need assistance, refer to the router’s user manual or consult the manufacturer’s support.
Step 5: Configuring the wireless settings
Now that you’re logged into the router’s settings page, you can proceed to configure the wireless settings to optimize your network performance and customize your wireless network according to your needs.
In the router’s settings page, look for the “Wireless” or “Wi-Fi” section. This is where you can make changes to the wireless network settings.
First, you can change the network name or SSID (Service Set Identifier) of your wireless network. Look for the field labeled “SSID” and enter the desired name for your network. This is the name that will appear when devices search for available Wi-Fi networks.
If you want to further secure your wireless network, consider enabling encryption. Look for the security settings or encryption options in the wireless settings. It is recommended to use WPA2 (Wi-Fi Protected Access 2) encryption for maximum security. Set a strong password or network key that is not easily guessable.
Another important aspect to consider is the wireless channel. By default, the router will automatically select a channel, but you can manually choose a channel to avoid interference from neighboring networks. Look for the channel settings in the wireless section and select a channel with minimal interference.
Additionally, you can also adjust other advanced settings such as transmission power, bandwidth, and QoS (Quality of Service) to optimize your wireless network’s performance.
Once you have made the desired changes, remember to save the settings. Look for the “Apply” or “Save” button in the router’s settings page to apply the changes. The router may reboot or apply the new settings, so be patient during this process.
After applying the changes, your wireless network will be configured according to your preferences. Any devices connected to the network will need to reconnect using the updated network name and password.
Remember to periodically check and update your wireless network settings as needed to ensure optimal performance and security.
With the wireless settings configured to your liking, you’re almost done! In the next step, we will guide you through the process of setting up password protection for your network to prevent unauthorized access.
Step 6: Setting up password protection for your network
Securing your wireless network with a strong password is essential to prevent unauthorized access and protect your privacy. In this step, we will guide you through the process of setting up password protection for your Asus wireless network.
In the router’s settings page, navigate to the “Wireless” or “Wi-Fi” section, where you made the previous configuration changes.
Look for the security settings or encryption options. Select the WPA2 (Wi-Fi Protected Access 2) encryption method, as it is the most secure option available.
Next, locate the field or option related to the network password or passphrase. Enter a strong password that is difficult to guess. A strong password should include a combination of upper and lowercase letters, numbers, and special characters. Avoid using common or easily guessable passwords.
Once you have entered the new password, save the settings and apply the changes. The router may need to reboot or apply the new settings, so be patient during this process.
After the changes are applied, any device that wants to connect to your wireless network will be prompted to enter the password. Make sure to update the password on all your devices that use the wireless network.
Remember to keep your wireless network password secure and avoid sharing it with unauthorized individuals. Changing the password periodically is also a good practice to enhance security.
By setting up password protection for your network, you have taken an important step towards securing your wireless connection and preventing unauthorized access.
Congratulations! You have successfully completed the process of connecting to your Asus wireless router and configuring the necessary settings. Your wireless network is now ready to use.
Feel free to explore the additional features and settings in the router’s settings page to further customize and optimize your network. If you encounter any issues or have any questions, consult the router’s user manual or contact the manufacturer’s support for assistance.
Enjoy a seamless and secure wireless internet experience with your Asus wireless router!
Conclusion
Setting up and connecting to your Asus wireless router may initially seem like a complex task, but with the right guidance, it becomes a straightforward process. By following the steps outlined in this article, you have successfully connected your router to a power source, your modem, and configured the wireless settings to optimize your network performance and security.
Remember to keep your router’s firmware up to date to ensure the latest security patches and bug fixes. Regularly check for firmware updates on the manufacturer’s website or through the router’s settings page. Updating your firmware can enhance performance, stability, and security.
Additionally, make sure to periodically review and update your wireless network settings to meet your changing needs. This includes changing the network name, adjusting security settings, and updating the network password.
By taking the necessary steps to secure your wireless network with a strong password, you can prevent unauthorized access and protect your personal information from potential threats.
If you encounter any issues or need further assistance during the setup process, consult the router’s user manual or reach out to the manufacturer’s customer support. They will be able to provide specific guidance and troubleshooting for your Asus wireless router model.
We hope that this guide has helped you successfully set up and connect to your Asus wireless router. Enjoy the convenience, speed, and reliability of your wireless network as you explore the vast possibilities of the internet.
Happy browsing!