Introduction
Welcome to the world of vibrant colors and stunning visuals on your Samsung Smart TV! Your television comes equipped with an array of advanced settings that allow you to customize the color output according to your preferences. Whether you want to enhance the brightness and contrast, fine-tune color settings, or calibrate the color temperature, this guide will walk you through the steps to adjust the color on your Samsung Smart TV.
A well-calibrated picture can greatly enhance your viewing experience, making the images on your screen appear more realistic and engaging. By adjusting the color settings, you can ensure that the colors displayed on your TV accurately represent the content you’re watching, whether it’s a thrilling action movie, a stunning nature documentary, or your favorite sitcom.
Before diving into the intricacies of adjusting the color on your Samsung Smart TV, it’s essential to understand the different picture modes available. These modes, such as Standard, Movie, and Dynamic, have predefined settings optimized for specific types of content. Each mode has its own distinct characteristics, which can significantly impact the color output.
Throughout this guide, we’ll explore various methods to adjust the color on your Samsung Smart TV. From basic adjustments of brightness and contrast to more advanced settings like color balance and saturation, you’ll have the tools to create a truly personalized visual experience. We’ll also cover how to save your settings and reset them if needed.
So, grab your remote control, sit back, and get ready to unlock the full potential of your Samsung Smart TV by learning how to adjust the color settings. Let’s dive in and discover the steps to bring your favorite movies, shows, and games to life with stunning color accuracy!
Understanding the Different Picture Modes
When it comes to adjusting the color on your Samsung Smart TV, understanding the different picture modes is a crucial first step. Picture modes are preconfigured settings that optimize display settings based on the type of content you’re watching. Let’s take a closer look at the most common picture modes and their characteristics:
- Standard Mode: This is the default picture mode on your Samsung Smart TV. It offers a balanced mix of brightness, contrast, and color settings suitable for everyday viewing. However, keep in mind that the color output might not be as vibrant or accurate as in other modes.
- Movie Mode: Designed for movie enthusiasts, this mode enhances picture quality and delivers a more cinematic experience. It typically reduces brightness and sharpness while providing a warmer color tone, giving movies a more natural and immersive feel.
- Dynamic Mode: If you want your TV to deliver vivid and eye-catching visuals, Dynamic mode is the way to go. It boasts increased brightness, sharper contrast, and punchy colors. This mode is ideal for well-lit environments or when you want to make your games and sports events truly pop.
- Game Mode: As the name suggests, Game mode optimizes display settings for gaming. It prioritizes low input lag and faster response times, providing a smooth and immersive gaming experience. The color settings in this mode are typically vibrant to enhance in-game visuals.
- Expert or Calibrated Mode: Samsung Smart TVs often include an Expert or Calibrated mode tailored for precise picture calibration. These modes provide a neutral color balance and more accurate colors, making them ideal for professional users or those who want to fine-tune their TV’s color output to match their specific preferences.
It’s essential to experiment with these different picture modes to find the one that suits your viewing preferences and the type of content you frequently consume. Remember, you can always switch between picture modes to optimize the display settings for different movies, shows, games, or even your day-to-day TV experience.
Now that you have a better understanding of the various picture modes available on your Samsung Smart TV, let’s dive deeper into how you can adjust the color settings within each mode to create a personalized visual experience. We’ll explore the steps to fine-tune brightness and contrast, calibrate color temperature, adjust color balance and saturation, and more. So, let’s move on to the next section and unlock the full potential of your TV’s color capabilities!
Adjusting Brightness and Contrast
One of the fundamental aspects of adjusting the color on your Samsung Smart TV is fine-tuning the brightness and contrast settings. These settings significantly impact the overall picture quality, allowing you to achieve the desired level of luminosity and detail. Here’s how you can adjust the brightness and contrast on your Samsung Smart TV:
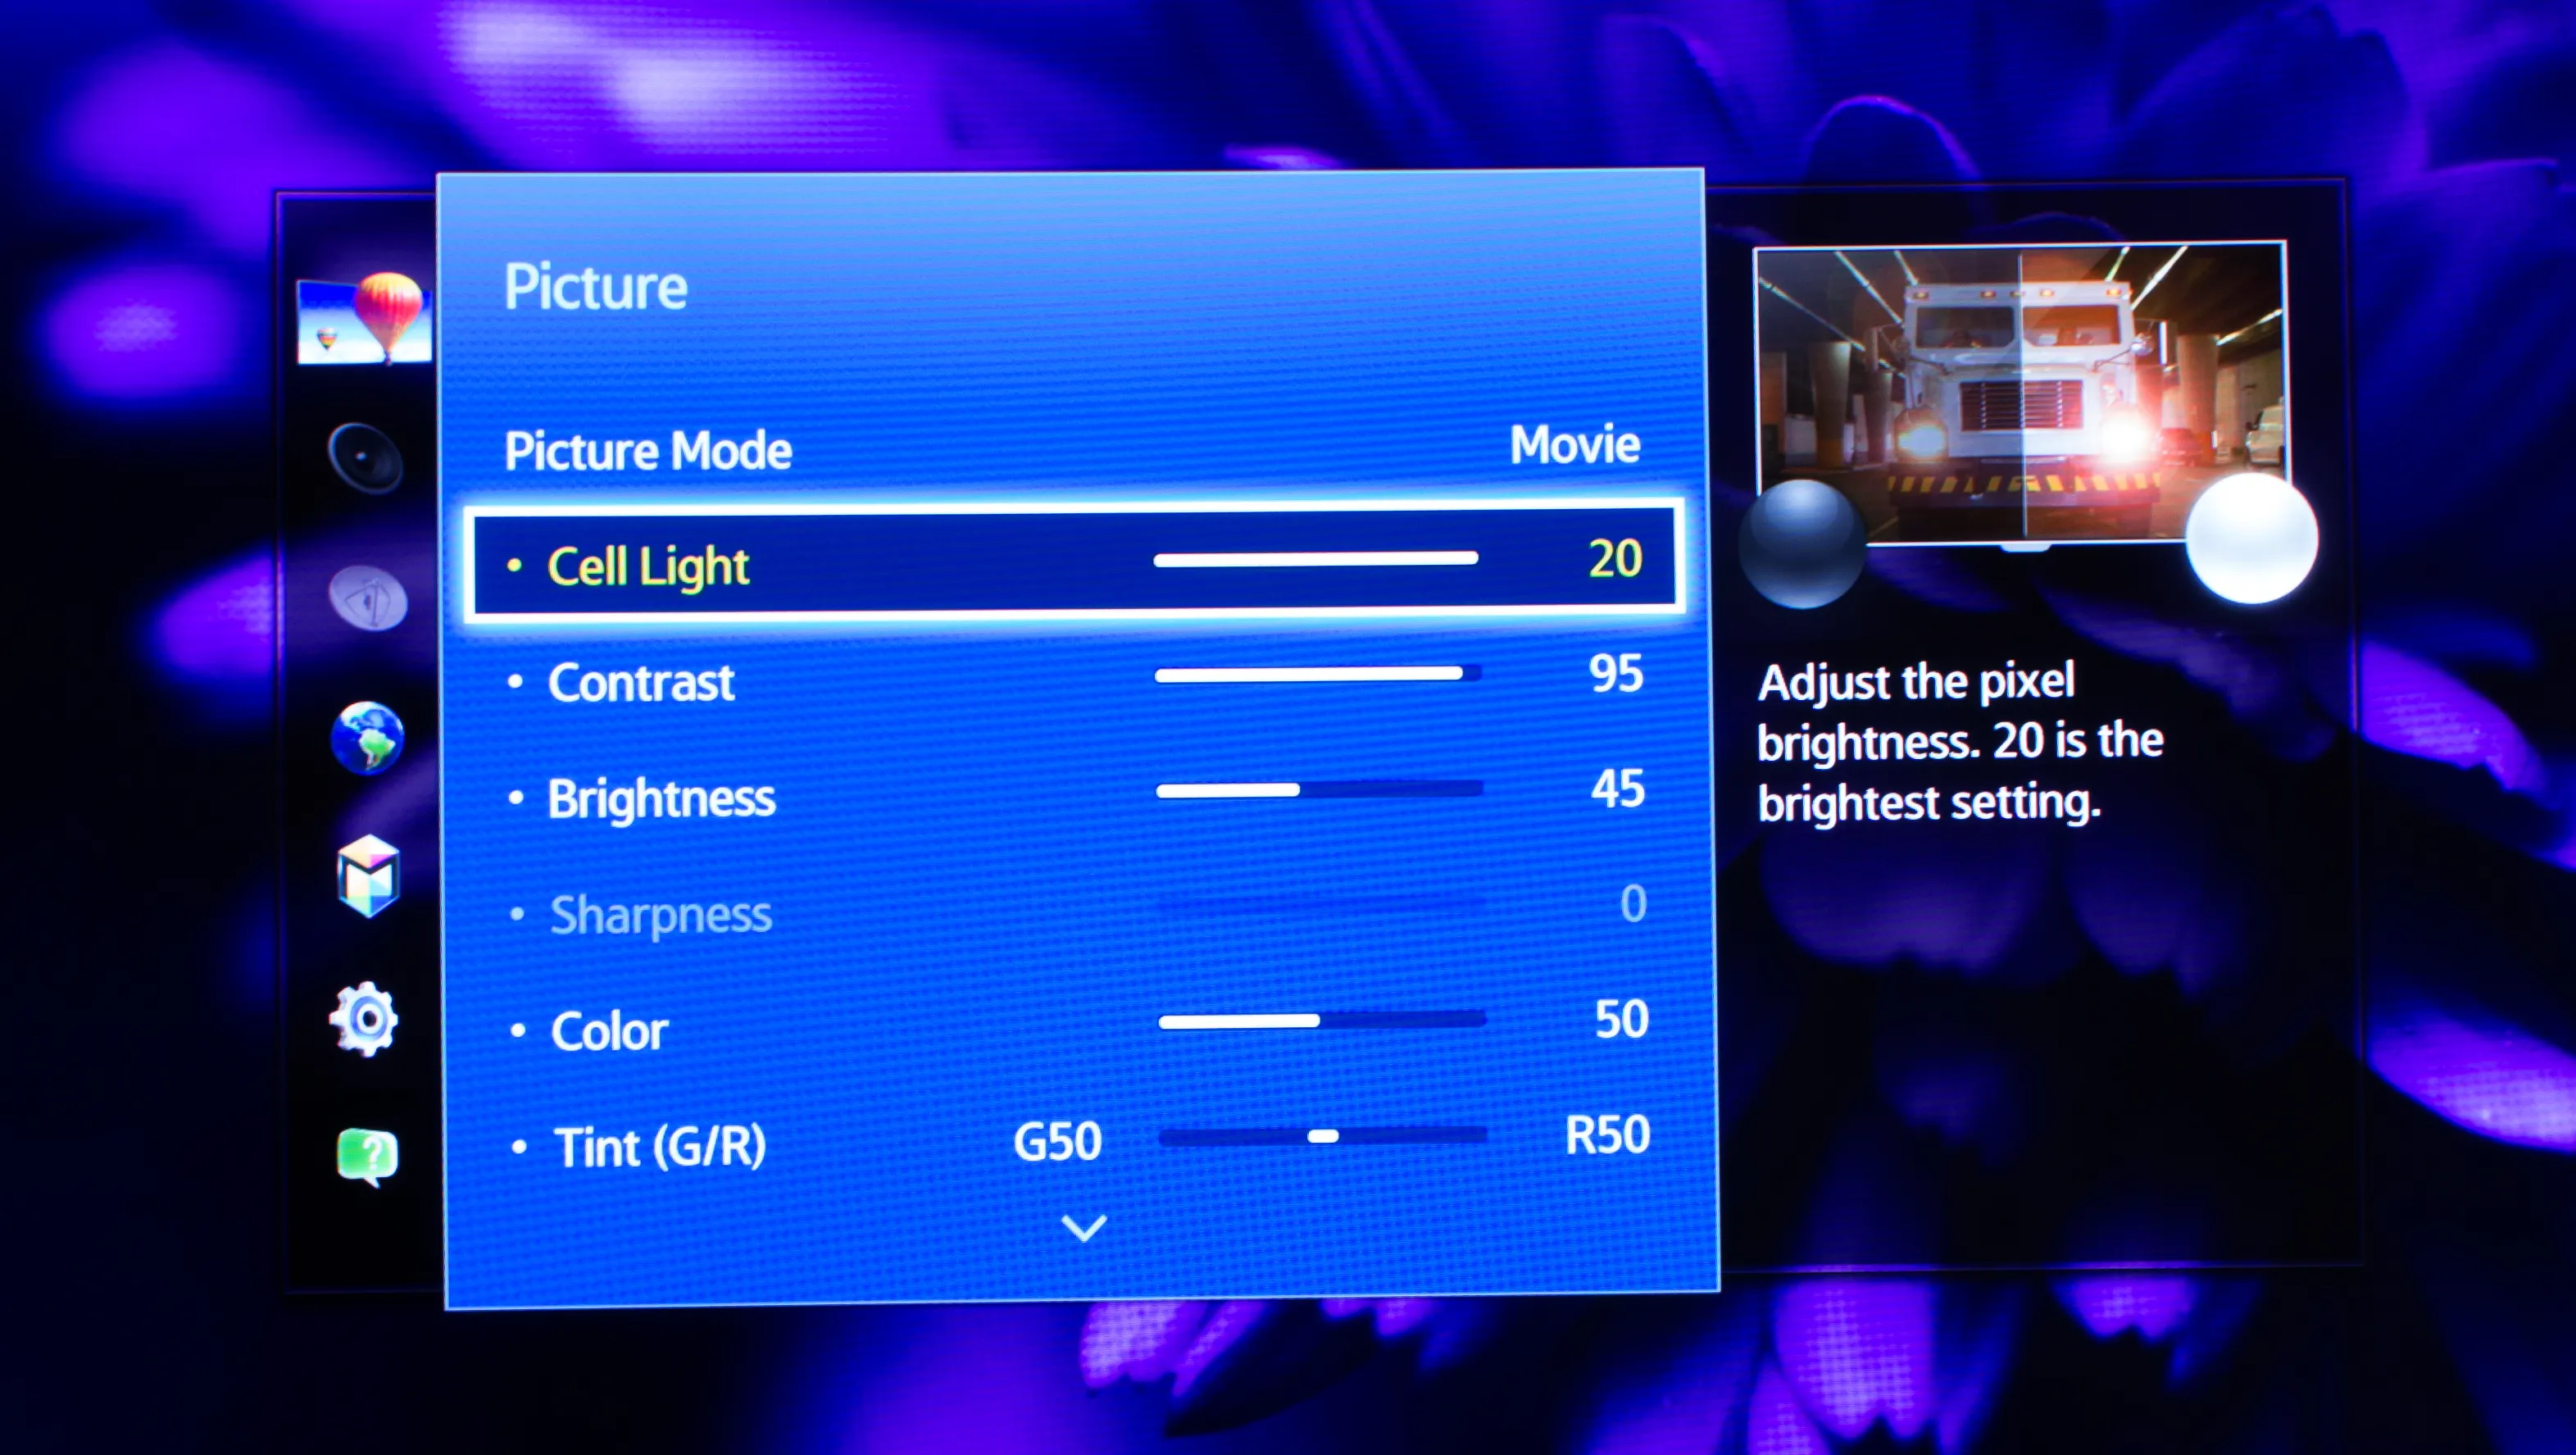
- Brightness: The brightness controls the intensity of the backlight, influencing how bright the overall image appears. To adjust the brightness, navigate to the Picture Settings menu on your TV. Look for the option labeled “Brightness” and use the arrow keys on your remote control to increase or decrease the value. Increasing the brightness can make the image appear more vibrant, but be careful not to set it too high, as it may result in loss of detail in darker areas. Conversely, decreasing the brightness can enhance the visibility of dark scenes, but setting it too low may make the image too dim.
- Contrast: Contrast refers to the difference between the darkest and lightest parts of an image. It affects the level of detail and depth in a scene. To adjust the contrast, navigate to the Picture Settings menu and locate the “Contrast” option. Use your remote control to adjust the contrast level to your liking. Increasing the contrast can make the image appear more vibrant and enhance the overall visual impact. However, setting the contrast too high might result in loss of detail or “crushing” of dark areas. On the other hand, decreasing the contrast can improve the visibility of subtle details, but setting it too low may make the image appear flat or washed out.
When adjusting the brightness and contrast, it’s important to strike a balance between a visually pleasing image and maintaining the integrity of the content. Experiment with different levels and take note of how different scenes and content types appear. Keep in mind that lighting conditions in your viewing environment can also influence these settings, so consider adjusting them accordingly based on the ambient lighting in your room.
Make small adjustments and regularly refer back to reference images or trusted sources to ensure that the colors and contrasts are accurate. This can help you achieve a well-balanced and enjoyable viewing experience on your Samsung Smart TV.
Now that you’ve dialed in the brightness and contrast settings, let’s move on to the next section, where we’ll explore how to fine-tune the color settings on your Samsung Smart TV.
Fine-Tuning Color Settings
After adjusting the brightness and contrast to your liking, the next step in optimizing the color output of your Samsung Smart TV is to fine-tune the color settings. This allows you to adjust individual color parameters, such as red, green, and blue, to achieve accurate and vibrant colors on your screen. Here’s how you can fine-tune the color settings on your Samsung Smart TV:
- Color Temperature: Color temperature refers to the overall warmth or coolness of the displayed colors. It is measured in Kelvin (K) and is typically adjusted on a scale ranging from warm (reddish) to cool (bluish). To adjust the color temperature, go to the Picture Settings menu and locate the “Color Temperature” option. Select the desired temperature setting that matches your preference or the specific content you’re watching. For a more natural representation of colors, a lower color temperature value (e.g., 6000K) is recommended, while higher values (e.g., 8000K) can make the colors appear cooler.
- Color Balance: The color balance allows you to fine-tune the intensity of individual primary colors: red, green, and blue. This adjustment ensures that the colors displayed on your Samsung Smart TV are accurate and well-balanced. To adjust the color balance, navigate to the Picture Settings menu and find the “Color Balance” or “White Balance” option. Use the remote control to adjust the intensity of each color until you achieve a visually pleasing and natural balance. A common method is to use reference images or videos to ensure that skin tones and other colors appear accurate.
- Color Saturation: Color saturation determines the intensity or richness of colors on your screen. To adjust the color saturation, locate the “Color” or “Saturation” option in the Picture Settings menu. Adjust the value to increase or decrease the intensity of colors according to your preference. Increasing the saturation can make the colors more vibrant and eye-catching, while decreasing the saturation can result in a more subdued and muted color palette.
When fine-tuning your color settings, it’s helpful to use reference images or videos with accurate color representation to guide you. These can be found online or through calibration tools designed for TVs. By comparing the on-screen colors with the reference, you can ensure that the final output is as close to the intended color accuracy as possible.
Remember to make small adjustments and take breaks to allow your eyes to readjust. Sometimes, subtle changes can have a significant impact on how colors appear. Additionally, consider the ambient lighting conditions in your viewing environment, as they can affect your perception of colors. Adjust the color settings accordingly to compensate for any variations in lighting.
Now that you’ve fine-tuned the color settings, let’s move on to exploring additional color adjustment options on your Samsung Smart TV in the next section.
Calibrating Color Temperature
Calibrating the color temperature on your Samsung Smart TV ensures that the colors displayed on your screen are accurate and have the desired warmth or coolness. Color temperature is an important aspect of achieving a natural and balanced color palette. Here’s how you can calibrate the color temperature on your Samsung Smart TV:
- Access the Settings: Start by accessing the Picture Settings on your Samsung Smart TV. This can usually be done by pressing the “Menu” button on your remote control and navigating to the Picture or Display settings.
- Locate the Color Temperature Option: Once in the Picture Settings menu, find the option labeled “Color Temperature.” Depending on your TV model, it may be located under a sub-category like Picture Mode Settings or Advanced Settings.
- Select the Desired Color Temperature: Samsung Smart TVs typically offer different pre-set options for color temperature, such as Cool, Normal, Warm, or Custom. Choose the one that best suits your preference or the specific content you’re watching. Cool color temperature (higher Kelvin value) tends to make the images appear bluer, while warm color temperature (lower Kelvin value) creates a redder, cozier ambiance.
- Customize the Color Temperature: Some Samsung Smart TVs also provide the option to customize the color temperature further. This allows you to manually adjust the red, green, and blue color channels individually to achieve a precise color balance. Experiment with these adjustments until the on-screen colors appear accurate and visually pleasing to you.
It is important to note that an accurate color temperature may vary depending on personal preferences, viewing conditions, and the content being displayed. For example, warmer color temperatures may lend a more nostalgic or cozy feel to movies and TV shows, while cooler color temperatures might be preferred for gaming or vibrant visuals.
When calibrating the color temperature, it can be helpful to reference professionally calibrated monitors or displays to ensure accurate color reproduction. There are also calibration tools available that can assist you in achieving precise color temperature adjustments.
By calibrating the color temperature on your Samsung Smart TV, you can create an immersive viewing experience with colors that truly reflect the intended artistic vision. Now that you’ve calibrated the color temperature, let’s explore further color adjustment options in the next section.
Using the Color Balance and Tint Controls
Aside from adjusting the color temperature, another way to fine-tune the color output on your Samsung Smart TV is by using the color balance and tint controls. These settings allow you to customize the intensity and hue of individual primary colors, resulting in a more accurate and visually pleasing color reproduction. Here’s how you can utilize the color balance and tint controls:
- Access the Picture Settings: Begin by accessing the Picture Settings menu on your Samsung Smart TV. This can typically be done by pressing the “Menu” button on your remote control and navigating to the Picture or Display settings.
- Locate the Color Balance and Tint Options: Once in the Picture Settings menu, look for options labeled “Color Balance” or “White Balance.” These options allow you to adjust the intensity of the primary colors – red, green, and blue. Additionally, you might also find a “Tint” option, which controls the hue or color balance between the primary colors.
- Adjust the Color Balance: Use your remote control to individually adjust the intensity or strength of each primary color to achieve a visually balanced output. Increasing the intensity of a specific color can make it more vibrant and dominant, while decreasing it can create a more subdued effect.
- Tweak the Tint: The tint control determines the balance of colors between the primary colors, typically red and green. Adjusting the tint allows you to achieve a more accurate reproduction of skin tones and overall color balance. Experiment with the tint adjustment until you achieve a natural and visually pleasing tint gradient.
As you make adjustments to the color balance and tint controls, it can be helpful to reference trusted sources or images with known color accuracy. This can ensure that the colors on your Samsung Smart TV display as intended, particularly for skin tones and other natural colors.
Keep in mind that small adjustments can have a significant impact on the final output. It’s advisable to make gradual changes and take breaks to readjust your eyes to avoid overcompensating or creating an unnatural color balance. Regularly recalibrate your adjustments and fine-tune the color balance until you achieve the desired result.
Now that you’ve learned how to utilize the color balance and tint controls on your Samsung Smart TV, let’s move on to the next section, where we’ll explore how to adjust color saturation and make additional color adjustments.
Adjusting Color Saturation
An essential aspect of fine-tuning the color on your Samsung Smart TV is adjusting the color saturation. Color saturation refers to the intensity or richness of colors displayed on your screen. By adjusting the color saturation, you can create a more vibrant and visually appealing viewing experience. Here’s how you can adjust the color saturation on your Samsung Smart TV:
- Access the Picture Settings: Start by accessing the Picture Settings menu on your Samsung Smart TV. This can usually be done by pressing the “Menu” button on your remote control and navigating to the Picture or Display settings.
- Find the Color or Saturation Option: Once in the Picture Settings menu, locate the option labeled “Color” or “Saturation.” This option allows you to adjust the intensity or strength of the colors displayed on your screen.
- Adjust the Color Saturation: Use your remote control to increase or decrease the color saturation level. Increasing the saturation will make the colors look more vibrant, vivid, and eye-catching. On the other hand, decreasing the saturation will result in a more muted and subdued color palette.
- Experiment and Fine-Tune: As you adjust the color saturation, it’s important to find the right balance that suits your preferences and the content you’re viewing. Keep in mind that individual scenes or genres may require different levels of saturation to enhance their visual impact.
When adjusting the color saturation, it can be helpful to reference visually rich content, such as movies or images with vibrant colors. This will allow you to assess the impact of your adjustments and ensure that the colors appear accurate and visually pleasing.
Remember that moderation is key when adjusting color saturation. Overly saturated colors can result in an artificial or exaggerated look, while insufficient saturation may make the colors appear dull or lacking in vibrancy. Regularly review your adjustments and make small changes as needed to achieve the desired color saturation level.
It’s important to note that the ideal level of color saturation may vary depending on personal preference and the content being displayed. Experiment with different saturation levels to find the right balance for your viewing experience.
Now that you know how to adjust the color saturation on your Samsung Smart TV, let’s move on to exploring additional color adjustments you can make to further enhance the visual output.
Making Additional Color Adjustments
While adjusting color temperature, color balance, tint, and saturation can greatly enhance the color output on your Samsung Smart TV, there are a few more adjustments you can make to further fine-tune the visual experience. These additional color adjustments allow you to customize the color settings to your liking and ensure a more accurate and vibrant representation of the content you’re watching. Here are some additional color adjustments you can try:
- Sharpness: Fine-tuning the sharpness can impact the clarity and crispness of the images displayed on your Samsung Smart TV. Adjusting sharpness can help enhance details, particularly in scenes with intricate textures or edges. Access the Picture Settings menu and locate the “Sharpness” option. Use your remote control to increase or decrease the sharpness level according to your preference.
- Gamma: Gamma is responsible for controlling the brightness and contrast at different levels of luminance. It affects the overall brightness distribution and can impact the visibility of details in shadows and highlights. Access the Picture Settings menu and look for the “Gamma” option. Adjust the gamma level to achieve the desired brightness distribution and enhance the visibility of details.
- Color Gamut: Color gamut refers to the range of colors that can be displayed on your Samsung Smart TV. Some TVs offer options to adjust the color gamut, allowing you to expand or limit the range of colors. Access the Picture Settings menu and find the “Color Gamut” or “Color Range” option. Experiment with different color gamut settings to find the one that suits the content and your preference.
- Dynamic Contrast: Dynamic contrast settings adjust the contrast dynamically based on the content being displayed. Enabling dynamic contrast can enhance the differentiation between dark and light areas, resulting in a more vivid and impactful viewing experience. Access the Picture Settings menu and locate the “Dynamic Contrast” option. Enable or disable it based on your preference and the nature of the content you’re watching.
As with any adjustments, it’s essential to make these additional color adjustments in moderation and refer to reference images or videos to ensure accuracy. Regularly review the visual output and fine-tune the settings to achieve the desired balance between enhanced visuals and realistic color representation.
Experiment with different combinations of these additional color adjustments to find the optimal settings for your Samsung Smart TV. Remember that personal preferences and environmental factors, such as ambient lighting, can influence the ideal color settings for your viewing experience.
Now that you’ve explored the various options for adjusting color on your Samsung Smart TV, it’s time to learn how to save your color settings and reset them if needed. Let’s move on to the next section to discover how to do this.
Saving and Resetting your Color Settings
Once you have adjusted the color settings on your Samsung Smart TV to your liking, it’s essential to know how to save your customized settings for future use. Additionally, there may be times when you want to reset the color settings to their default values. Here’s how you can save and reset your color settings on your Samsung Smart TV:
- Saving Customized Settings: After making your desired color adjustments, access the Picture Settings menu on your Samsung Smart TV. Look for an option that allows you to save the current settings. This option is typically labeled “Save” or “Apply.” Select this option to save your customized color settings.
- Creating Picture Modes: Some Samsung Smart TVs offer the option to create and save different Picture Modes with customized settings. This allows you to switch between different sets of color settings easily. Explore the settings menus to see if this feature is available and create Picture Modes with the desired color configurations.
- Resetting to Default: If you wish to revert to the default color settings, locate the option labeled “Reset” or “Default” within the Picture Settings menu. Select this option to reset all color settings to their original values. This can be useful if you want to start afresh or if you made changes that didn’t yield the desired results.
- Factory Reset: In some cases, you may want to perform a factory reset to revert all TV settings, including color adjustments, back to their original state. This should be done with caution, as it will erase all personalized settings and preferences. Consult your TV’s user manual or support documentation to learn how to perform a factory reset if needed.
By saving customized color settings, you can easily switch between different configurations based on your preferences or the type of content you’re viewing. This allows for a more personalized and immersive viewing experience.
Remember to periodically review and adjust your color settings as needed, especially if you change your viewing environment or if you want to optimize the color output for different types of content.
Now that you know how to save and reset your color settings, you’re equipped to fine-tune the color on your Samsung Smart TV according to your exact preferences and enjoy a visually stunning viewing experience.
Conclusion
Adjusting the color on your Samsung Smart TV allows you to create a personalized and immersive viewing experience. By understanding the different picture modes, such as Standard, Movie, and Dynamic, you can optimize the color output based on the content you’re watching. Fine-tuning brightness and contrast helps you achieve the desired level of luminosity and detail, while calibrating color temperature ensures accurate color representation. Utilizing the color balance and tint controls allows you to customize the intensity and hue of individual primary colors, while adjusting color saturation enhances the vibrancy of the displayed colors. Additionally, making additional color adjustments, such as sharpness, gamma, color gamut, and dynamic contrast, further refines the visual output on your Samsung Smart TV.
Remember to make small adjustments, reference trusted sources or reference images, and consider the ambient lighting conditions in your viewing environment. It’s important to strike a balance between vibrant visuals and accurate color representation. Saving your customized settings or creating picture modes enables you to easily switch between different configurations, while resetting to default or performing a factory reset allows you to start fresh if needed.
With the knowledge and techniques outlined in this guide, you are now equipped to unlock the full potential of your Samsung Smart TV and create a visually captivating and true-to-life color experience. Enjoy the vibrant colors, stunning visuals, and immersive viewing experience that your Samsung Smart TV offers!