Introduction
Welcome to the world of Samsung Galaxy S5, where you can easily personalize your contacts by adding photos to them. Adding a photo to a contact not only makes it visually appealing, but also helps you identify and connect with your loved ones more easily. In this step-by-step guide, we will walk you through the process of adding a photo to a contact on your Samsung Galaxy S5.
Having a photo associated with a contact brings them to life and adds a personal touch to your phonebook. Whether it’s a picture of your family, friends, or colleagues, you can display their photo whenever they call or message you, making communication more enjoyable.
With the Samsung Galaxy S5, you have the flexibility to choose any photo you like from your gallery or even take a new photo on the spot. You can also edit and adjust the photo to your liking before saving it to the contact. By following the simple steps outlined in this guide, you’ll be able to add photos to your contacts in no time.
Let’s dive into the details and start personalizing your contacts with beautiful photos on your Samsung Galaxy S5.
Step 1: Open the Contacts app
To begin the process of adding a photo to a contact on your Samsung Galaxy S5, you need to open the Contacts app. The Contacts app is where you manage and store all your contacts, making it easy to access and update their information.
Here’s how you can open the Contacts app:
- Locate and tap on the “Contacts” app icon on your home screen or app drawer. The icon is usually represented by a person’s silhouette or a book with contacts.
- Once you tap on the Contacts app icon, the app will open, displaying a list of your saved contacts. You will see a search bar at the top, followed by an alphabetical list of your contacts.
- Scroll through the list or use the search bar to find the contact you want to add a photo to. Alternatively, you can use the search function by tapping on the magnifying glass icon and entering the name of the contact you are looking for.
Now that you have successfully opened the Contacts app and located the desired contact, you are ready to move on to the next step.
Step 2: Select the contact you want to add a photo to
Once you have opened the Contacts app on your Samsung Galaxy S5, it’s time to select the contact to whom you want to add a photo. By selecting the specific contact, you can access their details and make any necessary changes, including adding a photo.
Here’s how you can select the contact:
- Scroll through the list of contacts or use the search bar to find the contact you wish to add a photo to. You can usually locate the contact by their name or associated details.
- When you find the desired contact, tap on their name to open their contact details. This will display all the information associated with that particular contact, such as phone numbers, email addresses, and more.
By selecting the contact, you are now ready to proceed to the next step of adding a photo to the contact.
Step 3: Tap on the Edit icon
Now that you have selected the contact you want to add a photo to on your Samsung Galaxy S5, the next step is to tap on the Edit icon. Tapping on the Edit icon allows you to make changes to the contact’s information, including adding or updating their photo.
Here’s how you can tap on the Edit icon:
- Within the contact details screen, look for an icon that typically resembles a pencil or a notepad. This is the Edit icon and tapping on it will enable you to edit the contact’s information.
- Once you find the Edit icon, simply tap on it to enter editing mode for the contact. This will allow you to modify various fields and settings associated with the contact.
Tapping on the Edit icon is a crucial step as it grants you access to update the contact’s information, including adding a photo. Now that you are in editing mode, you are ready to proceed to the next step and add a photo to the contact.
Step 4: Tap on the camera icon or the existing contact photo
After entering the editing mode for the selected contact on your Samsung Galaxy S5, it’s time to proceed with adding a photo. To do this, you need to tap on either the camera icon or the existing contact photo.
Here are the two options you can choose from:
- Camera icon: Look for a camera icon within the contact editing screen. This icon is typically situated near the contact’s profile picture or at the top of the contact’s information. Tapping on the camera icon will allow you to either take a new photo or choose an existing photo from your gallery.
- Existing contact photo: If the contact already has a photo associated with their profile, it will be displayed in the contact editing screen. Simply tap on the existing contact photo to proceed with updating it.
Tapping on either the camera icon or the existing contact photo serves as a trigger for adding or modifying the photo. Now that you have tapped on the appropriate icon, you can move on to the next step and choose the photo you want to assign to the contact.
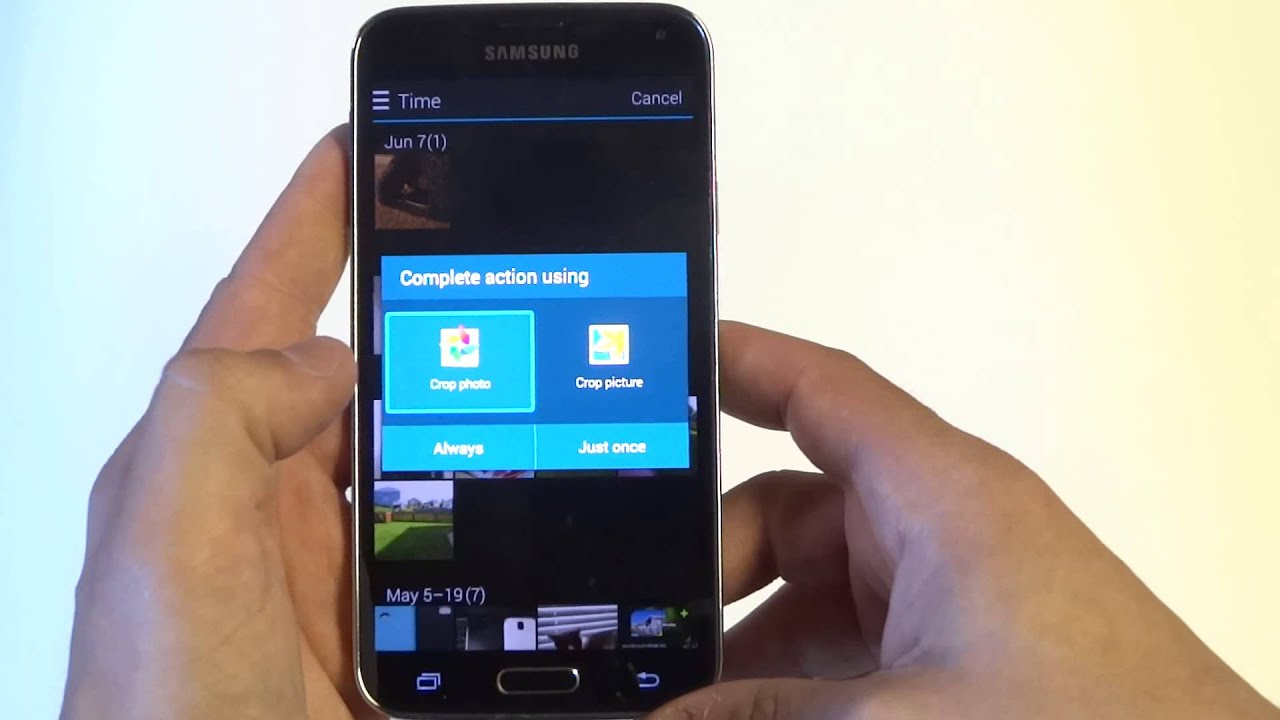
Step 5: Choose a photo from the gallery or take a new photo
After tapping on the camera icon or the existing contact photo, you will be presented with the option to choose a photo from your gallery or take a new photo on your Samsung Galaxy S5. This step allows you to select the perfect picture to assign to the contact.
Here’s how you can choose a photo:
- If you tapped on the camera icon, you will be directed to a screen where you can choose between taking a new photo or selecting an existing one from your gallery.
- To take a new photo, tap on the “Camera” option. This will launch your device’s camera, allowing you to capture a fresh image.
- If you prefer to select an existing photo, tap on the “Gallery” option. This will open your photo gallery, where you can browse through and choose the desired picture.
- Once you have selected the photo, simply tap on it to confirm your choice. The photo will then be assigned to the contact.
Choosing a photo from your gallery or taking a new photo gives you the opportunity to personalize the contact with an image that resonates with you. Now that you have successfully chosen a photo, you can proceed to the next step and make any necessary adjustments to the photo.
Step 6: Adjust the photo as needed
Now that you have chosen a photo for the contact on your Samsung Galaxy S5, you have the option to adjust and fine-tune it according to your preferences. This step allows you to make any necessary edits or modifications to the photo before saving it to the contact.
Here’s how you can adjust the photo:
- After selecting the photo, you will be taken to a screen where you can preview it.
- You may find various options and tools available to edit the photo. These options could include cropping, rotating, or applying filters to enhance the picture.
- Use your device’s touch screen controls to make the desired adjustments. For example, you can pinch to zoom, drag to crop, or use slider controls to adjust brightness, contrast, and other settings.
- Take your time to experiment with the available editing options until you are satisfied with the final result.
Whether you want to crop out unwanted elements, enhance the colors, or apply artistic filters, this step gives you the flexibility to customize the photo to your liking. Once you are done adjusting the photo, you are ready to move on to the final step and save the changes to the contact.
Step 7: Save the changes to the contact
After adjusting the photo to your satisfaction, it’s time to save the changes you have made and associate the photo with the contact on your Samsung Galaxy S5. Saving the changes ensures that the updated photo becomes the new profile picture of the contact.
Here’s how you can save the changes:
- Look for a “Save” or “Done” button on the screen that displays the edited photo.
- Tap on the “Save” or “Done” button to finalize the changes you have made to the contact.
- Upon saving, the updated photo will be automatically associated with the contact, becoming their new profile picture.
By saving the changes, you have successfully added the photo to the contact on your Samsung Galaxy S5. The next time you view the contact or receive a call or message from them, you will see their updated profile picture.
It’s worth noting that you can always revisit the contact’s details and make further changes to the photo or any other information related to the contact. This allows you to keep your contact book up to date and personalized with the latest photos and details.
Now that you have completed all the steps, you can enjoy the benefits of having personalized contact photos on your Samsung Galaxy S5.
Conclusion
Adding a photo to a contact on your Samsung Galaxy S5 is a simple and effective way to personalize your phonebook and make it more visually appealing. By following the step-by-step guide outlined above, you can easily add photos to your contacts and bring them to life.
Adding a photo to a contact offers several advantages. It allows you to quickly recognize and connect with the people in your life, making communication more enjoyable and efficient. Additionally, it adds a personal touch to your contacts, making them feel more meaningful and memorable.
The Samsung Galaxy S5 provides you with the flexibility to choose any photo from your gallery or capture a new photo on the spot. You can also make adjustments to the photo, such as cropping, rotating, or applying filters, to ensure it suits your preferences.
Remember that adding a photo is not a one-time process. You can always revisit the contact details and update the photo or make any other necessary changes. This allows you to keep your contact book up to date and reflect the most recent and meaningful images of your contacts.
So why wait? Start personalizing your contacts with beautiful and memorable photos on your Samsung Galaxy S5 today. Enjoy a more vibrant and visually appealing phonebook that brings your contacts to life.