Introduction
Installing a home security system is a crucial step in ensuring the safety and protection of your family and property. With the increasing number of burglaries and break-ins, it’s important to take proactive measures to secure your home. A home security system provides peace of mind by offering 24/7 monitoring, instant alerts, and the ability to remotely control and monitor your home even when you’re away.
However, the process of installing a home security system may seem daunting at first. From assessing your security needs to choosing the right equipment and installing it correctly, there are several steps that need to be taken to ensure a successful installation. This guide will walk you through the process, making it easier for you to install a home security system that meets your specific requirements.
Before diving into the installation process, it’s important to first understand your unique security needs. Assessing your home and identifying potential vulnerabilities is the initial step in determining the level of security measures required. Factors such as the size of your property, the number of entry points, and the level of risk in your neighborhood will help you determine the type and extent of security system you’ll need.
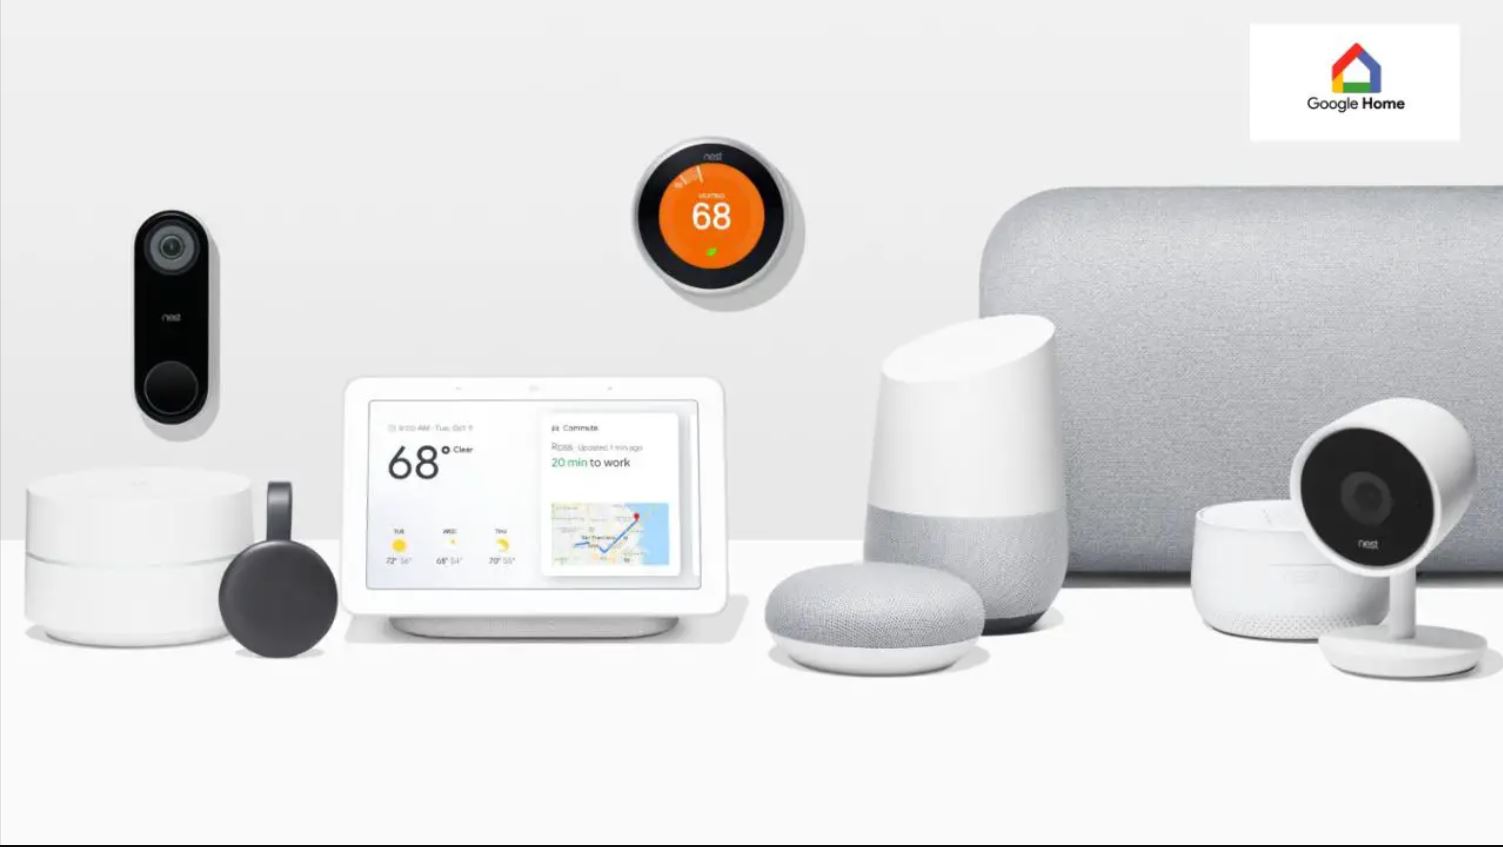
Once you have assessed your needs, it’s time to research the different types of home security systems available. There are various options to choose from, including wireless systems, wired systems, and smart home security systems. Each type has its own advantages and considerations, depending on your preferences and budget.
With your research complete, you’ll need to decide if you want to hire a professional installer or take the do-it-yourself (DIY) route. Professional installation can provide peace of mind, ensuring that the system is set up correctly. On the other hand, DIY installation offers the flexibility and cost savings to customize and install the system yourself.
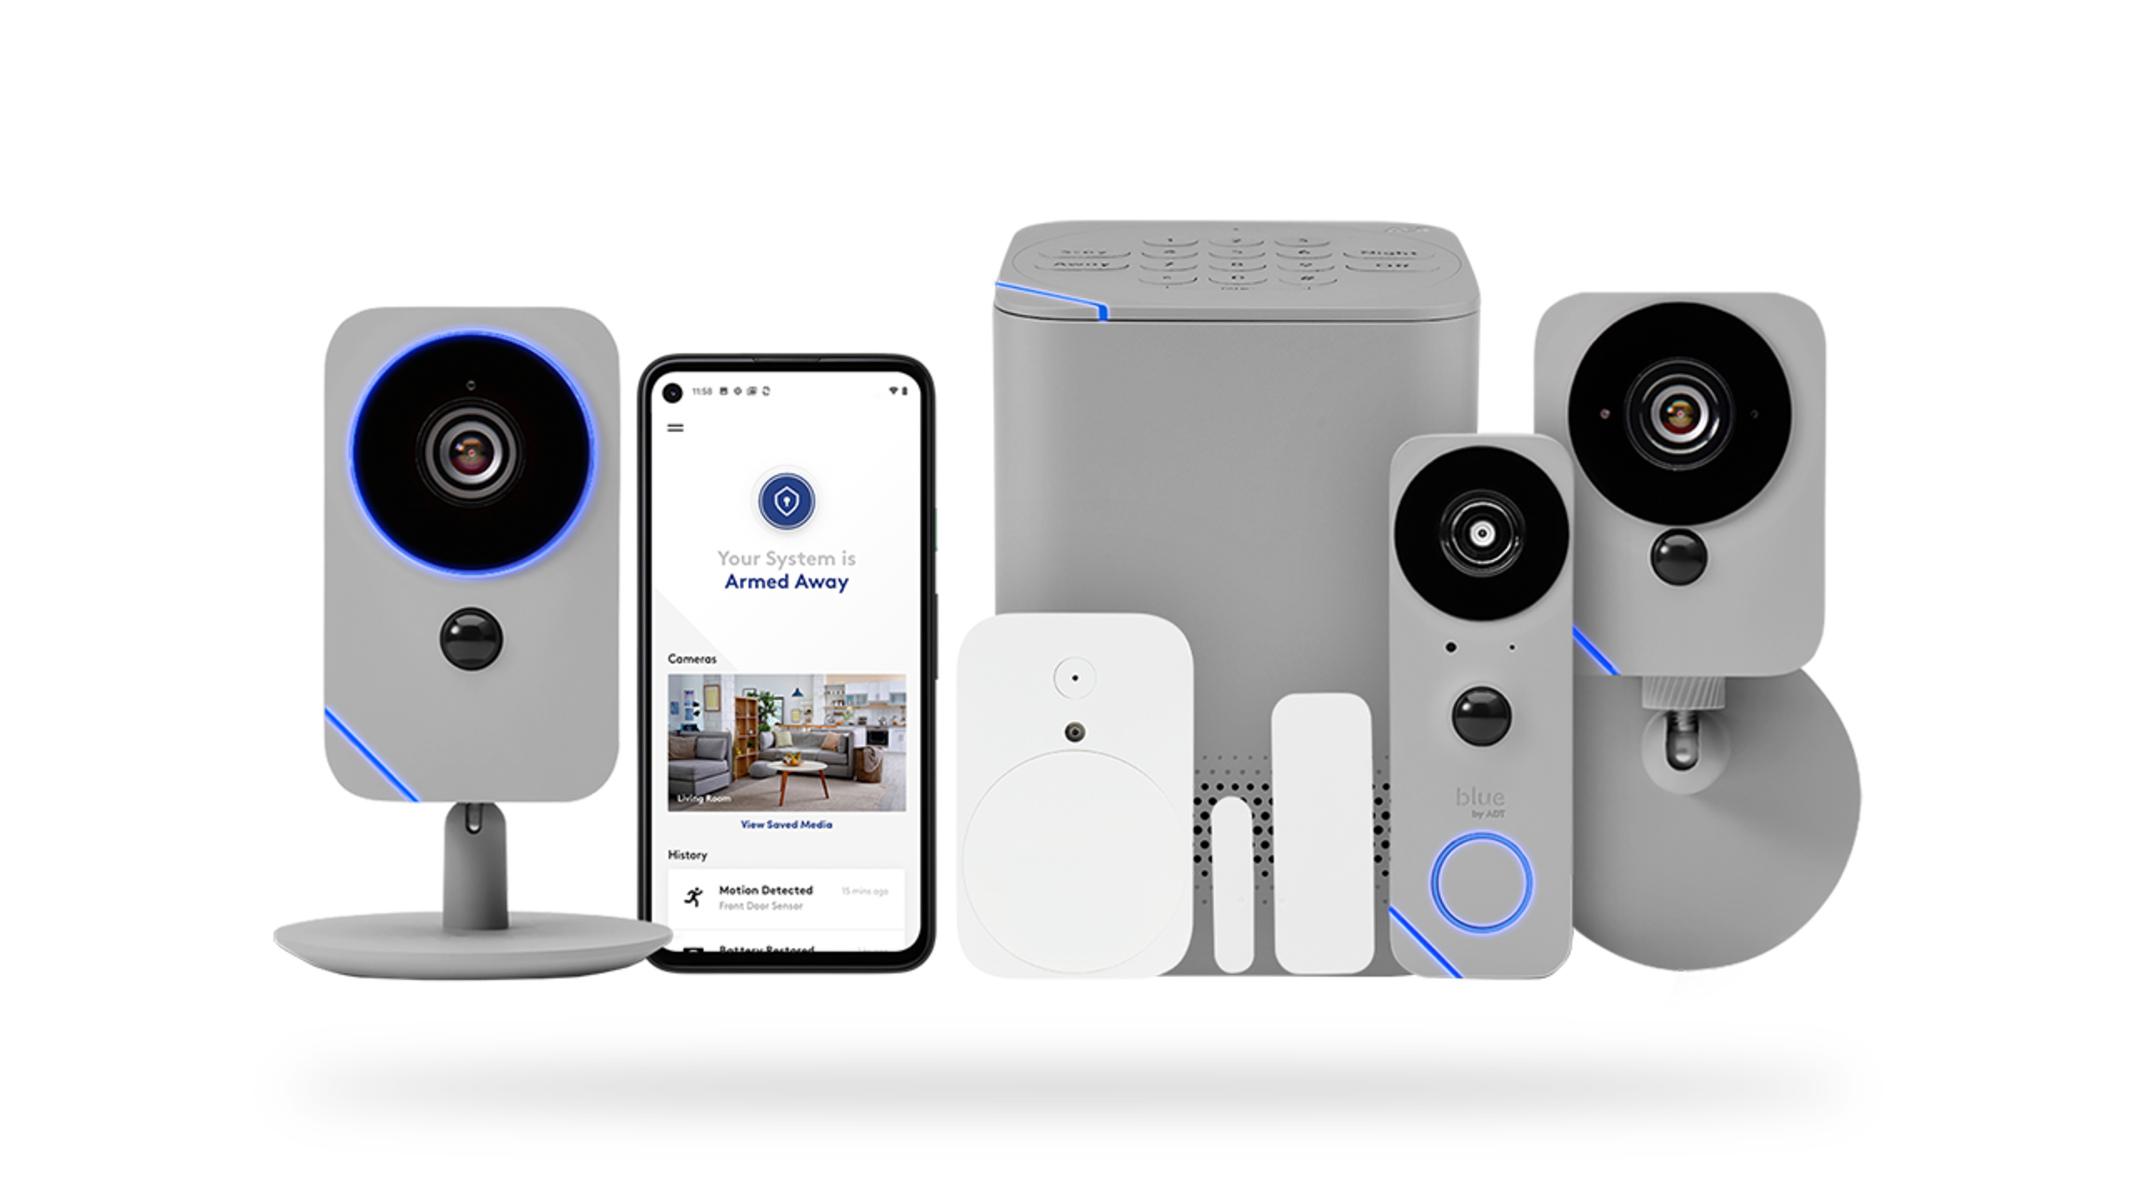
Choosing the right home security system is the next crucial step. Consider factors such as the security features, monitoring options, and additional add-ons available. Look for a system that offers a combination of features like door and window sensors, motion sensors, security cameras, and a control panel with an easy-to-use interface.
Step 1: Assess your home security needs
The first step in installing a home security system is to assess your specific security needs. This involves evaluating the layout of your property, identifying potential vulnerabilities, and determining the level of protection required.
Start by inspecting your home from the outside. Take note of any potential entry points, such as doors, windows, and garage doors. Look for weaknesses such as old or faulty locks, weak doors or windows, or areas that are hidden from view. It’s important to consider both the main entrance points and any secondary access points that could be targeted by potential intruders.
Next, evaluate the interior of your home. Assess the layout of your rooms, the location of valuables, and any potential hiding spots. This will help you determine the areas that require the most security coverage, such as bedrooms, living rooms, or home offices.
Consider the size of your property as well. Larger homes may require more extensive security measures, including additional sensors and cameras, to cover all entry points effectively.
Another important factor to consider is the level of risk in your neighborhood. Take note of any recent break-ins or suspicious activities. Speak to your neighbors about their own security measures and any issues they may have experienced. This information will help you assess the level of security needed to protect your home.
Additionally, think about your lifestyle and personal preferences. For example, if you travel frequently, you may want to consider a system that offers remote monitoring and control features. If you have pets, you’ll need to choose pet-friendly motion sensors that won’t be triggered by their movements.
By thoroughly assessing your home security needs, you’ll have a clearer understanding of the specific features and components required in your home security system. This will guide your decision-making process and help you choose a system that best fits your requirements.
Step 2: Research different types of home security systems
Once you have assessed your home security needs, it’s time to research the different types of home security systems available. There are several options to choose from, each with its own set of features and benefits.
One of the most popular types of home security systems is a wireless system. These systems use wireless technology, such as Wi-Fi or cellular networks, to connect the various components of the system. They are easy to install and offer flexibility when it comes to adding or relocating sensors and cameras. Wireless systems also provide remote access and control, allowing you to monitor and control your home security system through a smartphone app or web portal.
Another option is a wired system. Wired systems use physical cables to connect the various sensors, cameras, and control panel components. While they require more installation work, wired systems are known for their reliability and stability. They are not susceptible to wireless interference and typically have long-lasting battery life.
In recent years, smart home security systems have gained popularity. These systems integrate with other smart devices in your home, allowing you to control and monitor your security system using voice commands or through a central hub. Smart home security systems offer advanced features such as intelligent notifications, customizable automation, and integration with home automation devices.
When researching different types of home security systems, consider the specific features and capabilities they offer. Look for systems that have the right combination of sensors, cameras, and control panels to meet your security needs. For example, if you have a large property, you may need a system with multiple cameras and sensors to provide comprehensive coverage.
Additionally, take note of the monitoring options offered by each system. Some systems offer professional monitoring services where trained operators monitor your home 24/7 and dispatch emergency services in case of a break-in or other emergencies. Other systems may offer self-monitoring, where you receive alerts on your smartphone and can decide how to respond.
By researching different types of home security systems, you’ll be able to make an informed decision about which system is best suited for your home. Consider your specific needs, budget, and desired level of control to choose the system that offers the right balance of features and convenience.
Step 3: Decide between professional installation or DIY
When it comes to installing a home security system, one important decision you’ll need to make is whether to opt for professional installation or take the do-it-yourself (DIY) route. Both options have their own advantages and considerations, and choosing the right approach depends on your comfort level, time availability, and budget.
Professional installation involves hiring a trained technician who will come to your home and set up the security system for you. One of the biggest advantages of professional installation is the peace of mind that comes with knowing the system is installed correctly and functioning properly. Professionals have the knowledge and experience to assess your home’s layout, recommend the best placement for sensors and cameras, and ensure that the system is integrated with other components seamlessly.
Another advantage of professional installation is the convenience it offers. You don’t have to spend time researching and learning how to install the system yourself. Instead, you can leave it in the hands of experts who will complete the installation efficiently and save you valuable time.
On the other hand, DIY installation allows you to have full control over the installation process. It gives you the flexibility to choose where to place sensors and cameras based on your own understanding of your home’s vulnerabilities. DIY installation can also be more cost-effective, as you won’t have to pay for professional installation fees.
Today, many home security systems are designed with DIY installation in mind. Manufacturers provide detailed installation guides and videos, making it easier for homeowners to set up the system themselves. Some systems are even “plug and play,” meaning you simply need to connect them to power and follow a few setup steps to get them up and running.
When deciding between professional installation and DIY, consider your own skills and comfort level with technology. If you’re comfortable with tools and have a basic understanding of wiring and technology, DIY installation may be a suitable option for you. However, if you are not confident in your abilities or simply prefer to have experts handle the installation, professional installation is the way to go.
Ultimately, the choice between professional installation and DIY depends on your personal preferences and resources. Consider your budget, time availability, and willingness to learn and make an informed decision that suits your needs.
Step 4: Choose the right home security system
Choosing the right home security system is a crucial step in ensuring the safety and protection of your home and loved ones. With a wide range of options available in the market, it’s important to consider your specific needs, budget, and desired features to make an informed decision.
Start by identifying the key components that you require in a home security system. Common components include door and window sensors, motion detectors, security cameras, a control panel, and a monitoring service. Consider the number of entry points in your home, the size of your property, and any specific vulnerabilities that need to be addressed.
Next, think about the type of security features that are important to you. Some systems offer advanced features such as smart home integration, video doorbells, and home automation capabilities. Determine which features are essential and which ones are nice-to-have based on your lifestyle and preferences.
Consider the monitoring options available with each system. Some systems offer professional monitoring, where a dedicated team monitors your home 24/7 and responds to any emergencies. Others provide self-monitoring capabilities, where you receive alerts directly on your smartphone and can decide how to respond.
Take into account the scalability of the system as well. If you plan to expand or upgrade your security system in the future, ensure that the chosen system allows for easy integration of additional devices and components.
Read customer reviews and seek recommendations from trusted sources. Hearing about the experiences of other homeowners can provide valuable insights into the reliability, ease of use, and customer support of different home security systems.
Budget is another important consideration. Determine how much you are willing to invest in a home security system, keeping in mind that it’s an investment in the safety of your home and loved ones. Compare the features and prices of different systems to find one that aligns with your budget without compromising on the essential security features.
Lastly, ensure that the chosen home security system is compatible with your home’s infrastructure. Consider factors such as power source requirements, network connectivity, and compatibility with existing smart home devices if applicable.
By carefully considering your needs, preferences, budget, and the available options, you can choose the right home security system that provides the level of protection you desire for your home.
Step 5: Purchase the necessary equipment
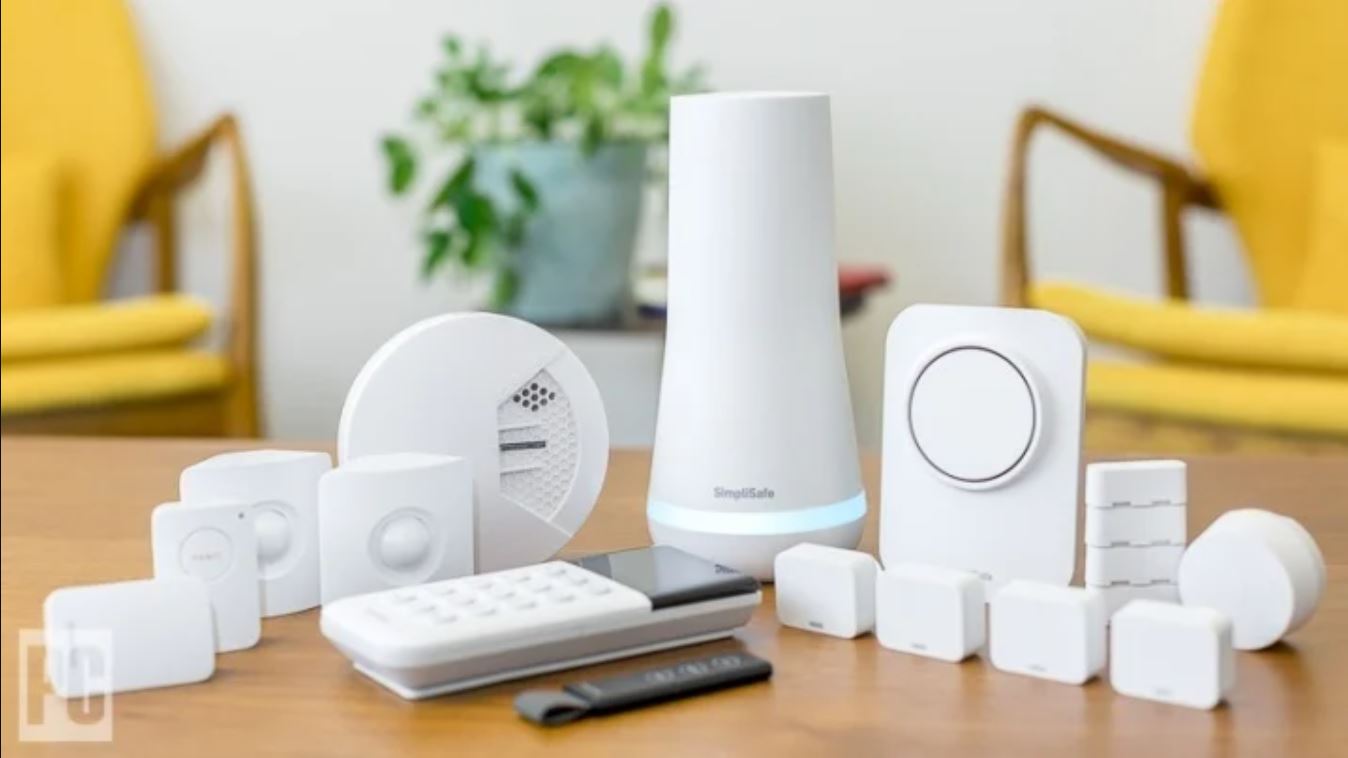
Once you have chosen the right home security system for your needs, it’s time to purchase the necessary equipment to complete the installation. This step requires careful consideration of the components and accessories required to ensure the proper functioning of your security system.
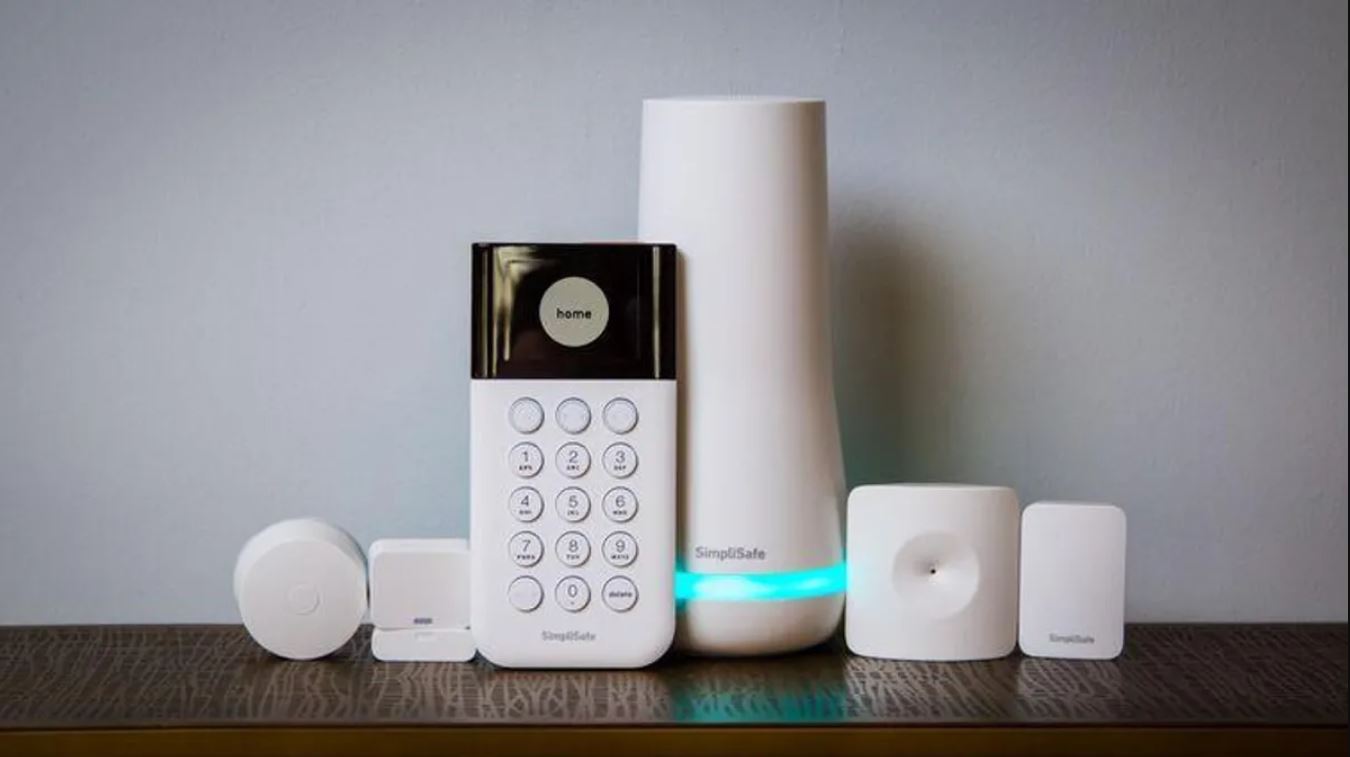
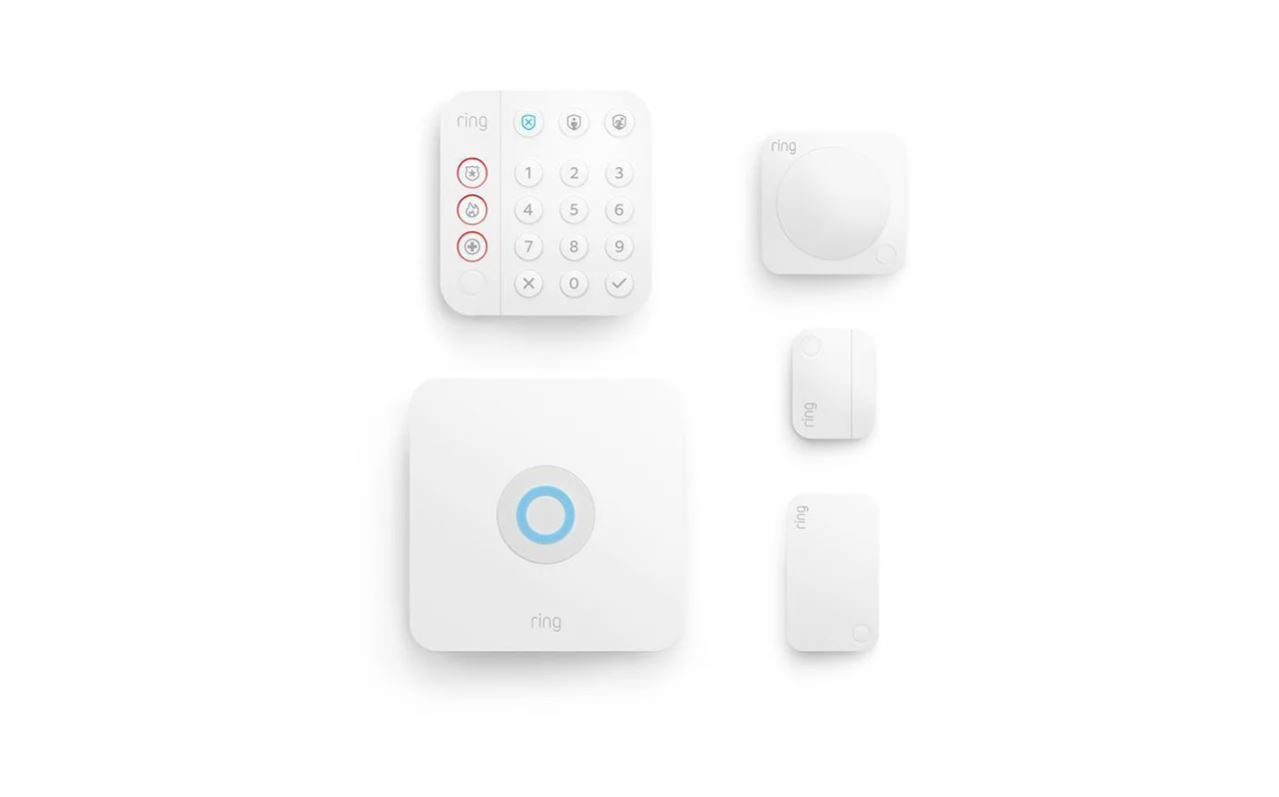
Start by making a list of the essential components that your chosen home security system requires. This typically includes items such as a control panel, sensors for doors and windows, motion detectors, security cameras, and any additional devices or accessories specific to your system.
Before making any purchases, it’s advisable to research different vendors and compare prices and reviews. Look for reputable suppliers and manufacturers who offer high-quality and reliable equipment. Read customer reviews to gauge the satisfaction levels of other users and ensure that the equipment you purchase meets your expectations.
Keep in mind any specific requirements or compatibility issues that need to be considered when purchasing the equipment. For example, if you have opted for a wireless system, ensure that the sensors and cameras you purchase are compatible with the chosen system’s wireless technology.
Consider the number of sensors and cameras required to adequately cover your home. Assess the size of your property and the number of entry points and vulnerable areas that need to be monitored. This will help you determine how many sensors and cameras you need to purchase to provide comprehensive security coverage.
Review the specifications and features of the equipment you plan to purchase. Look for features such as long battery life, night vision capabilities for cameras, and tamper-resistant sensors for enhanced security. Ensure that the equipment you choose aligns with your specific security needs and offers the functionality and features you desire.
Additionally, consider any accessories or add-ons that could enhance the functionality or convenience of your home security system. Examples include key fobs for convenient arming and disarming of your system, outdoor security lighting, and additional storage options for recorded video footage.
Lastly, schedule the purchase of the necessary equipment to ensure it arrives in time for installation. Check for any discounts or promotions that may be available to help save costs on your equipment purchases.
By carefully selecting and purchasing the necessary equipment, you are one step closer to completing the installation of your home security system and ensuring the safety and protection of your home and loved ones.
Step 6: Find the optimal locations for your security devices
Once you have purchased the necessary equipment for your home security system, the next step is to find the optimal locations to install each device. Proper placement of sensors, cameras, and other security devices is crucial for maximizing their effectiveness and ensuring comprehensive coverage of your home.
Start by referring to the installation guide provided by the manufacturer of your security system. This guide will typically offer recommendations and guidelines for the placement of each device. Follow these guidelines as a starting point and then customize the placement based on the layout and specific needs of your home.
When determining the optimal locations for sensors, consider placing them near all entry points, such as doors and windows. Ensure that they are positioned to detect any unauthorized entry and trigger the alarm. For windows, it’s typically best to place the sensors on the frame or sash, as this is the most vulnerable area. For doors, consider placing sensors on both the frame and the door itself.
In addition to entry points, consider placing motion detectors in areas where an intruder would most likely pass through. Hallways, staircases, and common areas are ideal locations for motion detectors as they provide wider coverage. Avoid placing them near sources of heat or direct sunlight, as this can lead to false alarms.
When positioning security cameras, aim to cover the main entry points, driveway, and any areas that require constant monitoring. Place cameras at a height where they can capture clear and comprehensive footage. Consider factors such as lighting, areas with potential blind spots, and the range of view required. It’s also important to position cameras in a way that they are less likely to be tampered with or obstructed.
Consider the accessibility of your control panel and keypad. The control panel should be placed in a central location that is easily accessible to all household members. The keypad should be placed near the main entry point or a convenient location where it can be easily armed and disarmed.
Take into account the presence of pets or other factors that may affect the performance of your security devices. Certain sensors may need to be adjusted or pet-friendly options considered to avoid false alarms.
Overall, finding the optimal locations for your security devices requires careful consideration of the layout of your home, the vulnerabilities you want to address, and the guidelines provided by the manufacturer. By strategically placing sensors, cameras, and other devices, you can ensure comprehensive coverage and maximize the effectiveness of your home security system.
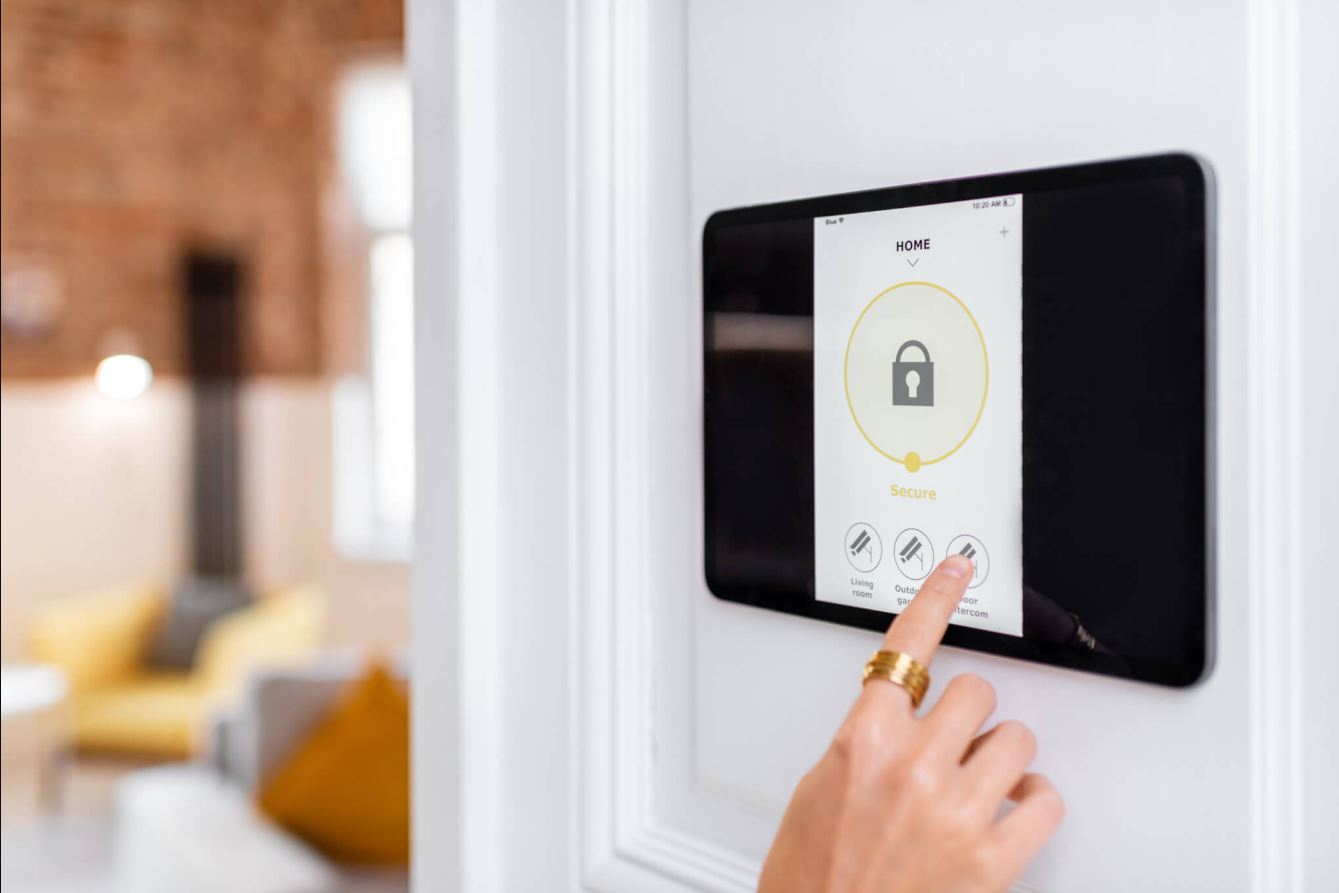
Step 7: Install the control panel and keypad
Installing the control panel and keypad is a crucial step in setting up your home security system. These components serve as the central command center for your system, allowing you to arm and disarm your alarms, access system settings, and receive notifications.
Start by choosing a suitable location for the control panel. Ideally, it should be placed in a central area that is easily accessible to all household members. Common locations include the main entryway, living room, or kitchen. Avoid placing the control panel in areas prone to moisture, extreme temperatures, or direct sunlight, as this can affect its performance.
Once you have identified the location, use the mounting hardware provided by the manufacturer to securely attach the control panel to the wall. Follow the instructions in the user manual or installation guide to ensure proper installation.
Next, install the keypad near the main entryway or any other convenient location where you can easily access and operate it. The keypad allows you to arm and disarm the security system using your unique access code.
Mount the keypad on the wall using the provided mounting hardware. Ensure that it is securely attached and at a comfortable height for easy operation. If your system allows for it, consider installing additional keypads in other areas of your home for added convenience.
Once the control panel and keypad are installed, connect them to the power source as per the manufacturer’s instructions. This may involve plugging them into a power outlet or wiring them directly into your home’s electrical system. Follow all safety precautions and, if needed, consult a professional electrician for assistance.
After connecting the power, initialize the control panel and keypad by following the instructions provided. This usually involves entering your access code and setting up any preferred settings or customization options.
Test the control panel and keypad to ensure that they are functioning properly. Arm and disarm the system using the keypad, and verify that the appropriate notifications and alarm triggers are working as expected.
If your system offers additional features such as touchscreen functionality or voice control, familiarize yourself with how to use these features and navigate through the control panel’s interface.
Remember to keep the control panel and keypad in a secure location to prevent unauthorized access. Regularly check for software updates or firmware upgrades provided by the manufacturer to ensure your system is up to date.
By installing the control panel and keypad correctly, you’ll have a centralized hub for controlling your home security system and accessing its various functions. This step brings you closer to fully setting up your system and enhancing the security and protection of your home.
Step 8: Install door and window sensors
Installing door and window sensors is a crucial part of setting up a comprehensive home security system. These sensors serve as the first line of defense, detecting any unauthorized entry attempts and triggering the alarm system.
Start by identifying the locations where you want to install door and window sensors. Consider all entry points, including front and back doors, garage doors, and ground-level windows. It’s important to place sensors on every accessible entry point to ensure comprehensive coverage.
For each door and window, follow the manufacturer’s instructions for installing the sensors. In most cases, the sensors consist of two components: a sensor and a magnet. The sensor is mounted on the frame of the door or window, while the magnet is mounted on the corresponding moving part (such as the door or window itself).
Before attaching the sensors, ensure that the sensor and magnet are aligned properly and that there is a small gap between them when the door or window is closed. This gap is what allows the sensor to detect when the door or window is opened.
Clean the surface where the sensors will be installed to ensure a secure and reliable connection. Use the adhesive backing provided by the manufacturer to attach the sensors to the surface. Apply firm pressure to ensure a strong bond.
Once the sensors are installed, test each one to ensure it is properly functioning. Open and close each door or window to verify that the alarm system is triggered and that you receive the appropriate notifications.
In some cases, you may need to adjust the positioning of the sensors to achieve optimal functioning. If the sensors are not aligning properly or are causing false alarms, try repositioning them slightly until they work correctly.
If your home security system requires it, program each door and window sensor into the control panel. This allows the system to recognize each sensor and provide accurate feedback on the status of each entry point.
Lastly, be sure to maintain and periodically check the door and window sensors to ensure they are in good working condition. Replace batteries as necessary and clean any dust or debris that may accumulate on the sensors.
By properly installing door and window sensors, you can deter potential intruders and ensure that your home security system is equipped to detect and respond to any unauthorized entry attempts.
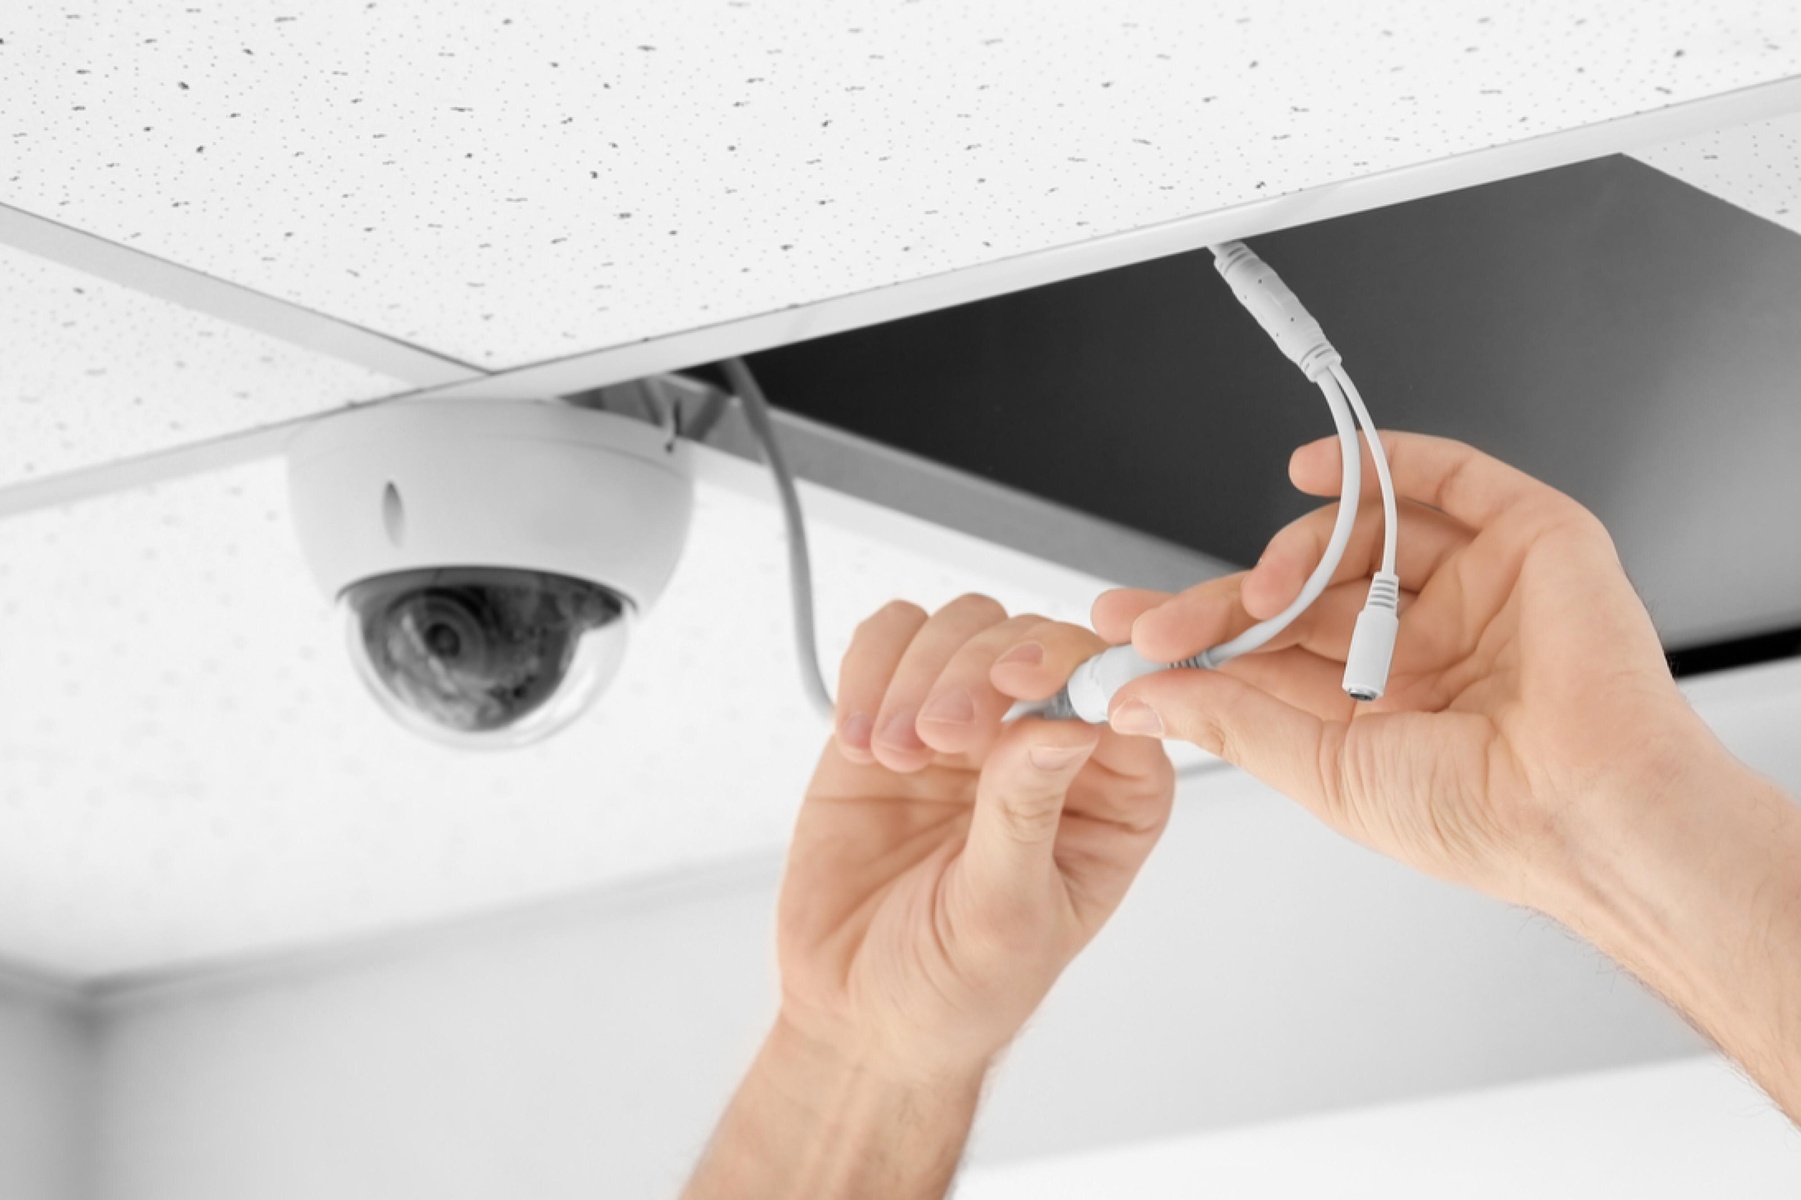
Step 9: Install motion sensors and security cameras
Installing motion sensors and security cameras is a crucial step in creating a robust and effective home security system. Motion sensors detect movement within their range, while security cameras provide video surveillance to monitor the areas of your home.
Start by identifying the optimal locations to install motion sensors. Consider areas where an intruder would most likely pass through, such as hallways, staircases, and entryways. Mount the motion sensors at a height that provides the best coverage while avoiding obstructions. Follow the manufacturer’s instructions for installation, which may involve attaching them to the wall or ceiling using the provided mounting brackets and screws.
Once the motion sensors are installed, adjust the sensitivity settings as necessary. Aim for a balance between detecting suspicious activity and minimizing false alarms caused by pets or other non-threatening motion.
When it comes to security cameras, determine the areas of your home that require constant monitoring. Common locations include the front and back entrances, driveway, and any vulnerable spots. Mount the cameras at a height and angle that provides a clear view of the area while minimizing blind spots. Follow the manufacturer’s instructions for installation, which may involve mounting brackets, screwing them into place, or using magnetic bases for easier positioning.
Ensure that your security cameras are positioned to cover high-risk areas and potential access points. Consider the range and field of view of each camera to ensure adequate coverage. If your cameras have pan, tilt, and zoom capabilities, adjust them to optimize the viewing angles.
If your security cameras require power, ensure they are connected to a stable power source. This can be an electrical outlet or a power-over-Ethernet (PoE) connection, depending on the camera’s specifications. Conceal or secure the cables to prevent tampering or damage.
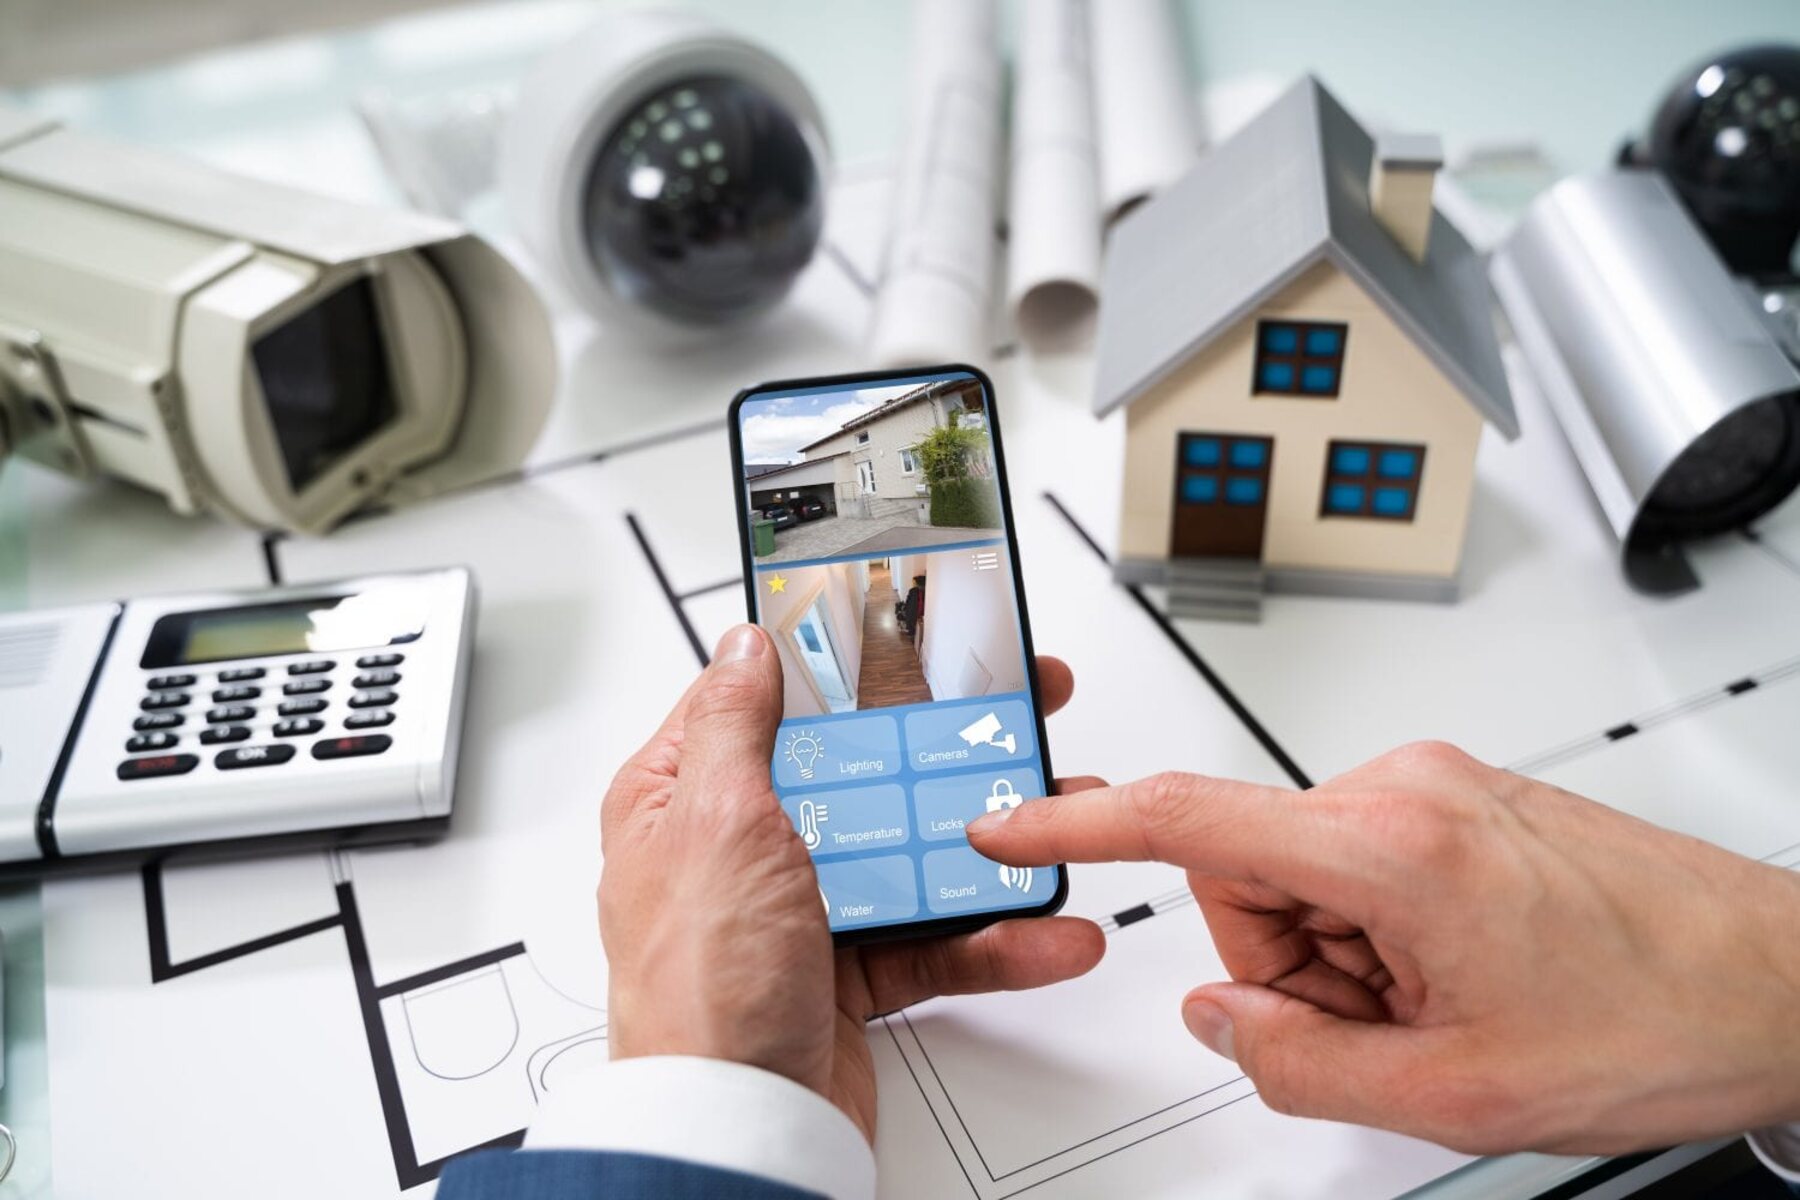
After installation, configure your security cameras according to the manufacturer’s instructions. This includes adjusting settings such as motion detection sensitivity, video quality, recording duration, and storage options. Also, consider connecting your cameras to your home network for remote access and viewing through a smartphone or computer.
Test each motion sensor and security camera to ensure they are functioning properly. Activate the motion sensors and check if the alarm system is triggered accordingly. Review the video feed from each camera to ensure it provides clear images and adequate coverage.
Regularly maintain and clean your security cameras to ensure optimal performance. Wipe the lenses to remove dust and debris, check for loose connections, and update firmware as recommended by the manufacturer.
By installing motion sensors and security cameras strategically, you can enhance the surveillance capabilities of your home security system, deter potential intruders, and capture valuable evidence in case of any suspicious activity.
Step 10: Connect your home security system to a monitoring service
Connecting your home security system to a monitoring service is a crucial step in maximizing the effectiveness and responsiveness of your security measures. A monitoring service provides 24/7 surveillance of your home, ensuring that any security breaches or emergencies are quickly detected and responded to.
Start by researching and choosing a reputable monitoring service provider. Look for providers that have a strong track record, positive customer reviews, and excellent response times. Consider factors such as the types of monitoring services offered, the availability of customer support, and the pricing plans.
Once you have selected a monitoring service provider, contact them to discuss the process of connecting your home security system to their service. They may require specific information, such as the make and model of your security system, to ensure compatibility.
Before connecting to the monitoring service, ensure that your home internet connection is stable and reliable. Most monitoring services require an internet connection to receive alerts and provide remote access to your security system.
Follow the specific instructions provided by the monitoring service provider to connect your security system to their monitoring network. This may involve setting up an account, entering relevant information into your control panel, or installing any necessary software or applications.
Test the connection to the monitoring service to ensure that it is functioning properly. Activate the alarms or triggers of your home security system and verify that the monitoring service receives the alerts and responds accordingly. Test any remote access or control features offered by the monitoring service to ensure seamless communication with your security system.
Ensure that you understand the contract terms and any fees associated with the monitoring service. Review the service level agreement to know what services are included, response times, and any limitations or exclusions.
Regularly check the connection status between your security system and the monitoring service. If any issues arise, contact the service provider for assistance troubleshooting or resolving connectivity problems.
Remember to keep the monitoring service provider updated with any changes to your contact information, emergency contacts, or any modifications to your home security system setup.
By connecting your home security system to a monitoring service, you add an extra layer of protection and enhance the response capabilities of your security measures. This ensures that any security breaches or emergencies are promptly addressed and that you and your loved ones have peace of mind knowing that your home is being monitored round the clock.
Step 11: Test and troubleshoot your home security system
After setting up your home security system, it’s important to test and troubleshoot the system to ensure its proper functioning. Testing allows you to identify any issues or gaps in the system and address them promptly, ensuring that your home remains adequately protected.
Start by conducting a comprehensive test of all the components of your security system. Arm the system and walk through your home to test the sensors, motion detectors, and cameras. Verify that each device is triggering the appropriate alarms and notifications. This will help you determine if any components are not working properly or if there are any dead zones that need additional coverage.
Test the responsiveness of the monitoring service by triggering an alarm or alert and checking how quickly they respond. Ensure that they receive the signal and contact you or the designated emergency contacts promptly. This step is crucial to guarantee an effective emergency response when needed.
Verify the integration and functionality of any additional features or home automation devices connected to your security system. Test features such as remote access, customized automation rules, and integration with voice control devices to ensure they are working as intended.
If any issues or malfunctions are identified during testing, follow the troubleshooting steps provided by the manufacturer or contact their customer support for assistance. They may guide you through basic troubleshooting or recommend professional help if needed.
Regularly test the battery life of wireless devices and replace them as necessary to ensure uninterrupted functionality. Keep spare batteries on hand to minimize downtime if a battery needs to be replaced.
Review the placement and positioning of your security devices, such as sensors and cameras, to ensure they provide optimal coverage. Make any necessary adjustments to address blind spots or areas of inadequate surveillance.
Consider testing your system periodically under different scenarios, such as during extreme weather conditions or while you are away from home. This will help ensure the reliability of your security system in different situations.
Keep a log of your testing and troubleshooting activities, noting any issues encountered and the steps taken to resolve them. This documentation will provide a valuable reference in the future and help identify any recurring problems that need further attention.
Remember to also educate and train all household members on the proper use of the security system. Ensure they understand how to arm and disarm the system, operate the control panel and keypad, and respond to alarms or alerts.
By regularly testing and troubleshooting your home security system, you are proactively ensuring its effectiveness and reliability. This step is crucial to maintain the optimal level of protection for your home and provide peace of mind for you and your loved ones.
Conclusion
Installing a home security system is an essential step in safeguarding your home and providing peace of mind. By following the step-by-step guide outlined in this article, you can successfully install a home security system that meets your specific needs and enhances the security of your property.
Throughout the installation process, it’s important to assess your home security needs, research different types of systems, and choose the right equipment. Whether you opt for professional installation or decide to take the DIY route, carefully installing each component, such as the control panel, sensors, motion detectors, and security cameras, is crucial for ensuring their optimum performance.
Connecting your home security system to a monitoring service adds an extra layer of protection and helps ensure a prompt response to any security breaches or emergencies. By regularly testing and troubleshooting your system, you can identify and address any issues or gaps in its functionality, providing continuous protection for your home.
Remember that home security is an ongoing effort. Regular maintenance, updates, and staying informed about the latest security technologies are important to keep your system up to date and effective in deterring potential intruders.
By taking the necessary steps to install and maintain a home security system, you are investing in the safety and protection of your home and loved ones. With a well-designed and properly installed system in place, you can have peace of mind knowing that your home is secure and that you are taking proactive measures to deter potential threats.