Introduction
In today's fast-paced world, our smartphones have become indispensable companions, accompanying us through every aspect of our lives. Whether capturing precious moments, staying connected with loved ones, or accessing vital information, our phones are constant companions. However, the vulnerability of these devices to water damage can be a cause for concern. Accidental spills, unexpected rain, or even a moment of forgetfulness near a pool can lead to devastating consequences for our beloved gadgets.
Thankfully, there's a simple and cost-effective solution to safeguard our phones from water damage: crafting a DIY waterproof phone case using silicone. This ingenious method allows you to create a protective barrier around your phone, ensuring it remains safe and functional even in wet conditions. By following a few easy steps, you can provide your device with the defense it needs to withstand water exposure, giving you peace of mind in any situation.
Throughout this guide, we will explore the step-by-step process of creating a waterproof phone case using readily available materials and straightforward techniques. From gathering the necessary supplies to applying the silicone and testing the waterproofing, each stage will be thoroughly explained to enable you to protect your phone effectively. By the end of this tutorial, you will have the knowledge and confidence to safeguard your device against water damage, empowering you to enjoy your phone without the worry of potential water-related mishaps.
With this DIY approach, you can customize the waterproofing process to fit your specific phone model and personal preferences, ensuring a tailored solution that meets your needs. Whether you're an outdoor enthusiast, a frequent traveler, or simply someone who wants to safeguard their device against life's unexpected moments, this DIY waterproof phone case offers a practical and affordable way to protect your valuable gadget.
So, let's embark on this creative journey and learn how to craft a custom waterproof phone case using silicone. Get ready to equip your phone with the ultimate defense against water and embrace worry-free usage in any environment.
Step 1: Gather the Materials
Before embarking on the process of creating a DIY waterproof phone case using silicone, it's essential to gather the necessary materials. By ensuring you have all the required items at hand, you can streamline the crafting process and achieve optimal results. Here's a comprehensive list of materials you will need for this project:
Materials:
-
Silicone: The key component for creating the waterproof barrier around your phone is a high-quality silicone sealant. Look for a silicone product that is explicitly labeled as waterproof and suitable for creating a protective layer on electronic devices. Opt for a clear silicone sealant to maintain the aesthetic appeal of your phone while ensuring effective waterproofing.
-
Plastic Wrap or Gloves: To protect your hands during the silicone application process, it's advisable to have plastic wrap or disposable gloves on hand. These will prevent the silicone from sticking to your skin and make the application process more manageable.
-
Masking Tape: An essential tool for creating clean and precise edges, masking tape will help you define the area where the silicone will be applied on your phone. Additionally, it will aid in preventing any accidental smearing of the silicone onto unwanted areas of your device.
-
Mixing Tool: Depending on the type of silicone sealant you choose, you may require a small spatula or mixing tool to blend the silicone thoroughly before application. This will ensure a uniform consistency and optimal performance of the waterproofing barrier.
-
Scissors: To trim the excess plastic wrap and masking tape, a pair of scissors will be necessary. Ensure they are sharp and precise for clean cutting.
-
Phone Case (Optional): If you prefer to create a separate waterproof case for your phone, having a spare or inexpensive phone case that fits your device's model will be beneficial. This will serve as the base for applying the silicone and creating a custom waterproof enclosure for your phone.
By gathering these materials, you will be well-equipped to commence the process of crafting a DIY waterproof phone case using silicone. With the necessary items at your disposal, you can proceed to the next steps with confidence, knowing that you have everything needed to safeguard your phone against water damage.
Step 2: Prepare the Phone
Before applying the silicone to create a waterproof barrier for your phone, it's crucial to prepare the device thoroughly. This preparation process ensures that the silicone adheres effectively and provides optimal protection against water damage. Here's a detailed guide on how to prepare your phone for the silicone application:
Clean the Phone:
Begin by cleaning your phone meticulously to remove any dust, dirt, or residue that could hinder the silicone's adhesion. Use a gentle, non-abrasive cleaning solution and a soft microfiber cloth to wipe the entire surface of the phone. Pay special attention to the edges and corners, as these areas are prone to accumulating debris. Ensuring a clean and dry surface is essential for the silicone to bond effectively and provide reliable waterproofing.
Remove the Phone Case (if applicable):
If your phone is currently housed in a protective case, carefully remove it to expose the device's bare surface. This step is crucial for the silicone to make direct contact with the phone, creating a seamless waterproof barrier. If the phone case is designed to fit snugly, take extra care during removal to avoid any accidental damage to the device.
Masking Tape Application:
To define the precise area where the silicone will be applied, use masking tape to create a boundary around the edges of the phone. This step is particularly important if you intend to apply the silicone directly onto the phone without using a separate case. Carefully align the masking tape along the edges of the phone, ensuring it adheres securely and forms a clear boundary for the silicone application.
Protecting Openings and Ports:
If your phone features open ports, such as charging ports or headphone jacks, take measures to protect them from the silicone. Use small pieces of masking tape to cover these openings, preventing any accidental seepage of silicone into the internal components of the phone. This precaution will maintain the functionality of your phone while safeguarding it against water intrusion.
By following these meticulous preparation steps, you will create an ideal foundation for applying the silicone and establishing a reliable waterproof barrier for your phone. With the device cleaned, exposed, and appropriately masked, you are now ready to proceed to the next stage of the DIY waterproofing process.
Step 3: Mix the Silicone
Mixing the silicone is a crucial step in the process of creating a DIY waterproof phone case. The proper blending of the silicone sealant ensures a uniform consistency, maximizing its effectiveness in providing a reliable waterproof barrier for your phone. Here's a detailed guide on how to mix the silicone effectively:
-
Select a Mixing Tool: Depending on the type of silicone sealant you have chosen, you may require a small spatula, mixing stick, or similar tool for blending. Ensure the mixing tool is clean and free from any residual substances that could compromise the silicone's integrity.
-
Prepare the Silicone: Squeeze an appropriate amount of silicone sealant onto a clean, disposable surface. The quantity needed will depend on the size of your phone and the desired thickness of the waterproof barrier. It's advisable to start with a moderate amount and prepare additional silicone as needed to avoid wastage.
-
Begin Mixing: Using the selected mixing tool, gently stir the silicone sealant in a circular motion, ensuring that all components are thoroughly combined. Pay close attention to achieving a consistent texture throughout the mixture, as any unevenness could affect the waterproofing performance.
-
Check for Uniformity: As you continue mixing, observe the silicone closely to verify that it maintains a uniform appearance and texture. The goal is to achieve a smooth and homogeneous blend that will facilitate even application onto the phone's surface.
-
Avoid Over-Mixing: While thorough mixing is essential, it's crucial to avoid over-agitating the silicone, which can introduce air bubbles and compromise its integrity. Aim for a balanced approach, ensuring that the silicone is well-blended without excessive stirring.
-
Evaluate the Consistency: Once the silicone is adequately mixed, assess its consistency to ensure it meets the desired specifications for application. The ideal texture is one that is pliable and easy to spread, allowing for smooth and controlled application onto the phone.
By following these steps and exercising care during the mixing process, you will prepare a well-blended silicone sealant that is ready for application onto your phone. The meticulous mixing of the silicone sets the stage for the subsequent step of applying it to the phone's surface, ultimately leading to the creation of a custom waterproof case that safeguards your device against water damage.
Step 4: Apply the Silicone to the Phone
With the silicone thoroughly mixed and the phone prepared, it's time to apply the silicone to create a protective waterproof barrier. This step requires precision and attention to detail to ensure a seamless and effective coating. Here's a comprehensive guide on how to apply the silicone to your phone:
-
Commence Application: Begin by carefully applying the mixed silicone to the prepared phone surface. If you're using a separate phone case, ensure it is placed on a stable, level surface before proceeding. If you're applying the silicone directly onto the phone, ensure that the masking tape is securely in place to define the boundaries for the waterproof barrier.
-
Smooth and Even Coating: Using a small spatula or a similar tool, spread the silicone evenly across the surface of the phone. Aim for a smooth and consistent coating, ensuring that the silicone extends to the edges and corners of the device. Take your time to achieve a uniform layer, as this will contribute to the effectiveness of the waterproofing.
-
Pay Attention to Detail: As you apply the silicone, be mindful of any open ports, such as charging ports and headphone jacks. Ensure that these areas are coated with a thin layer of silicone to provide additional protection against water intrusion. Take care to maintain a neat and precise application, as this will contribute to the overall aesthetic appeal of the waterproofed phone.
-
Remove Excess Silicone: After applying the initial coating, assess the phone to identify any excess silicone that may have accumulated. Use a clean, sharp tool or the edge of a piece of cardboard to carefully remove any surplus silicone, ensuring that the edges and openings remain clear and functional.
-
Allow for Proper Drying: Once the silicone is applied, allow it to dry undisturbed in a well-ventilated area. Follow the manufacturer's recommendations regarding the drying time for the specific silicone sealant you have used. This crucial step ensures that the silicone forms a robust and durable waterproof barrier around your phone.
By following these detailed steps, you will effectively apply the silicone to your phone, creating a customized waterproof case that offers reliable protection against water damage. The thorough and precise application of the silicone sets the stage for the final step of the process: allowing the silicone to cure and testing the waterproofing to ensure its effectiveness.
Step 5: Let the Silicone Cure
After applying the silicone to your phone to create a protective waterproof barrier, the next critical step is to allow the silicone to cure effectively. Curing refers to the process in which the silicone sealant undergoes chemical changes, ultimately transforming into a durable and resilient waterproof coating for your phone. Proper curing is essential to ensure the effectiveness and longevity of the waterproofing, providing your device with reliable protection against water damage.
The curing time for silicone sealants can vary depending on factors such as humidity, temperature, and the specific product used. It is crucial to adhere to the manufacturer's instructions regarding the curing process to achieve optimal results. Typically, silicone sealants require at least 24 hours to cure fully, although some products may necessitate a longer duration for complete curing.
During the curing period, it is essential to place the phone in a well-ventilated area with minimal exposure to dust, debris, or potential disturbances. This environment facilitates the uninterrupted curing of the silicone, allowing it to form a robust and impermeable waterproof barrier around the phone.
As the silicone cures, it undergoes a transformation from a pliable, wet substance to a solid, resilient coating. It gradually develops the characteristic properties of silicone sealants, including flexibility, durability, and exceptional water resistance. This transformation is vital for ensuring that the silicone effectively safeguards your phone against water intrusion, providing peace of mind in various environments and situations.
Throughout the curing process, it is advisable to refrain from handling or disturbing the phone to prevent any disruption to the silicone coating. Additionally, avoid exposing the phone to moisture or water during this critical phase, as it may compromise the integrity of the curing silicone.
Once the recommended curing time has elapsed, carefully inspect the silicone-coated phone to ensure that the waterproof barrier has formed uniformly and without any imperfections. Verify that the silicone has adhered securely to the phone's surface, creating a seamless and effective enclosure that protects the device from water damage.
By allowing the silicone to cure thoroughly, you ensure that your DIY waterproof phone case achieves its intended purpose: safeguarding your valuable device from the perils of water exposure. This final stage of the process sets the stage for testing the waterproofing to validate its effectiveness and provide you with the assurance of a well-protected phone.
Step 6: Test the Waterproofing
After allowing the silicone to cure thoroughly and form a robust waterproof barrier around your phone, the next crucial step is to test the effectiveness of the waterproofing. This essential validation process ensures that your DIY waterproof phone case provides the intended protection against water intrusion, offering peace of mind and confidence in the reliability of your device's defense.
To test the waterproofing, you can employ a straightforward yet thorough approach to assess the silicone-sealed phone's resistance to water. Here's a detailed guide on how to conduct the waterproofing test:
Gather Testing Materials:
Before commencing the waterproofing test, gather the necessary materials, including a small container of water and a dry, absorbent cloth. Ensure that the testing environment is suitable for assessing the phone's response to water exposure, with minimal risk of accidental damage or moisture intrusion.
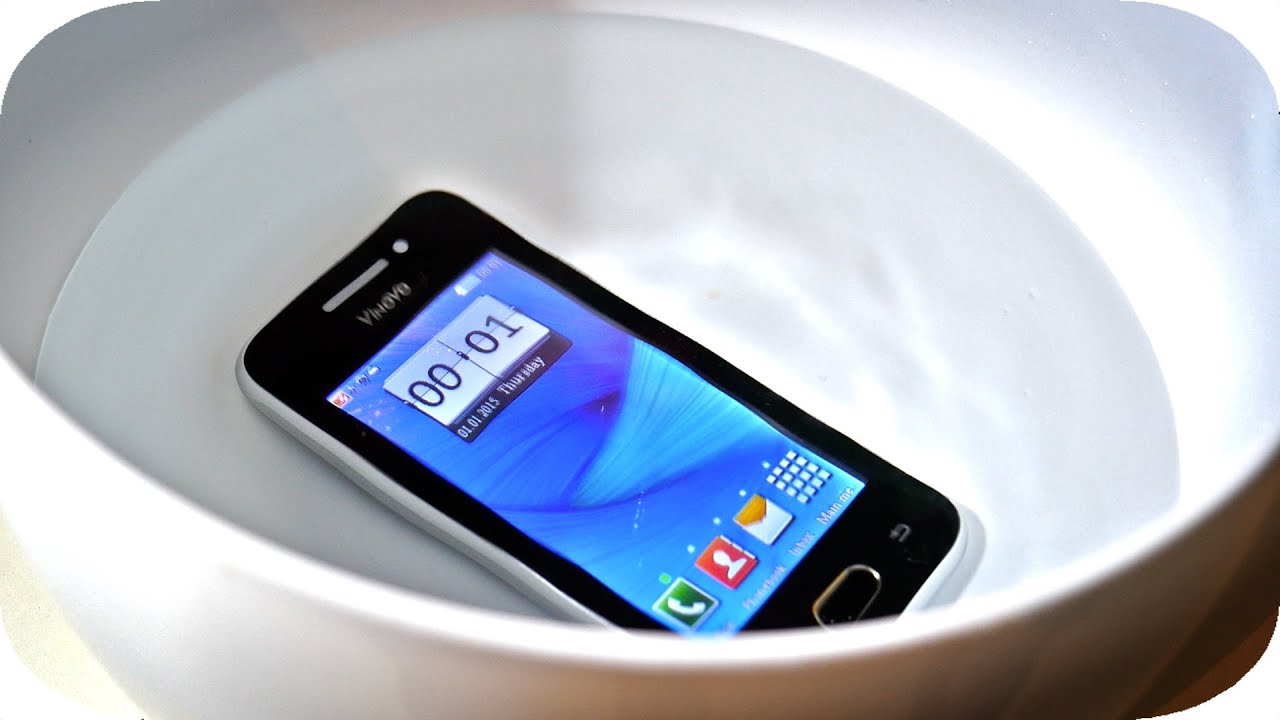
Submerge the Phone:
Carefully submerge the silicone-coated phone into the container of water, ensuring that it remains immersed for a brief duration. The depth of the submersion can vary, but it is advisable to simulate conditions that the phone may encounter in real-world scenarios, such as accidental spills or brief immersion in water.
Observe for Water Intrusion:
As the phone remains submerged, closely observe the silicone-sealed areas for any signs of water intrusion. Pay particular attention to the edges, corners, and openings, where water may attempt to penetrate the protective barrier. Additionally, monitor the exposed ports and openings for any indications of moisture ingress.
Remove and Inspect the Phone:
After the brief submersion, carefully remove the phone from the water and thoroughly inspect the silicone-sealed areas. Use the dry, absorbent cloth to gently pat the phone's surface and assess for any signs of water penetration. Verify that the silicone has effectively repelled water, maintaining a dry and protected interior for the device.
Validate the Waterproofing:
Upon inspection, verify that the phone remains fully functional and free from any water-related damage. Test the device's various functions, including the touchscreen, buttons, and ports, to ensure that the waterproofing has not compromised its usability. Additionally, confirm that the silicone-sealed areas exhibit no signs of water retention or compromise.
By conducting this comprehensive waterproofing test, you can ascertain the effectiveness of the DIY waterproof phone case in safeguarding your device against water damage. The validation process provides the assurance that your phone is well-protected in wet conditions, empowering you to utilize your device with confidence and security in diverse environments.
Through meticulous testing and validation, you can confirm that the silicone-sealed phone offers reliable waterproofing, ensuring that your valuable device remains safeguarded against the perils of water exposure. This final step of the process solidifies the effectiveness of your DIY waterproof phone case, providing you with the peace of mind to embrace worry-free phone usage in any situation.
Conclusion
In conclusion, the process of crafting a DIY waterproof phone case using silicone presents an accessible and effective solution for safeguarding your valuable device against water damage. By following the step-by-step guide outlined in this tutorial, you have gained the knowledge and confidence to create a custom waterproof barrier for your phone, offering peace of mind and security in various environments and situations.
Through meticulous preparation, including gathering the necessary materials and thoroughly cleaning and masking the phone, you have established an ideal foundation for applying the silicone. The careful mixing and precise application of the silicone sealant have resulted in a robust and resilient waterproof barrier that effectively shields your phone from water intrusion.
Allowing the silicone to cure thoroughly has facilitated the transformation of the wet sealant into a durable and impermeable coating, ensuring the longevity and effectiveness of the waterproofing. The subsequent testing and validation process have provided the assurance that your DIY waterproof phone case performs admirably, repelling water and safeguarding your device from potential damage.
By embracing this DIY approach to waterproofing your phone, you have tailored a protective solution that aligns with your specific device and preferences. Whether you're an outdoor enthusiast, a frequent traveler, or simply someone who values the security of their phone, the custom waterproof case offers a practical and cost-effective means of ensuring your device remains functional and protected in any situation.
The ability to create a waterproof phone case using readily available materials and straightforward techniques empowers you to take proactive measures in safeguarding your device, reducing the risk of water-related mishaps and potential costly repairs or replacements. This DIY endeavor not only offers protection but also fosters a sense of ownership and customization, allowing you to personalize the waterproofing process to suit your individual needs and style.
In essence, the creation of a DIY waterproof phone case using silicone represents a testament to your resourcefulness and commitment to preserving the functionality and longevity of your device. By embracing this creative and practical endeavor, you have equipped your phone with the ultimate defense against water, enabling worry-free usage and peace of mind in any environment.