Introduction
If you're an avid gamer, you understand the significance of a well-configured game controller. Logitech, a renowned name in the gaming industry, offers a range of high-performance game controllers that can greatly enhance your gaming experience. However, to truly optimize your gaming sessions, it's essential to assign keys to your Logitech game controller that align with your gaming style and preferences. This ensures that you have quick access to essential functions and commands during gameplay, giving you a competitive edge.
Configuring your Logitech game controller involves a few simple steps, and with the help of Logitech Gaming Software, you can easily customize the controller to suit your gaming needs. Whether you're a fan of first-person shooters, racing simulations, or role-playing games, assigning keys to your Logitech game controller can significantly improve your gaming performance and overall enjoyment.
In this guide, we'll walk you through the process of assigning keys to your Logitech game controller using the Logitech Gaming Software. By following these steps, you'll be able to personalize your controller to match your preferred gaming style, giving you a more immersive and tailored gaming experience. So, let's dive in and explore the steps to configure your Logitech game controller for an enhanced gaming adventure.
Step 1: Download and Install Logitech Gaming Software
Before you can begin customizing your Logitech game controller, you’ll need to download and install the Logitech Gaming Software, which serves as the central hub for configuring Logitech gaming peripherals. This software provides a user-friendly interface that allows you to assign keys, create profiles, and fine-tune various settings for your game controller.
To get started, visit the official Logitech website and navigate to the support or downloads section. Here, you can search for the Logitech Gaming Software compatible with your specific game controller model. Once you’ve located the software, download the installer to your computer. The installation process is straightforward and typically involves running the downloaded file and following the on-screen instructions to complete the setup.
After the Logitech Gaming Software is successfully installed on your computer, launch the application to ensure that it recognizes your Logitech game controller. If your game controller is not automatically detected, you may need to connect it to your computer using the provided USB cable or wireless receiver. Once your game controller is recognized by the software, you’re ready to proceed to the next step of configuring your Logitech game controller.
Step 2: Connect Your Logitech Game Controller
Connecting your Logitech game controller to your computer is a crucial step in the customization process. Depending on the model of your Logitech game controller, you may have a wired or wireless connection option. If your controller is wireless, ensure that it’s fully charged and powered on before attempting to connect it to your computer.
If your Logitech game controller utilizes a wireless receiver, plug the receiver into an available USB port on your computer. Once the receiver is connected, press the pairing button on the controller to establish a wireless connection with the receiver. This process may vary slightly based on the specific model of your Logitech game controller, so it’s advisable to refer to the user manual for detailed instructions.
For wired Logitech game controllers, simply connect the controller to an available USB port on your computer using the provided USB cable. Once the controller is connected, the Logitech Gaming Software should automatically detect and recognize the device, allowing you to proceed with the customization process.
It’s important to ensure that your Logitech game controller is securely connected and properly recognized by the Logitech Gaming Software before proceeding to the next steps. A stable connection is essential for seamless customization and key assignment, so take the time to verify that your controller is successfully linked to your computer before moving forward.
Step 3: Open Logitech Gaming Software
Once your Logitech game controller is connected to your computer, it’s time to open the Logitech Gaming Software to initiate the customization process. Locate the Logitech Gaming Software icon on your desktop or in the designated installation folder and double-click to launch the application. If you don’t have a desktop shortcut, you can also access the software through the Start menu or application list on your computer.
Upon opening the Logitech Gaming Software, you’ll be greeted with an intuitive interface that provides access to various customization features for your Logitech game controller. The software allows you to create and manage profiles, adjust button assignments, configure sensitivity settings, and more, offering a comprehensive suite of tools to tailor your gaming experience to your preferences.
Depending on the specific model of your Logitech game controller, the software interface may vary slightly, but the core functionality remains consistent across Logitech’s gaming peripherals. Take a moment to familiarize yourself with the layout and navigation of the Logitech Gaming Software, as this will streamline the process of assigning keys and customizing your game controller to suit your gaming needs.
With the Logitech Gaming Software open and your game controller connected, you’re now ready to delve into the customization options and begin assigning keys to your Logitech game controller. The software provides a user-friendly environment that empowers you to fine-tune every aspect of your controller, ensuring that it aligns perfectly with your gaming style and preferences.
Step 4: Assign Keys to Your Logitech Game Controller
With the Logitech Gaming Software open and your game controller connected, you can now proceed to assign keys to your Logitech game controller. This step is crucial for tailoring the controller to your specific gaming preferences and ensuring that essential functions and commands are easily accessible during gameplay.
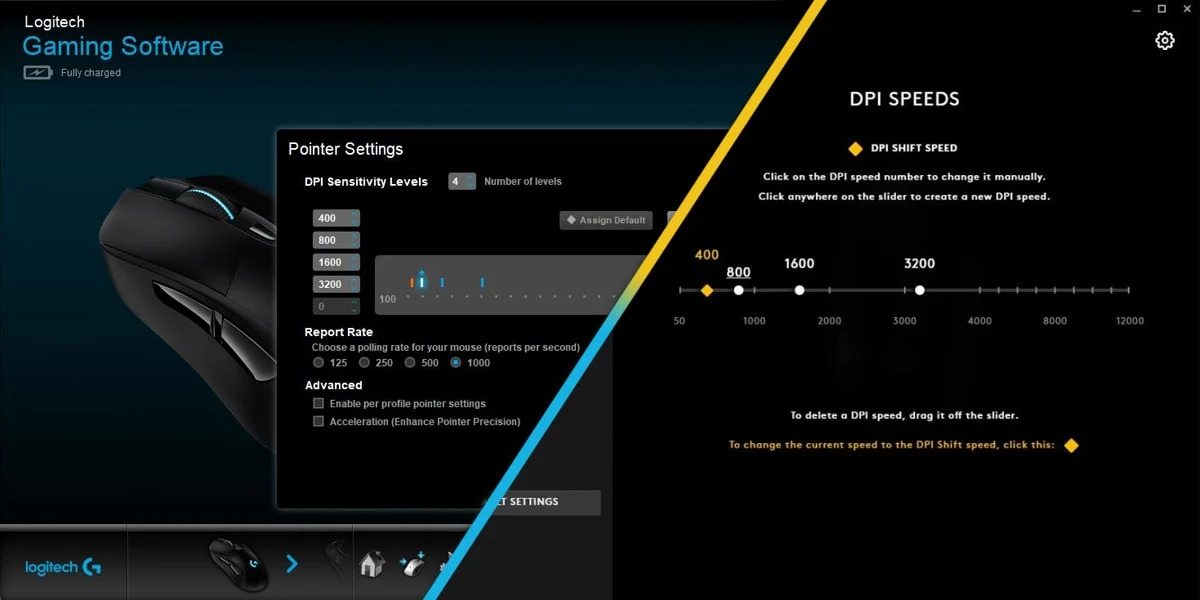
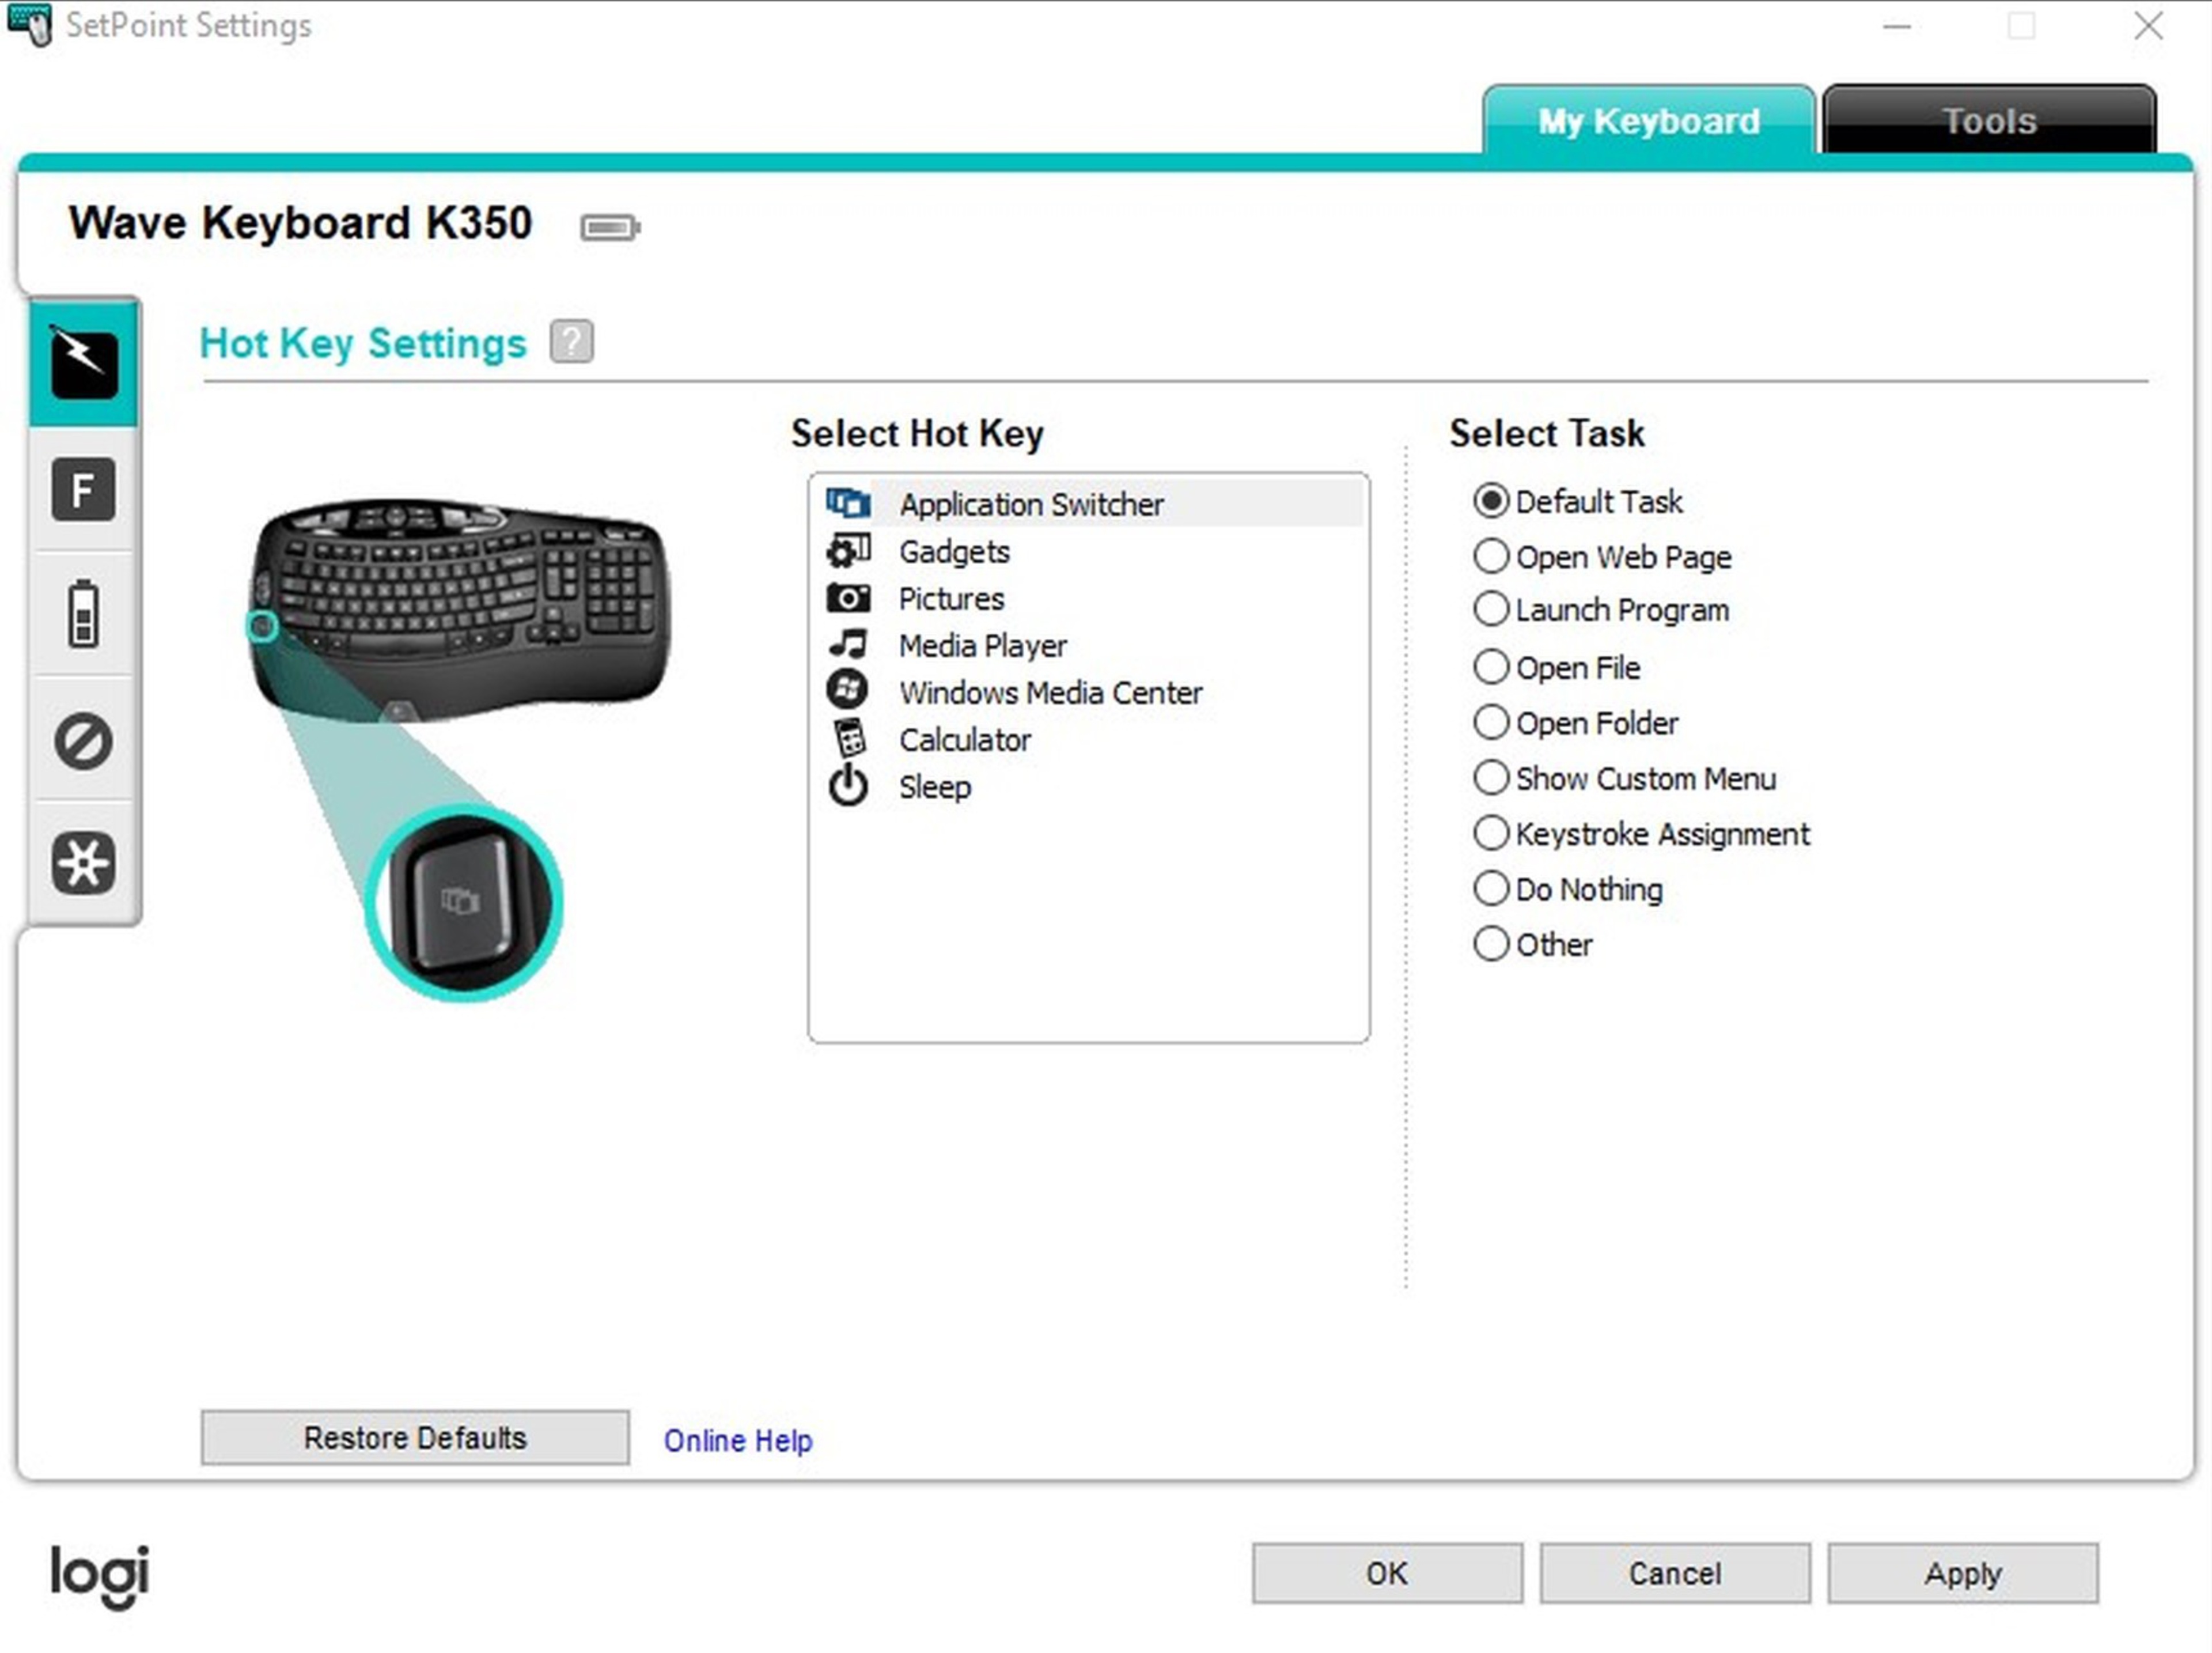
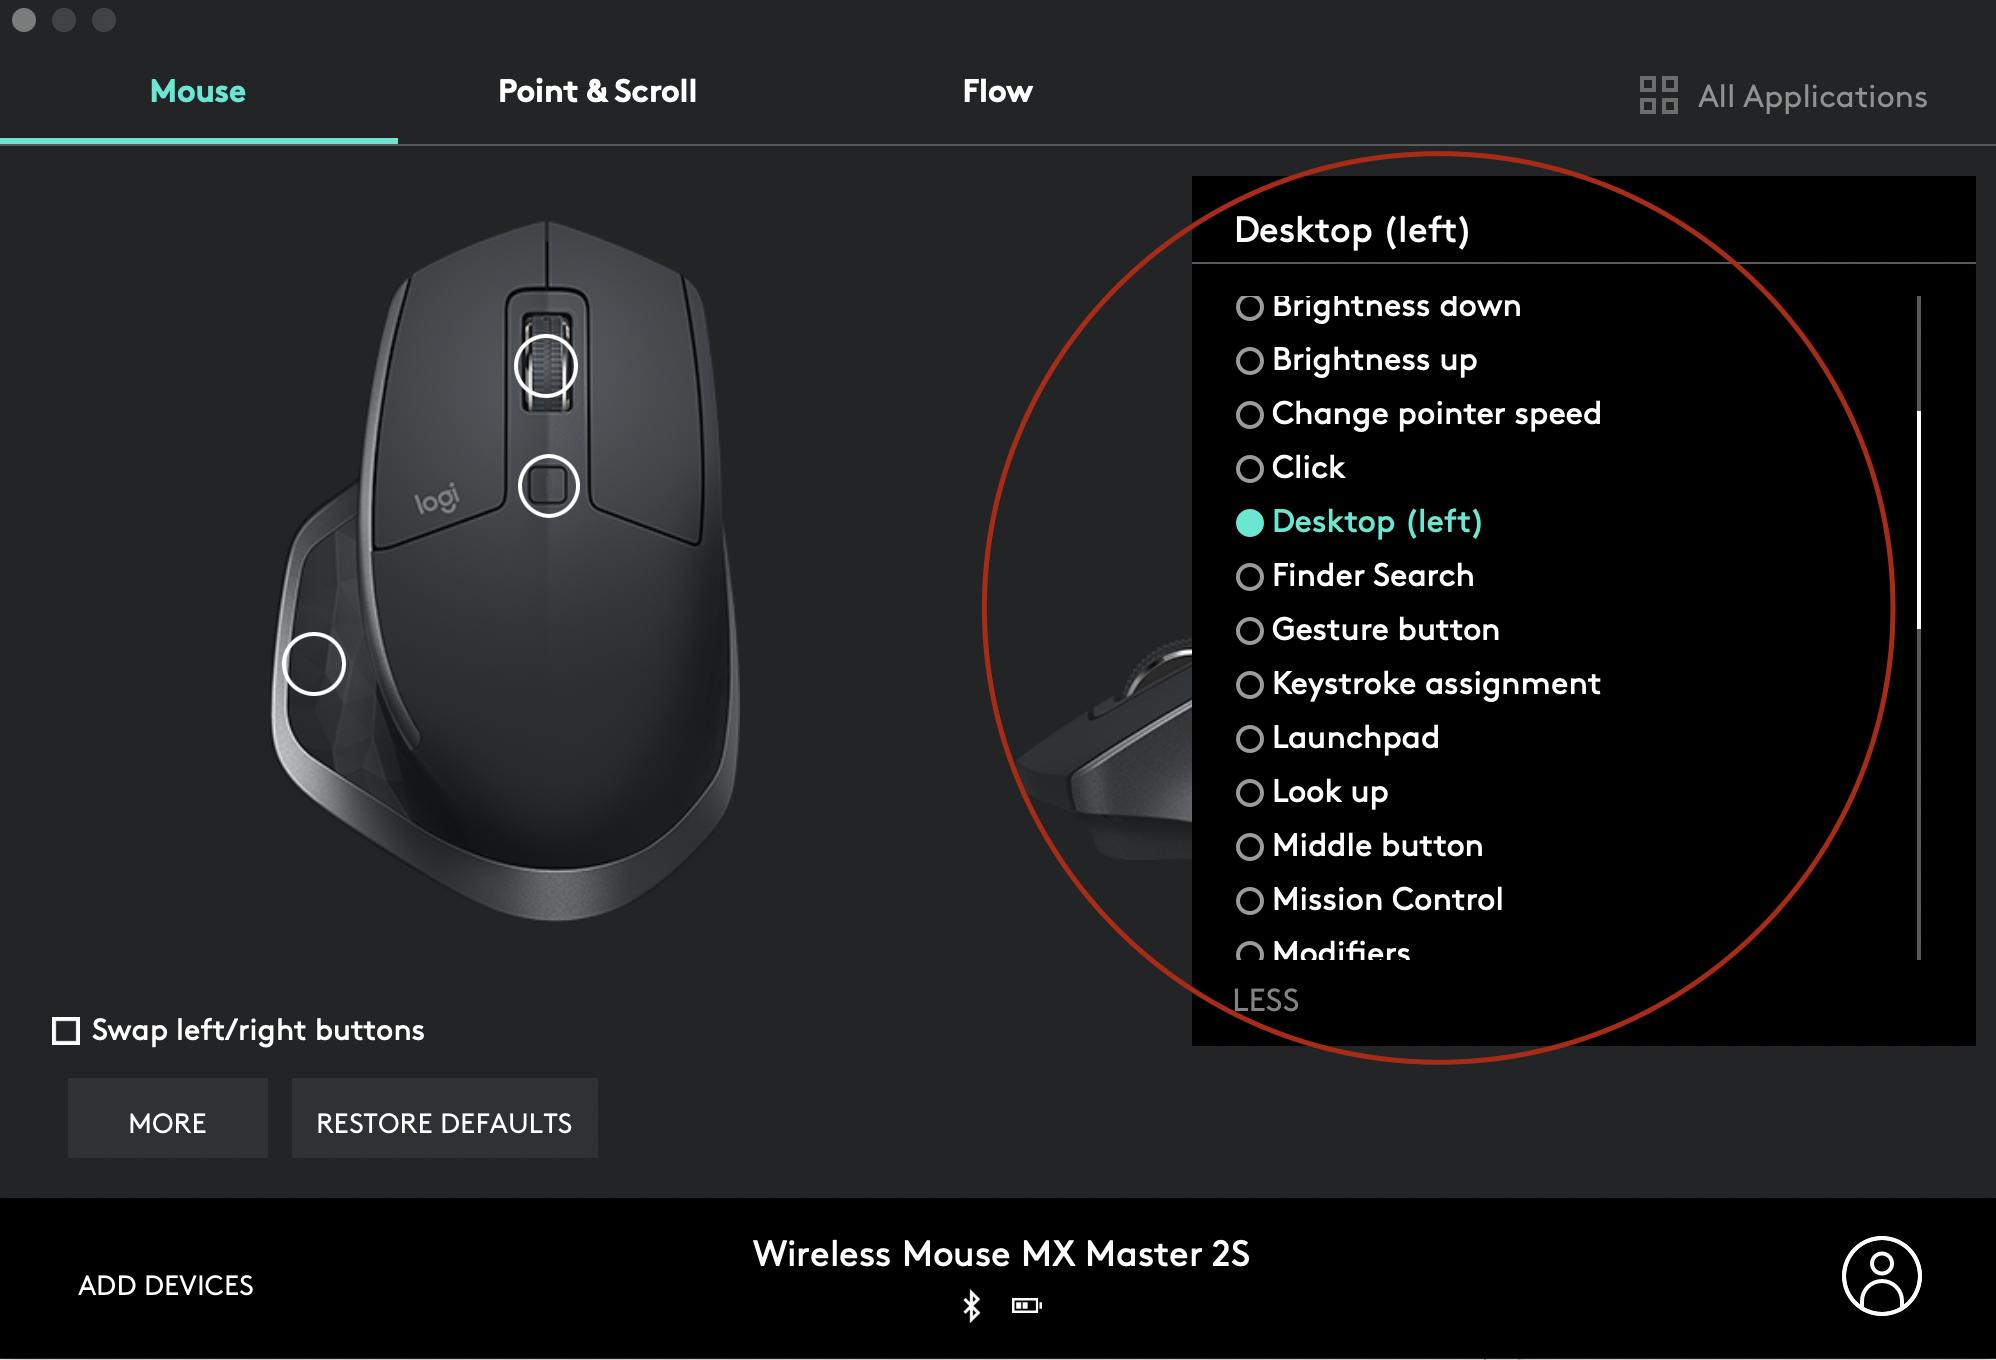
To begin the key assignment process, navigate to the designated section within the Logitech Gaming Software that allows you to customize button assignments for your game controller. Depending on the model of your Logitech game controller, this section may be labeled as “Button Assignment,” “Key Mapping,” or a similar descriptive term within the software interface.
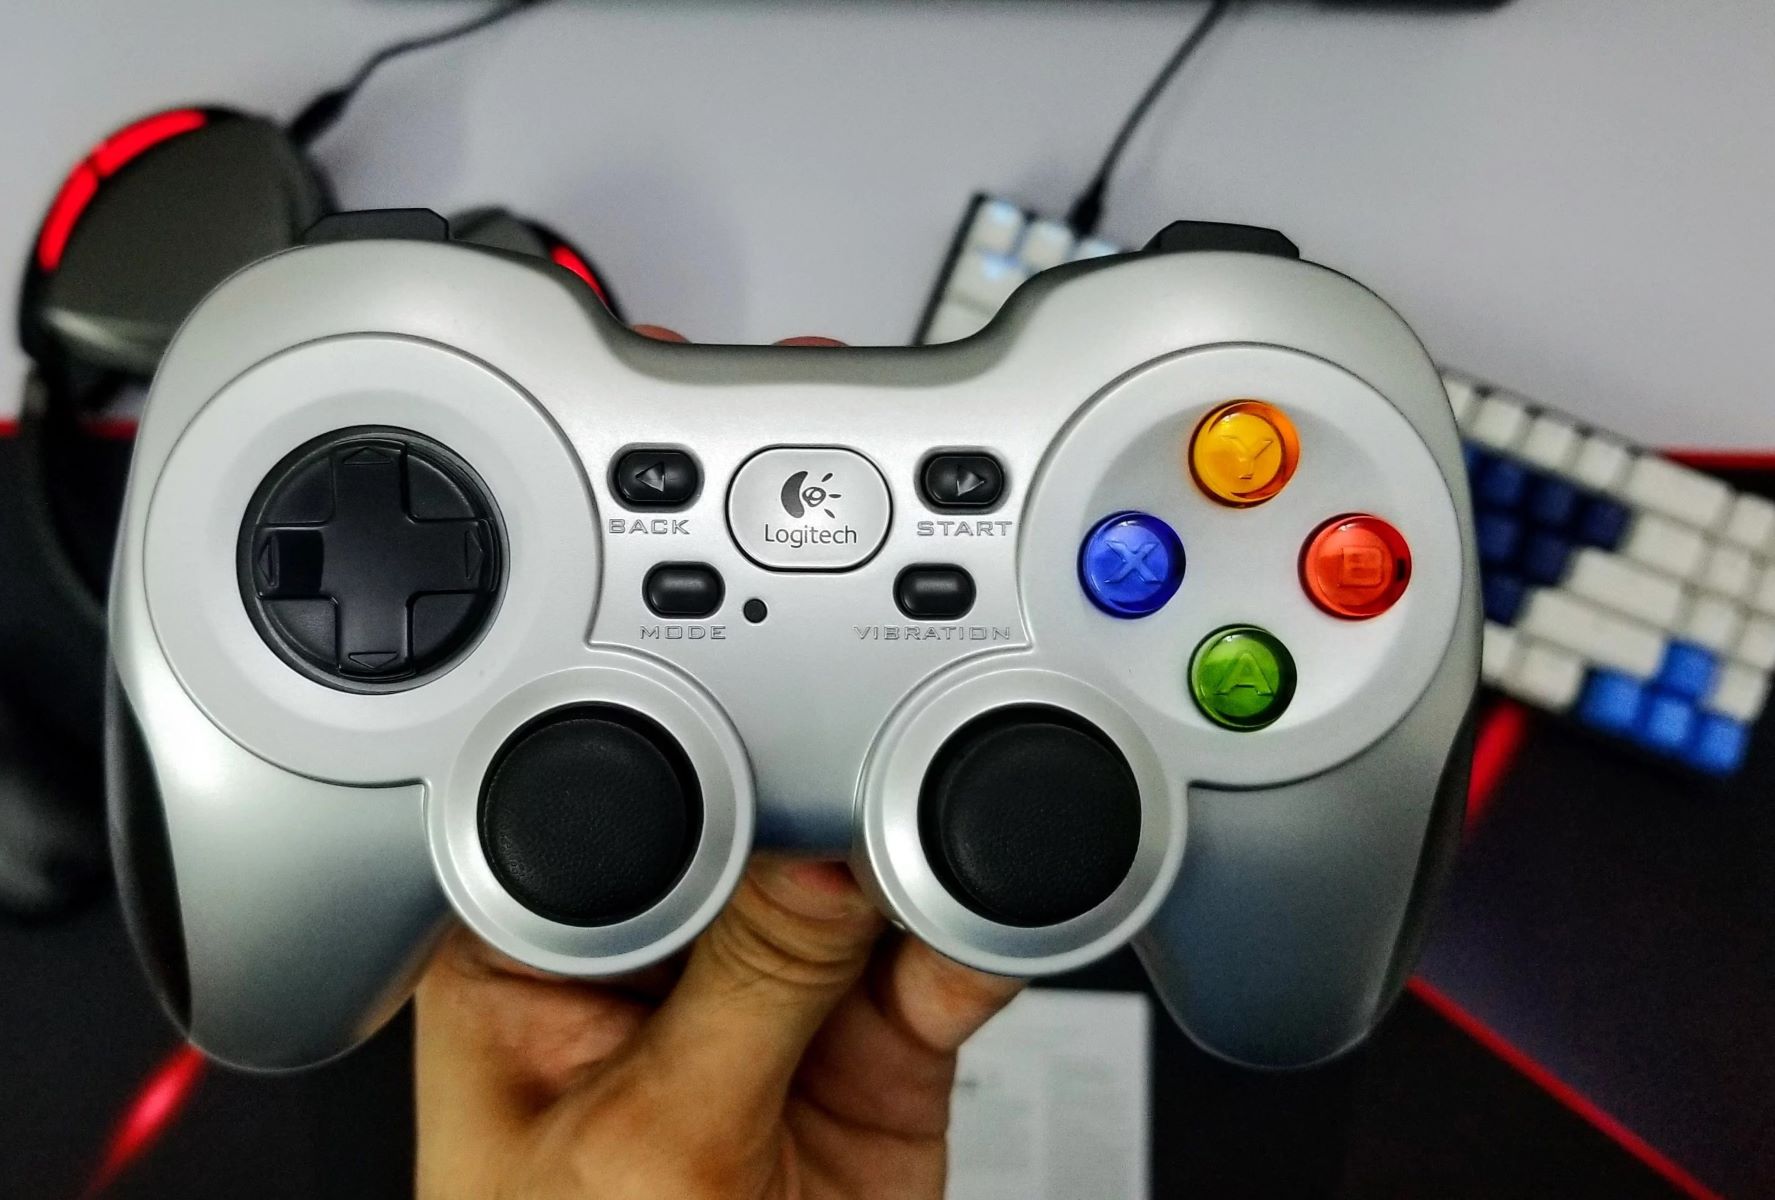
Once you’ve accessed the button assignment section, you’ll be presented with a visual representation of your Logitech game controller, displaying each button and control element available for customization. This visual layout provides a clear and intuitive way to assign specific functions or keystrokes to individual buttons, triggers, or analog sticks on your game controller.
To assign a key to a specific button on your Logitech game controller, simply click on the corresponding button within the software interface and select the desired function or keystroke from the available options. This allows you to map essential in-game actions, such as shooting, jumping, or reloading, to the buttons that best suit your gaming style and hand positioning.
As you assign keys to your Logitech game controller, consider the unique requirements of the games you play most frequently. Different gaming genres may benefit from distinct button configurations, so take the time to customize the controller for each game or gaming style you enjoy. This level of personalization can significantly enhance your gaming performance and overall enjoyment.
Step 5: Save Your Settings
After customizing the key assignments for your Logitech game controller, it’s essential to save your settings to ensure that your configurations are preserved and readily accessible for future gaming sessions. The Logitech Gaming Software provides straightforward options for saving your personalized settings, allowing you to create and manage profiles that capture your preferred button assignments and controller configurations.
Once you’ve finalized the key assignments and button configurations for your Logitech game controller, navigate to the profile management section within the Logitech Gaming Software. Here, you can create a new profile or select an existing one to overwrite with your updated settings. Profiles serve as containers for your customized configurations, enabling you to switch between different setups based on the games you’re playing or the gaming scenarios you encounter.
When saving your settings, it’s advisable to use descriptive and recognizable profile names that reflect the specific games or genres for which the configurations are tailored. This makes it easier to identify and select the appropriate profile when launching a game, ensuring that your Logitech game controller is optimized for the gaming experience at hand.
Once you’ve named and saved your profile, the Logitech Gaming Software will store your key assignments and controller configurations, allowing you to access them whenever you use your game controller for gaming. This seamless integration of personalized profiles streamlines the process of adapting your Logitech game controller to different gaming environments, enhancing your overall gaming versatility and convenience.
By saving your settings within the Logitech Gaming Software, you’re ensuring that your efforts in customizing your Logitech game controller are preserved and easily accessible whenever you engage in gaming activities. This proactive approach to profile management empowers you to maintain a consistent and optimized gaming experience across various games and gaming genres, maximizing the benefits of your personalized key assignments and controller configurations.
Conclusion
Customizing your Logitech game controller through the Logitech Gaming Software offers a gateway to a more immersive and tailored gaming experience. By following the steps outlined in this guide, you’ve gained the knowledge and tools to personalize your game controller, aligning it with your gaming style and preferences.
From downloading and installing the Logitech Gaming Software to assigning keys and saving your settings, each step in the process contributes to creating a gaming environment that empowers you to perform at your best. The ability to map essential functions and commands to your Logitech game controller’s buttons and triggers enhances your responsiveness and control during gameplay, giving you a competitive edge in the virtual worlds you explore.
Remember that the customization process is not static; it’s an ongoing opportunity to refine and adapt your Logitech game controller to the evolving landscape of games and gaming experiences. Whether you’re engaging in fast-paced action, strategic role-playing, or intense racing simulations, your personalized key assignments and controller configurations can elevate your gaming performance and enjoyment.
Embrace the versatility and adaptability of the Logitech Gaming Software as you explore new games and genres, utilizing the power of customized profiles to seamlessly transition between gaming scenarios. Your personalized settings are a reflection of your gaming identity, empowering you to express your unique playstyle and preferences in every virtual adventure.
With your Logitech game controller finely tuned to your specifications, you’re poised to embark on gaming journeys that resonate with your individuality and elevate your gaming prowess. The fusion of technology and personalization opens the door to a world of gaming experiences tailored to your preferences, ensuring that every press of a button on your Logitech game controller resonates with your gaming spirit.