Introduction
Welcome to this step-by-step guide on how to add WePay to your WooCommerce online store. WePay is a popular payment gateway that allows businesses to securely accept online payments from customers. By integrating WePay into your WooCommerce store, you can streamline your checkout process and provide a convenient and secure payment experience for your customers.
Whether you’re a small business owner or an entrepreneur starting your first online store, integrating WePay with WooCommerce can help you increase sales and grow your business. In this guide, we will walk you through the process of setting up and configuring WePay as a payment method in your WooCommerce store.
But first, you may be wondering, why choose WePay over other payment gateways? Well, WePay offers a seamless integration with WooCommerce, providing a user-friendly interface and robust security features. They prioritize the safety and privacy of both merchants and customers, ensuring that all transactions are encrypted and protected against fraud.
Now, let’s dive into the step-by-step process of adding WePay to your WooCommerce store. We’ll cover everything from creating a WePay account to configuring your WooCommerce settings and testing the payment process. By the end of this guide, you’ll have a fully functional WePay integration that will allow you to accept payments from your customers with ease.
Step 1: Sign up for a WePay account
The first step to adding WePay to your WooCommerce store is to sign up for a WePay account. Here’s how:
- Go to the WePay website and click on the “Sign Up” button. You will be redirected to the registration page.
- Choose the type of account you want to create. WePay offers both individual and business accounts. Select the option that best suits your needs.
- Fill out the required information, including your name, contact details, and business information if applicable. Make sure to provide accurate and up-to-date information to avoid any issues later on.
- Create a strong and secure password for your WePay account. Remember to use a combination of uppercase and lowercase letters, numbers, and special characters to enhance security.
- Review and accept the terms of service and privacy policy.
- Click on the “Sign Up” button to complete the registration process.
Once you’ve successfully signed up for a WePay account, you’ll receive a confirmation email with further instructions. Make sure to follow the email’s instructions to verify your account and access your WePay dashboard.
It’s worth mentioning that WePay may require additional documentation or verification for business accounts to ensure compliance with their policies and regulations. If prompted, provide the necessary documents to complete the verification process.
Signing up for a WePay account is an important first step in the process of integrating WePay with WooCommerce. It allows you to access the necessary credentials and settings to connect your online store with WePay’s secure payment processing system.
Step 2: Install the WooCommerce plugin
Once you have signed up for a WePay account, the next step is to install the WooCommerce plugin if you haven’t done so already. WooCommerce is a popular and powerful e-commerce plugin for WordPress, and it will serve as the foundation for integrating WePay into your online store.
Follow these steps to install the WooCommerce plugin:
- Login to your WordPress admin panel.
- Go to the “Plugins” section and click on “Add New”.
- In the search bar, type “WooCommerce”.
- Click on the “Install Now” button next to the WooCommerce plugin.
- Once the installation is complete, click on the “Activate” button to activate the plugin.
After activating the WooCommerce plugin, you will be prompted to set up some initial configurations, such as your store location, currency, shipping options, and payment methods. These settings can be modified later, but it’s important to review and set them up correctly from the beginning.
Installing the WooCommerce plugin is essential for integrating WePay into your online store. It provides the necessary framework and functionality to manage your products, inventory, and customer orders. With WooCommerce and WePay working together, you can offer a seamless shopping experience to your customers.
Step 3: Configure your WooCommerce settings
Before you can add WePay as a payment method in WooCommerce, you need to configure some basic settings to ensure that your online store is set up correctly. Let’s walkthrough the process:
- Access your WordPress admin panel and navigate to the “WooCommerce” tab.
- Click on “Settings” to open the WooCommerce settings page.
- Review the settings in each tab and customize them according to your business needs.
- In the “General” tab, set your store location, currency, and other general settings.
- In the “Products” tab, configure product-related settings such as inventory management, tax options, and shipping.
- Go through all the other tabs, including “Shipping”, “Payments”, “Accounts & Privacy”, and “Emails” to customize the settings based on your requirements.
- Ensure that you save the changes after making any modifications in each tab.
Configuring your WooCommerce settings correctly is crucial for the smooth operation of your online store and the integration of WePay. Taking the time to review and customize these settings will help you provide a great user experience, manage your products effectively, and streamline your checkout process.
In the next step, we will focus specifically on adding WePay as a payment method to your WooCommerce store and configuring the necessary settings to accept payments from your customers. Configuring the payment settings correctly is essential to ensure a secure and seamless payment process.
Step 4: Add WePay as a payment method
Now that you have configured the basic settings in WooCommerce, it’s time to add WePay as a payment method to your online store. Follow these steps to get started:
- Access your WordPress admin panel and go to the “WooCommerce” tab.
- Click on “Settings” and navigate to the “Payments” tab.
- On the Payments page, you will see a list of available payment methods. Scroll down and find “WePay”.
- Click on the toggle switch to enable WePay as a payment method.
- Once you enable WePay, you will see additional options for configuring the settings.
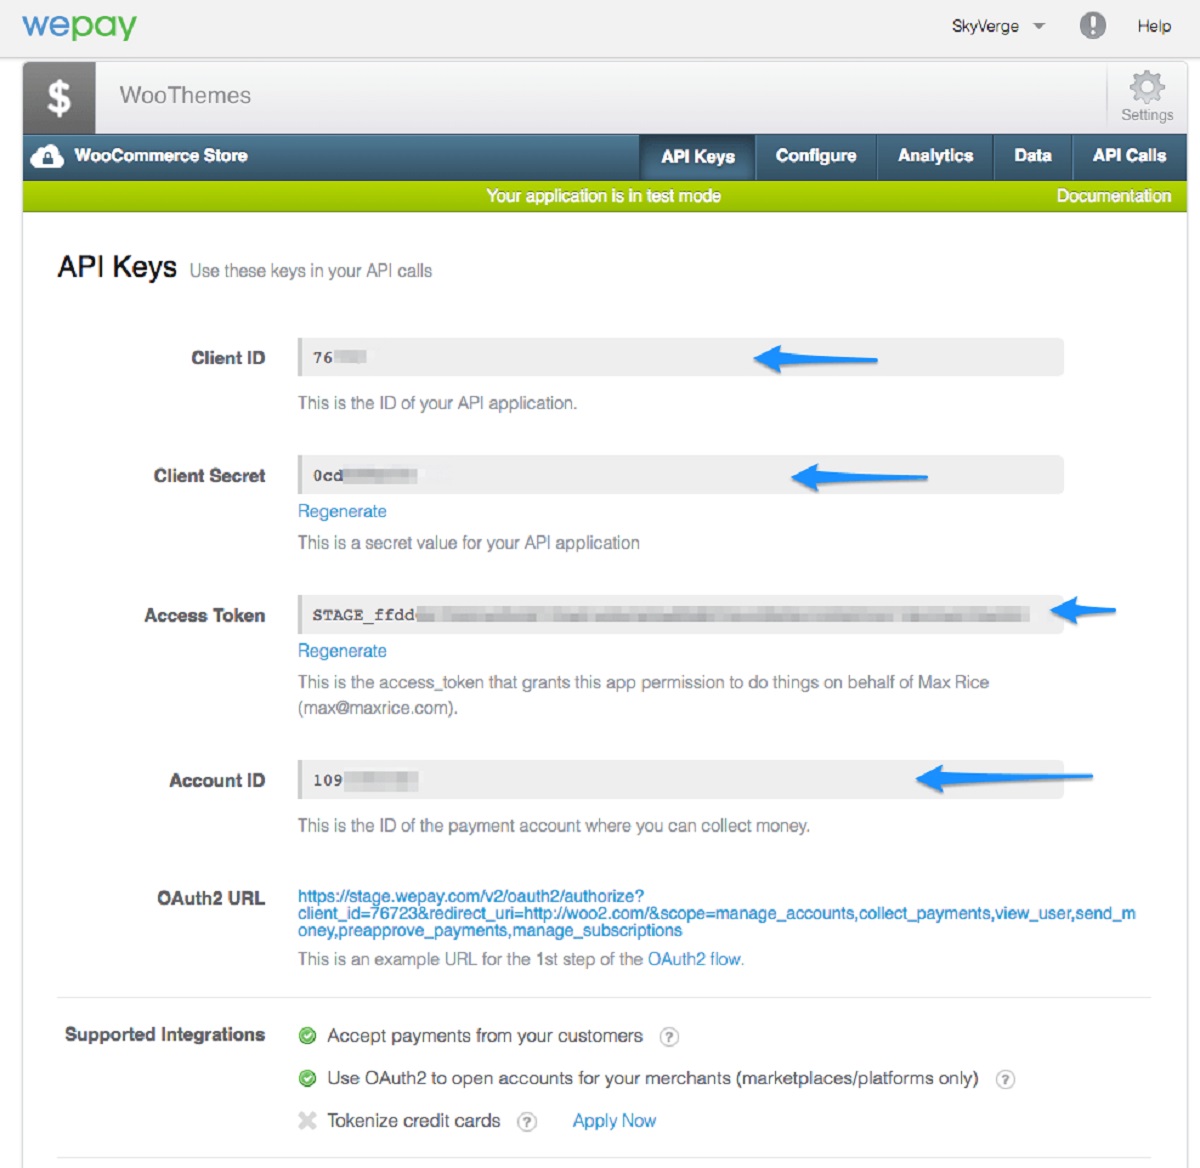
In the WePay settings section, you will need to provide your WePay account details, such as your Client ID, Client Secret, and Access Token. These credentials can be found in your WePay account dashboard.
To obtain your WePay account credentials:
- Login to your WePay account.
- Navigate to the “Integrations” or “API” section.
- Generate the necessary Client ID, Client Secret, and Access Token.
Once you have obtained the WePay account credentials, enter them in the respective fields in the WooCommerce settings. Make sure to save the changes.
Now that you have added WePay as a payment method and configured the necessary settings, it will appear as an option for your customers during the checkout process. They will be able to securely make payments using WePay, providing a seamless and convenient experience.
In the next step, we will explore further configuration options specific to WePay, allowing you to fine-tune the payment process according to your preferences and business needs.
Step 5: Configure WePay settings
After adding WePay as a payment method in WooCommerce, it’s time to configure the specific settings for WePay to ensure a smooth and secure payment process. Here’s how to configure WePay settings in WooCommerce:
- Access your WordPress admin panel and go to the “WooCommerce” tab.
- Click on “Settings” and navigate to the “Payments” tab.
- Find the WePay payment method and click on the “Manage” button.
- In the WePay settings, you will see options to configure various settings specific to WePay.
Let’s explore some of the key settings you can configure:
- Transaction Mode: Choose between “Live” mode and “Test” mode. It’s advisable to initially test your integration in the “Test” mode to ensure everything is working correctly before going live.
- Capture Setting: Determine when the funds will be captured – either when the order is placed or when it is fulfilled. Choose the option that aligns with your business practices and preferences.
- Order Status Mapping: Map different order statuses with WePay transaction states. This allows you to synchronize the order status on your WooCommerce store with the payment status in WePay.
- Payment Instructions: Customize the payment instructions that your customers will see during the checkout process when using WePay.
Take the time to explore each setting and configure them according to your specific needs and preferences. These settings will allow you to customize the payment process and align it with your overall business operations.
Remember to save the changes after configuring the WePay settings to ensure that the new settings take effect on your online store.
With the WePay settings configured, you’re now ready to test the payment process to ensure everything is working smoothly. This brings us to the next step of the integration process.
Step 6: Test the payment process
Testing the payment process is a crucial step to ensure that your customers can make payments through WePay without any issues. It helps identify and resolve any potential problems or glitches before your online store goes live. Follow these steps to test the payment process:
- Access your online store and add a product to the cart.
- Proceed to the checkout page and select WePay as the payment method.
- Enter the necessary billing details and complete the required fields.
- Review the order summary and ensure that everything is correct.
- Click on the “Place Order” or “Complete Purchase” button.
- You will be redirected to the WePay payment page, where you can enter test payment details and simulate the payment process.
During the testing phase, you can use the test credit card details provided by WePay to complete the payment. These test credit card details do not charge any real transactions but allow you to simulate the payment process for testing purposes. Make sure to follow the instructions provided by WePay to use the test credit card details correctly.
Once you have completed the payment, you should receive a confirmation or order success page. Verify that the order details and payment status are correctly updated in your WooCommerce admin panel. You can also check your WePay account dashboard to ensure that the simulated payment is reflected correctly.
If you encounter any issues during the testing process, double-check your WePay and WooCommerce settings to ensure they are correctly configured. Additionally, make sure you have entered the test payment details accurately.
Continue testing the payment process multiple times to ensure consistency and reliability. Pay attention to the order status updates, transaction details, and any error messages that may appear during the testing process. This thorough testing will help you identify and resolve any potential issues before launching your online store.
Once you are satisfied with the testing results and confident that the payment process is working smoothly, you can proceed to make your online store live and start accepting real payments through WePay.
Conclusion
Congratulations! You have successfully learned how to add WePay as a payment method to your WooCommerce online store. By integrating WePay, you have opened up new opportunities to streamline your checkout process and provide a secure payment experience for your customers.
In this step-by-step guide, we covered the essential steps involved in adding WePay to WooCommerce. We started by signing up for a WePay account and installing the WooCommerce plugin. We then configured the basic WooCommerce settings and added WePay as a payment method. After that, we explored the specific settings for WePay, allowing you to tailor the payment process to suit your business needs.
Finally, we tested the payment process to ensure that everything is functioning smoothly and successfully completed a test payment using WePay’s test credit card details. Testing the payment process is crucial to identify any potential issues and ensure a seamless experience for your customers.
Now, armed with the knowledge and steps outlined in this guide, you can confidently accept payments through WePay in your WooCommerce store. Remember to regularly monitor your transactions and keep your settings up to date to ensure a secure and efficient payment process.
Adding WePay to your WooCommerce store is just the beginning. As your business grows, you might explore additional features and customization options offered by WePay to enhance your payment process further.
Thank you for following this guide, and we hope that integrating WePay with WooCommerce boosts your sales and provides a seamless payment experience for your customers!


