Introduction
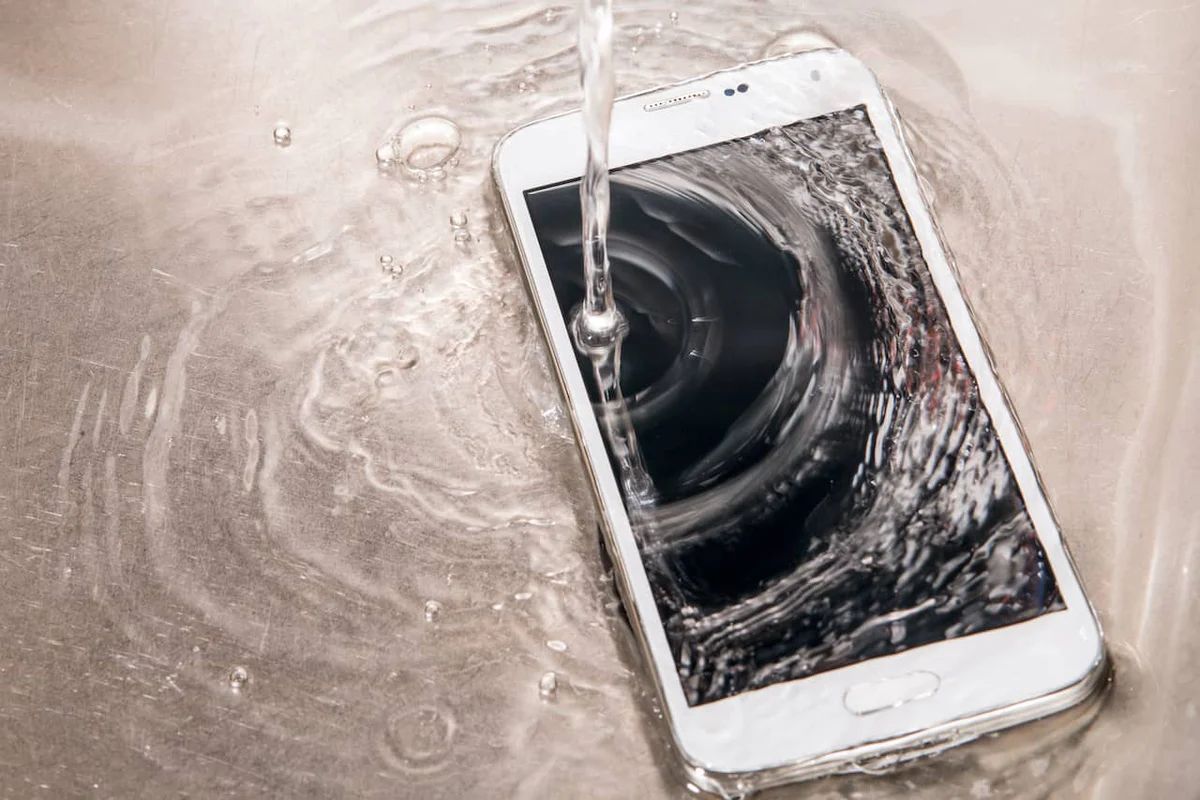
Accidents happen, and one of the most unfortunate mishaps that can occur is dropping your beloved smartphone into water. Whether it’s a sink, toilet, or even a puddle, a wet phone can spell disaster if not handled properly. But fear not! In this guide, we will walk you through the steps on how to save a wet smartphone.
Water damage can wreak havoc on your phone’s internal components, causing it to malfunction or even render it completely unusable. However, if you act quickly and follow the right steps, you can increase the chances of saving your wet phone and preventing any further damage.
It’s important to note that the success of saving a wet smartphone depends on various factors, such as the duration of water exposure, the type of water (freshwater or saltwater), and the phone’s make and model. Nevertheless, by following these steps, you can give your wet phone the best possible chance of survival.
So, without further ado, let’s dive into the steps you need to take to save your wet smartphone.
Step 1: Remove the phone from water
The moment you realize your phone has taken an unexpected dip in water, time is of the essence. The longer it stays submerged, the higher the risk of irreparable damage. Here’s what you need to do:
- Act quickly: Retrieve your phone from the water as soon as possible. The longer it remains submerged, the greater the chance for water to seep into sensitive areas.
- Power off the phone: To avoid any potential short circuits, immediately turn off your phone. If the screen is unresponsive, hold down the power button until it shuts down.
- Do not press any buttons: Resist the temptation to test if your phone is still working. Pressing buttons can force water deeper into the device and cause more damage.
- Do not shake or blow on the phone: These actions can further spread the water and push it into the device’s internal components. Instead, proceed to the next step.
- Remove any external accessories: Take off the phone case, pop off the back cover (if possible), and remove any plugs or attachments. These can trap water and hinder the drying process.
By following these initial steps, you can mitigate further damage and set yourself up for a successful smartphone rescue mission.
Step 2: Power off the phone
Once you have removed the phone from water, the next critical step is to turn it off immediately. This action is crucial to prevent electrical shorts and further damage to the internal components. Here’s how you should proceed:
- Hold down the power button: Locate the power button on your smartphone. For most devices, it is typically located on the side or top of the phone. Hold it down until you see the power-off options appear on the screen.
- Choose the power-off option: Select the option to power off or shut down your phone. This action will cut off the power supply to the device, minimizing the risk of short circuits.
- Remove the battery (if applicable): If you have a phone with a removable battery, take this opportunity to carefully remove it. This step is particularly important for devices such as older models or some Android devices.
- Avoid using the phone: While it may be tempting to test if your phone is still functioning, it is crucial to refrain from pressing any buttons or attempting to power it back on. Doing so can cause further damage.
By promptly and properly powering off your wet phone, you are taking a crucial step in preventing potential electrical damage and increasing the chances of saving your device.
Step 3: Remove the SIM card and memory card
After powering off your wet phone, the next step is to remove the SIM card and memory card. These components can be susceptible to water damage and should be taken out to prevent further harm. Follow these steps to safely remove them:
- Locate the SIM card slot: The SIM card slot is typically located on the side or top of the phone. Look for a small tray or slot with a pinhole or removable cover.
- Insert the SIM card removal tool or a paperclip: If your phone came with a SIM card ejection tool, use it to gently push into the pinhole or slot until the tray pops out. Alternatively, you can straighten a paperclip and insert it into the pinhole to release the tray.
- Remove the SIM card: Once the tray is out, carefully remove the SIM card from the slot. Handle it with care to avoid any damage.
- Remove the memory card (if applicable): If your phone has a memory card slot, locate it and follow the same procedure to remove the memory card.
- Inspect the SIM card and memory card: After removing them, check for any signs of moisture or damage. If you notice any wetness, gently wipe them dry using a clean cloth or tissue.
By removing the SIM card and memory card, you are preventing potential damage to these delicate components. This step will also aid in the drying process and increase the chances of successfully saving your wet phone.
Step 4: Dry your phone with a cloth or towel
Now that you have removed the SIM card and memory card, it’s time to start the drying process. Using a cloth or towel, you can remove any visible water on the surface of your phone. Follow these steps for effective drying:
- Get a clean, soft cloth or towel: Choose a cloth that is lint-free and absorbent, such as a microfiber cloth or a soft cotton towel.
- Gently dab the phone: Carefully pat the surface of your phone to absorb any visible water. Avoid rubbing or applying excessive pressure as it can push the water deeper into the phone.
- Pay attention to ports and crevices: Use the cloth or towel to delicately wipe around the charging port, headphone jack, speakers, and any other openings. Be thorough but gentle to avoid causing any damage.
- Do not use heat or blow-drying methods: It’s essential to remember that heat can damage your phone further. Do not attempt to use a hairdryer, oven, or any other heat source to dry your phone.
- Do not use compressed air: Using compressed air can force water into the internal components or damage delicate parts. It’s best to avoid this method.
Drying your phone with a cloth or towel helps to remove excess moisture from the surface. However, keep in mind that this step alone may not be sufficient. It is essential to proceed with the following steps to further aid in the drying process.
Step 5: Use silica gel packets or rice to absorb moisture
After drying the surface of your phone, it’s time to tackle the hidden moisture within the device. One effective method is to use either silica gel packets or uncooked rice to absorb the remaining moisture. Here’s how you can proceed:
- Option 1: Silica gel packets
- Locate silica gel packets: If you have saved any silica gel packets from packaged goods or electronic devices, these can be extremely helpful in removing moisture. The packets are often labeled as “Desiccant – Do not eat.”
- Place your phone in a container: Find a sealable container or a ziplock bag that is large enough to hold your phone comfortably.
- Add the silica gel packets: Place a few silica gel packets into the container with your phone. Make sure the packets are not in direct contact with the device to prevent any potential damage.
- Seal the container: Close the container or ziplock bag tightly to create an airtight environment.
- Leave it for at least 24 to 48 hours: Allow your phone to sit in the container undisturbed for a minimum of 24 to 48 hours. The silica gel packets will naturally absorb the moisture from the phone.
- Option 2: Rice
- Find a container: If you do not have silica gel packets, uncooked rice can be a readily available alternative for absorbing moisture.
- Fill a container with rice: Use a container large enough to accommodate your phone and fill it with uncooked rice.
- Place your phone in the rice: Nestle your phone in the rice, ensuring that it is completely covered and surrounded by the grains.
- Seal the container: Seal the container tightly to maintain an airtight environment.
- Wait for at least 24 to 48 hours: Allow your phone to remain in the rice undisturbed for a minimum of 24 to 48 hours. The rice will help absorb the moisture from your device.
Using silica gel packets or rice is a cost-effective method to draw out moisture from your wet phone. While these methods are popular, it’s important to note that they do not guarantee 100% success. However, they can significantly increase the chances of saving your device by aiding in the drying process.
Step 6: Avoid using heat sources to dry the phone
As tempting as it may be to hasten the drying process, using heat sources to dry your wet phone should be strictly avoided. Heat can potentially damage the internal components of your device and exacerbate the water damage. Here’s why you should steer clear of heat sources:
- Avoid using a hairdryer: Using a hairdryer to dry your phone is a common mistake, but it is highly discouraged. The hot air blown from a hairdryer can cause excessive heat, which can warp or melt delicate internal components.
- Keep the phone away from direct sunlight: Placing your wet phone under direct sunlight is another heat-related risk. The intense heat from the sun can overheat the device, leading to irreversible damage.
- Avoid using microwaves or ovens: Microwaving or placing your phone in an oven can have disastrous consequences. Microwaves generate electromagnetic waves that can fry the delicate circuitry inside your phone, while ovens can expose your device to excessive heat.
- Prevent excessive heat exposure: Leaving your device on a radiator, near a heater, or any other heat source is not recommended. The prolonged exposure to heat can cause internal components to malfunction or even melt.
Remember, the goal is to gently and naturally evaporate the moisture from your phone. Using heat sources can do more harm than good, resulting in irreversible damage. It’s best to be patient and allow your phone to air dry or use alternative moisture-absorbing methods discussed earlier.
Step 7: Wait for at least 24 hours for the phone to dry
Once you have taken the necessary steps to dry your phone, it’s essential to exercise patience and allow sufficient time for the drying process to take place. Waiting for at least 24 hours before attempting to power on your phone is crucial. Here’s why:
The drying time may vary depending on several factors, such as the extent of water exposure, humidity levels, and the make and model of your device. Waiting for a minimum of 24 hours will ensure that the internal components have ample time to evaporate any remaining moisture.
During this waiting period, it’s essential to resist the temptation of turning on your phone or checking if it’s fully dried. Prematurely attempting to power on your device can risk further damage if it hasn’t had enough time to dry thoroughly.
It’s also crucial to choose a well-ventilated and dry area to leave your phone. Avoid placing it in a closed drawer or any location with high humidity, as this can hinder the drying process.
By allowing your phone to sit undisturbed for a minimum of 24 hours, you greatly increase the chances of success in reviving your wet phone. In some cases, a longer drying time may be necessary, so exercise patience and resist the urge to rush the process.
Step 8: Test the phone to check if it’s working
After the waiting period, it’s time to test your phone to see if it has successfully recovered from the water damage. Here’s how you can check if your phone is working:
- Reassemble the phone: If you had removed any components such as the SIM card or memory card, reinsert them back into their respective slots.
- Power on your phone: Hold down the power button to turn on your phone. If it powers on successfully and you see the logo or home screen, it’s a positive sign.
- Test various functions: Check all the essential functions of your phone, including the touchscreen, camera, speakers, microphone, and buttons. Make a test call to ensure the microphone and speaker are working properly.
- Monitor for any issues: Pay close attention to any abnormal behavior or signs of malfunctioning during the testing period. Look for issues such as distorted sound, unresponsiveness, or flickering screen.
- Check for water damage indicators: Most smartphones have water damage indicators that change color when exposed to moisture. Check for any visible changes in the indicator’s color to confirm water damage.
While a successful test indicates that your phone has survived the water damage, it’s important to keep an eye out for any potential long-term issues that may arise. Even if your phone appears to be working fine initially, complications can manifest later due to residual damage.
If you encounter any persistent issues or your phone does not turn on after following these steps, it may be necessary to seek professional help or consult with the manufacturer for further assistance.
Step 9: Consider professional help if the phone does not turn on
If, despite your best efforts, your phone does not turn on or exhibits persistent issues after following the previous steps, it may be time to consider seeking professional assistance. Here are some reasons why professional help may be necessary:
- Extensive water damage: If your phone experienced prolonged water exposure or submersion, there may be internal damage that requires specialized knowledge and equipment to repair.
- Inaccessible or sensitive components: Smartphones are intricate devices with delicate components that may be difficult to access without proper tools. Professionals have the expertise to disassemble and repair these components effectively.
- Advanced troubleshooting and diagnostics: Professional technicians possess the necessary skills to diagnose and address complex issues that may not be apparent to the average user. They can perform advanced troubleshooting to pinpoint the exact cause of the problem.
- Manufacturer warranty or insurance coverage: If your phone is still under warranty or covered by insurance, it is advisable to contact the manufacturer or your insurance provider for guidance on the next course of action. They may offer repair services or replacement options.
- Prevention of further damage: Attempting DIY repairs without proper knowledge and tools can potentially cause more harm than good. Professional assistance can minimize the risk of causing irreversible damage to your device.
Remember, attempting to repair your phone beyond your skill level can void any existing warranties. It’s crucial to consult with experts who have the necessary training and experience in smartphone repair.
Don’t lose hope if your phone doesn’t turn on or function properly. Professionals have the expertise to assess and provide potential solutions to salvage your device or help you explore replacement options.
Conclusion
Accidentally submerging your smartphone in water can be a distressing experience, but with the right steps, you can increase the chances of saving your device. Here’s a recap of what you should do when you find yourself with a wet phone:
- Remove the phone from water as quickly as possible and power it off.
- Remove the SIM card and memory card, if applicable.
- Dry the surface of the phone with a cloth or towel, being careful not to apply excessive pressure.
- Utilize silica gel packets or uncooked rice to absorb moisture from the device. Avoid using heat sources.
- Wait at least 24 hours for the phone to dry thoroughly.
- Power on the device and test all functions to ensure proper functionality.
- If the phone does not turn on or exhibits persistent issues, consider seeking professional help.
Remember, the success of saving a wet smartphone depends on various factors, and there are no guarantees. Acting quickly and following these steps can improve your chances of salvaging your device. However, it’s important to exercise caution and seek professional assistance if needed.
Lastly, prevention is key. Taking precautions like keeping your phone away from water sources and using waterproof cases can help avoid future mishaps. But if an accident does occur, now you have the knowledge to handle the situation with confidence.