Introduction
Welcome to this guide on how to dust off your Ultrabook UX21A. Over time, dust and debris can accumulate on the surface and inside your Ultrabook, affecting its performance and longevity. Regular maintenance, including dusting off your device, is essential to ensure that it continues to run smoothly and efficiently.
The Ultrabook UX21A is a sleek and powerful device, known for its compact design and excellent performance. However, its small size also means that it can be more prone to dust and dirt buildup, which can impact its functionality. By following the steps outlined in this guide, you will be able to safely and effectively remove dust particles from both the exterior and interior of your Ultrabook UX21A.
Taking the time to clean and maintain your Ultrabook can have several benefits. Firstly, it helps to prevent overheating, as dust can clog the cooling system and contribute to higher temperatures. Secondly, removing dust can improve the performance of your device, as it ensures that the components are not obstructed and can function optimally. Lastly, cleaning your Ultrabook regularly can help to prolong its lifespan, saving you from costly repairs or replacements down the line.
In the following sections, we will provide you with a step-by-step guide on how to properly dust off your Ultrabook UX21A. Before we dive into the cleaning process, let’s make sure you have all the necessary tools and equipment at your disposal.
Why Dusting Off Your Ultrabook UX21A is Important
Dusting off your Ultrabook UX21A is crucial for maintaining its performance and longevity. Here are some reasons why regular cleaning is important:
- Prevents Overheating: Dust and debris can accumulate in the cooling system of your Ultrabook, hindering proper airflow and causing the device to overheat. This can lead to reduced performance, unexpected shutdowns, and even long-term damage to the internal components. By dusting off your Ultrabook regularly, you can ensure that the cooling system is free from obstruction and can effectively dissipate heat.
- Improves System Performance: Dust can accumulate on the surface of the keyboard, touchpad, and other components, affecting their functionality. Over time, this can lead to sticky keys, unresponsive touchpads, and decreased overall performance. By cleaning these areas, you can ensure that your Ultrabook operates smoothly and efficiently.
- Prolongs Device Lifespan: Regular maintenance, including dusting off your Ultrabook, helps to extend its lifespan. Dust particles can be abrasive and cause wear and tear on delicate components, leading to premature failure. By keeping your Ultrabook clean, you can reduce the risk of damage and ensure that it continues to function optimally for a longer period.
- Enhances Aesthetics: A clean and dust-free Ultrabook not only performs better but also looks better. Dust and smudges on the exterior can make your device appear worn and neglected. By regularly dusting off your Ultrabook, you can maintain its sleek and professional appearance.
- Creates a Healthy Environment: Dust can contain allergens and other particles that can be harmful to your health, especially if you suffer from allergies or respiratory conditions. Regularly cleaning your Ultrabook helps to create a healthier environment, reducing the risk of breathing in dust particles that may be released during use.
By understanding the importance of dusting off your Ultrabook UX21A, you can prioritize regular cleaning as part of your device maintenance routine. Now that you know why dusting off your Ultrabook is important, let’s move on to the next section, where we will discuss the tools you will need for the cleaning process.
Tools Needed for Dusting Off Your Ultrabook UX21A
Before you start the process of dusting off your Ultrabook UX21A, it’s important to gather all the necessary tools and equipment. Having the right tools not only ensures that you can clean your device effectively but also prevents any accidental damage. Here are the key tools you will need:
- Microfiber cloth: A microfiber cloth is a must-have tool for cleaning your Ultrabook. It is gentle on the surface and helps to remove dust without scratching or leaving residue behind. Make sure to choose a high-quality microfiber cloth to ensure optimal cleaning results.
- Canned air: Canned air is a useful tool for removing dust from areas that are hard to reach or inaccessible with a cloth. It comes in a pressurized can and is sprayed to blow away dust particles. When using canned air, make sure to hold the can upright to avoid spraying any liquid or debris onto your device.
- Cleaning solution: If there are stubborn smudges or marks on the surface of your Ultrabook, a cleaning solution can help to remove them. Choose a cleaning solution specifically designed for electronics and avoid using harsh chemicals that may damage the surface or affect the performance of your device. Apply the cleaning solution to the microfiber cloth and gently wipe the affected areas.
- Cotton swabs: Cotton swabs are useful for cleaning small and delicate areas of your Ultrabook, such as the gaps between keys on the keyboard or connectors. Dip a cotton swab into a small amount of cleaning solution or isopropyl alcohol to clean these areas effectively.
- Soft brush: A soft brush, such as a small paintbrush or a clean makeup brush, can be used to gently sweep away dust from hard-to-reach corners, crevices, and vents. Avoid using a brush with stiff bristles that may scratch or damage the surface of your Ultrabook.
- Antistatic gloves: Antistatic gloves are not necessary but can be beneficial to prevent the buildup of static electricity during the cleaning process. Static electricity can potentially damage sensitive electronic components, so wearing antistatic gloves adds an extra layer of protection.
By having these tools ready, you will be well-equipped to effectively and safely dust off your Ultrabook UX21A. In the next section, we will walk you through the step-by-step process of cleaning the exterior of your device.
Step 1: Shutting Down and Unplugging Your Ultrabook UX21A
Before you begin cleaning your Ultrabook UX21A, it is essential to shut it down and unplug it from any power source. This step ensures your safety and prevents any potential damage that can occur if you accidentally press keys or buttons during the cleaning process. Follow these simple steps:
- Save your work: Before shutting down your Ultrabook, make sure to save any open documents or files. This ensures that you don’t lose any unsaved data when you power off the device.
- Close running programs: Close any running programs or applications. This prevents any interference during the shutdown process and ensures a smooth shutdown.
- Click Start: Click on the “Start” button in the bottom left corner of your screen, then click on the “Power” button.
- Select Shut Down: From the drop-down menu, select the “Shut Down” option. Your Ultrabook will begin the shutdown process.
- Wait for the shutdown to complete: Allow your Ultrabook to fully power down before proceeding to the next step. This may take a few moments, so be patient.
- Unplug your Ultrabook: Once your Ultrabook is shut down, unplug the power adapter from the device. This ensures that there is no electrical connection and eliminates the risk of electric shock during the cleaning process.
By following these steps, you ensure that your Ultrabook UX21A is safely powered off and disconnected from any power source. This sets the stage for a thorough and effective cleaning process. In the next step, we will guide you through removing the battery (if applicable) before you start cleaning the exterior of your Ultrabook.
Step 2: Removing the Battery (if Applicable)
Before you proceed with cleaning the exterior of your Ultrabook UX21A, it is important to check if your device has a removable battery. Not all Ultrabooks have user-accessible batteries, so this step may not be applicable to your specific model. However, if your Ultrabook does have a removable battery, here is how you can safely remove it:
- Ensure proper shutdown: Make sure your Ultrabook UX21A is completely shut down and unplugged from any power source, as mentioned in the previous step. This guarantees your safety during battery removal.
- Locate the battery release latch: Look for the battery release latch on the underside of your Ultrabook. It is usually marked with a battery icon or a lock symbol.
- Slide or press the latch: Slide or press the battery release latch in the direction indicated by the arrow or the provided instructions. This will unlock the battery.
- Remove the battery: Once the latch is released, gently slide or lift the battery out of its compartment. Use caution and avoid pulling forcefully to prevent any damage to the battery or the internal components.
- Set aside the battery: Place the removed battery in a safe and clean location, away from any liquids or potential sources of damage. If you have an extra battery, you may want to swap the batteries to ensure uninterrupted usage.
Removing the battery allows you better access to clean the exterior of your Ultrabook UX21A without the risk of accidentally turning it on or causing any electrical issues. If your Ultrabook does not have a removable battery, simply skip this step and proceed to the next section where we will cover cleaning the exterior of your device.
Now that you know how to remove the battery (if applicable), you are ready to move on to the next step – cleaning the exterior of your Ultrabook UX21A.
Step 3: Cleaning the Exterior of Your Ultrabook UX21A
Now that your Ultrabook UX21A is shut down, unplugged, and, if applicable, the battery is removed, it’s time to clean the exterior of your device. Cleaning the exterior not only enhances the appearance of your Ultrabook but also helps to remove dust, fingerprints, and other debris. Follow these steps to clean the exterior of your Ultrabook UX21A:
- Use a microfiber cloth: Take a clean microfiber cloth and gently wipe the entire surface of your Ultrabook, paying attention to areas that are more prone to dust and fingerprints. Use smooth and circular motions to remove any visible dirt. Avoid applying excessive pressure, as it may cause damage to the surface.
- Focus on the edges and corners: Pay close attention to the edges and corners of your Ultrabook, as dirt and dust tend to accumulate in these areas. Use the corner of the microfiber cloth or a soft brush to gently remove any stubborn dirt or debris.
- Don’t forget the screen: Your Ultrabook UX21A’s screen is a critical component that requires regular cleaning. Make sure the device is turned off and use a clean microfiber cloth to wipe the screen gently. Avoid using excessive force or harsh cleaning solutions, as they can damage the screen. If necessary, slightly dampen the cloth with water or a mild cleaning solution specifically designed for screens.
- Clean the touchpad and keyboard: The touchpad and keyboard are areas that accumulate a lot of dirt and grime. Use a clean microfiber cloth or a cotton swab slightly dampened with a cleaning solution to wipe the touchpad and keyboard. Ensure that no excess liquid is used to prevent it from seeping into the cracks.
- Pay attention to ports and connectors: Dust and debris can accumulate in the ports and connectors of your Ultrabook UX21A. Use a clean and dry cotton swab to gently remove any visible dirt or dust from these areas. Avoid using any cleaning solutions, as they may cause damage to the connectors.
- Allow your Ultrabook to dry: After cleaning the exterior, allow your Ultrabook UX21A to air dry before moving on to the next step. Make sure all areas are completely dry before reassembling or turning on your device.
By following these steps, you can effectively clean the exterior of your Ultrabook UX21A and maintain its sleek appearance. In the next section, we will cover how to clean the keyboard and touchpad, ensuring that these essential components are free from dust and debris.
Step 4: Cleaning the Keyboard and Touchpad
The keyboard and touchpad of your Ultrabook UX21A are areas that require regular cleaning, as they are prone to accumulating dirt, dust, and debris. By properly cleaning these components, you can ensure smooth and accurate functionality. Follow these steps to clean the keyboard and touchpad of your Ultrabook:
- Power off your Ultrabook: Make sure your Ultrabook UX21A is turned off and unplugged before you begin cleaning the keyboard and touchpad. This ensures your safety and prevents any accidental inputs.
- Shake out loose debris: Gently turn your Ultrabook upside down and shake it lightly to dislodge any loose debris or crumbs that may have gathered between the keys. Be cautious not to shake it too vigorously.
- Use a can of compressed air: Hold the can of compressed air upright and use short bursts to blow out any remaining dust or debris from between the keys. Start from the top of the keyboard and work your way down, covering all areas. Pay special attention to the spaces between the keys and around the edges of the touchpad.
- Wipe the keys: Dampen a cotton swab or a clean microfiber cloth with a mild cleaning solution or isopropyl alcohol. Gently wipe the keys, focusing on areas that are visibly dirty or sticky. Avoid using excessive liquid or applying too much pressure that may damage the keys or the surface of your Ultrabook.
- Clean the touchpad: To clean the touchpad, use a microfiber cloth or a cotton swab slightly dampened with a cleaning solution. Wipe the touchpad gently in a circular motion to remove any smudges or fingerprints. Be careful not to press too hard, as it may affect the sensitivity of the touchpad.
- Allow the keyboard and touchpad to dry: After cleaning, allow the keyboard and touchpad to air dry completely before turning on your Ultrabook or using them. This prevents any moisture from affecting the functionality of these components.
By following these steps, you can effectively remove dirt, dust, and debris from the keyboard and touchpad of your Ultrabook UX21A. Now that these essential components are clean, let’s proceed to the next section where we will discuss how to clean the display screen of your device.
Step 5: Cleaning the Display Screen
The display screen of your Ultrabook UX21A is an important component that can easily accumulate dust, fingerprints, and smudges. Cleaning the screen not only improves visibility but also enhances the overall user experience. Follow these steps to clean the display screen effectively:
- Ensure your Ultrabook is powered off: Before you start cleaning the display screen, make sure your Ultrabook is turned off and unplugged. This prevents any accidental inputs and ensures your safety during the cleaning process.
- Use a microfiber cloth: Take a clean microfiber cloth and gently wipe the display screen in a circular motion. Start from the top corner and work your way down, covering the entire surface of the screen. Avoid using excessive pressure that may damage or scratch the screen.
- Dampen the cloth (optional): If there are stubborn smudges or marks on the screen, you can slightly dampen the microfiber cloth with water or a screen cleaning solution. Make sure the cloth is not dripping wet, as excessive moisture can damage the screen. Lightly wipe the affected areas with the damp cloth, using gentle, circular motions.
- Focus on the edges and corners: Pay extra attention to the edges and corners of the display screen, as dust and debris can accumulate in these areas. Gently clean these areas with the microfiber cloth, ensuring that all visible dirt is removed.
- Avoid using harsh chemicals: It is important to avoid using harsh chemicals, alcohol-based cleaners, or abrasive materials such as paper towels or tissues. These can damage the protective coating of the screen or leave scratches. Stick to using a microfiber cloth or a screen cleaning solution specifically designed for electronic displays.
- Allow the screen to dry: After cleaning, allow the display screen to air dry completely before turning on your Ultrabook or closing the lid. This ensures that no moisture is trapped between the screen and the keyboard, which can cause damage.
By following these steps, you can effectively clean the display screen of your Ultrabook UX21A, ensuring a clear and vibrant viewing experience. Now that your screen is clean, let’s move on to the next section where we will discuss how to clean the ports and connectors of your device.
Step 6: Cleaning the Ports and Connectors
The ports and connectors of your Ultrabook UX21A can accumulate dust, dirt, and debris over time, affecting their functionality and causing connectivity issues. Cleaning these areas ensures smooth and reliable connections. Follow these steps to clean the ports and connectors of your device:
- Power off your Ultrabook: Before you start cleaning the ports and connectors, make sure your Ultrabook is turned off and unplugged. This ensures your safety and prevents any accidental damages.
- Inspect the ports and connectors: Take a close look at the ports and connectors to identify any visible dust, dirt, or debris. Common ports include USB, HDMI, audio, and charging ports. Also, check the connectors for any buildup.
- Use a can of compressed air: Hold the can of compressed air upright and use short bursts to blow away any loose dust or debris from the ports and connectors. Be careful not to blow too closely or with excessive force, as it may cause damage. Aim the airflow directly into the port or connector to dislodge any particles.
- Use a cotton swab: If there are stubborn particles that cannot be removed with compressed air, gently use a clean and dry cotton swab to clean the ports and connectors. Be cautious not to apply excessive pressure or push any debris further into the port.
- Inspect for residue or moisture: After cleaning, examine the ports and connectors for any residue or moisture. If necessary, use a clean and dry cotton swab or microfiber cloth to remove any leftover residue.
- Allow the ports and connectors to dry: Ensure that all ports and connectors are completely dry before using them or plugging in any devices. Moisture can cause electrical issues or damage the connected devices.
By following these steps, you can effectively clean the ports and connectors of your Ultrabook UX21A, ensuring reliable connections and optimal performance. Now that these areas are clean, let’s move on to the next section where we will discuss removing dust from the cooling system of your device.
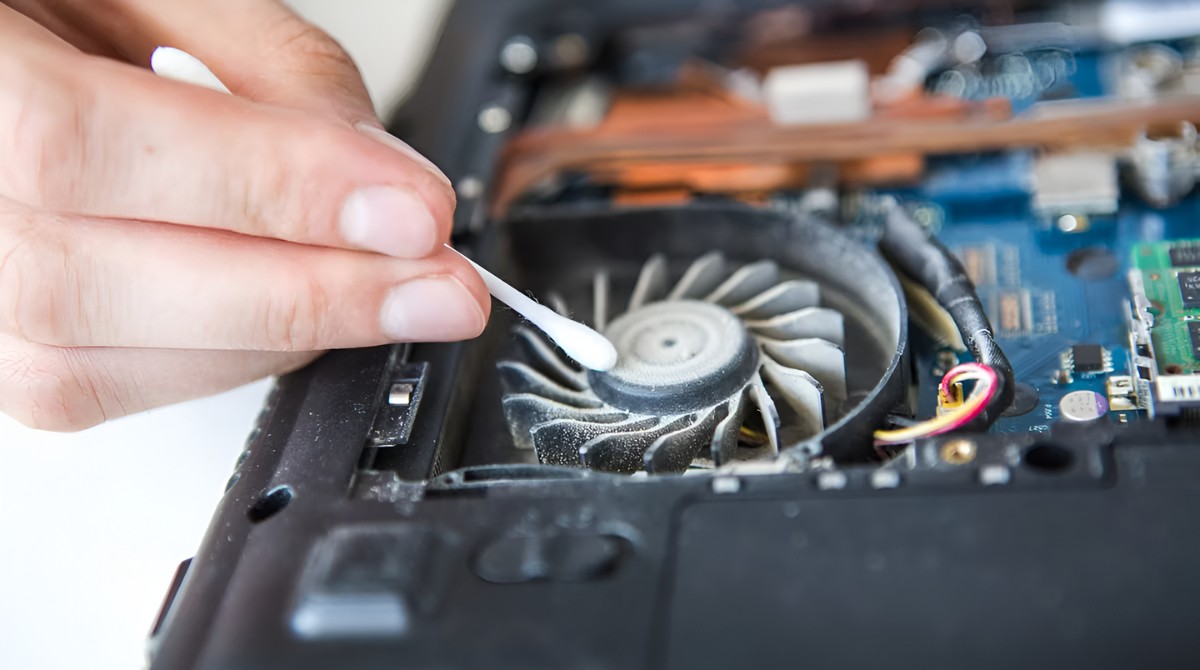
Step 7: Removing the Dust from the Cooling System
Over time, dust can accumulate inside the cooling system of your Ultrabook UX21A, leading to poor airflow, increased temperatures, and potential performance issues. It is crucial to remove this dust to ensure optimal cooling and prevent overheating. Follow these steps to remove dust from the cooling system:
- Ensure your Ultrabook is powered off: Before you begin cleaning the cooling system, make sure your Ultrabook is turned off, unplugged, and the battery (if applicable) is removed. This ensures your safety and prevents any accidental damage to the internal components.
- Locate the cooling vents: Identify the cooling vents on your Ultrabook UX21A. These are usually located on the sides, bottom, or back of the device, allowing the flow of air to keep the internal components cool.
- Use a can of compressed air: Hold the can of compressed air upright and use short bursts to blow air into the cooling vents. Start from the furthest vent and work your way towards the center, ensuring that you cover all the vents. Keep the can upright to prevent any liquid from escaping.
- Be thorough but gentle: While blowing the compressed air, be thorough but gentle to avoid causing any damage to the internal components. Pay close attention to areas where dust is visible, and blow the air at different angles to dislodge the trapped dust.
- Repeat if necessary: Depending on the amount of dust accumulated, you may need to repeat the process to ensure that all the dust has been removed. Take your time and be patient to achieve the best results.
- Allow the dust to settle: After blowing air into the cooling system, allow the dust to settle for a few minutes. This prevents any residual dust from being blown back into the system or other internal components when you power on your Ultrabook.
By following these steps and removing dust from the cooling system, you can improve the airflow within your Ultrabook UX21A, ensuring that the internal components remain cool and perform optimally. Now that the dust has been removed, let’s move on to the final step – reassembling your Ultrabook.
Step 8: Reassembling Your Ultrabook UX21A
After completing the cleaning process, it’s time to reassemble your Ultrabook UX21A. Follow these steps to ensure that everything is properly put back together:
- Check for any remaining moisture: Before reassembling your Ultrabook, verify that all surfaces and components are completely dry. Moisture can cause electrical issues or damage the internal components.
- If you removed the battery, insert it back: If you removed the battery during the cleaning process, carefully insert it back into its compartment. Ensure that it is securely in place before moving on to the next step.
- Connect any necessary cables: Reconnect and secure any cables or connectors that were disconnected during the cleaning process. Double-check that all connections are secure to avoid any potential issues with functionality or performance.
- Double-check for any loose screws: Inspect the exterior of your Ultrabook to ensure that no screws or fasteners are loose or missing. If you notice any, tighten them carefully using the appropriate screwdriver.
- Power on your Ultrabook: Once you have reassembled your Ultrabook UX21A, you can proceed to power it on. Connect the power adapter and press the power button to start up your device. Verify that everything is functioning correctly.
- Perform a test run: After powering on your Ultrabook, run some tests or perform tasks to ensure that the device is functioning properly. Check the keyboard, touchpad, screen, and connectivity to ensure that everything is working as expected.
By following these steps to reassemble your Ultrabook UX21A, you can confidently use your device knowing that it has been properly cleaned and put back together. Regular cleaning and maintenance will help to keep your Ultrabook performing optimally and extend its lifespan. Congratulations on successfully dusting off your Ultrabook!
Conclusion
Congratulations, you have now successfully dusted off your Ultrabook UX21A! Regularly cleaning your device is vital for its performance, longevity, and overall user experience. By following the step-by-step guide in this article, you have learned how to properly clean the exterior, keyboard, touchpad, display screen, ports, connectors, and cooling system of your Ultrabook UX21A.
Through the process, you have discovered the importance of dusting off your Ultrabook. Regular maintenance ensures proper airflow, prevents overheating, improves system performance, enhances aesthetics, and creates a healthier environment. It also prolongs the lifespan of your device, saving you from potential repairs or replacements in the future.
Remember to gather the necessary tools before starting the cleaning process, including a microfiber cloth, canned air, a cleaning solution, cotton swabs, a soft brush, and antistatic gloves if desired. Additionally, adopt a gentle and thorough approach when cleaning to avoid causing any damage to your Ultrabook.
By regularly dusting off your Ultrabook UX21A and incorporating it into your device maintenance routine, you can enjoy optimal performance, a longer lifespan, and a pristine appearance. So, don’t let dust and debris compromise the functionality and beauty of your Ultrabook – keep it clean, and it will continue to serve you well for years to come!