Introduction
The Dell Optiplex 755 is a reliable desktop computer that is widely used in homes, offices, and businesses. One of the essential components of the Optiplex 755 is the case fan, which plays a crucial role in keeping the system cool and preventing overheating. Over time, the case fan may become worn out or accumulate dust, leading to reduced performance and potential damage to the system. In these cases, it becomes necessary to remove the old fan and replace it with a new one.
In this guide, we will walk you through the step-by-step process of removing the case fan from your Dell Optiplex 755. Whether you need to clean the fan or replace it with a new one, this guide will provide you with the necessary instructions to complete the task safely and effectively. Remember, working with computer components requires caution and attention to detail. Be sure to follow the instructions carefully to avoid any damage to your system.
Before we dive into the steps, it’s important to note that opening the case of your Dell Optiplex 755 may void the warranty if it is still under warranty. If your computer is still covered, it’s recommended to consult a professional or contact Dell support for assistance. However, if your warranty has expired or you feel comfortable performing the task yourself, let’s gather the tools you’ll need to get started.
Tools Needed
Before you begin the process of removing the case fan from your Dell Optiplex 755, you’ll need to gather a few essential tools. Having these tools on hand will make the process smoother and ensure that you have everything you need to complete the task. Here are the tools you’ll need:
- Screwdriver set: You’ll need a Phillips head screwdriver to remove the screws holding the case fan in place. Make sure you have a compatible screwdriver size to avoid damaging the screws.
- Anti-static wrist strap: This is an optional but highly recommended tool to prevent static electricity from damaging sensitive computer components. If you don’t have an anti-static wrist strap, make sure to touch a grounded metal surface before handling any internal components.
- Canned air or a small brush: If you’re planning to clean the case fan before reinstalling it or replacing it with a new one, having canned air or a small brush will help you remove any dust or debris that may have accumulated over time.
- Replacement case fan (optional): If you’re planning to replace the existing case fan, make sure you have a compatible replacement fan that fits the Dell Optiplex 755. Check the specifications of the original fan or consult the Dell support website to ensure compatibility.
Once you have gathered these tools, you’re ready to proceed with the step-by-step process of removing the case fan from your Dell Optiplex 755. Make sure to have a clean and well-lit workspace to easily identify and manipulate the components. Now, let’s power off and unplug your computer to ensure your safety throughout the process.
Step 1: Power Off and Unplug
Before you begin working on your Dell Optiplex 755, it is crucial to ensure your safety by turning off the power and disconnecting the computer from its power source. Follow these steps to complete this initial step:
- Save your work: If you have any unsaved work, make sure to save it and close all open programs before proceeding.
- Shut down the computer: Click on the “Start” button on the taskbar, then select “Shut Down” from the menu. Wait for the computer to completely shut down before proceeding.
- Unplug the power cord: Locate the power cord connected to the back of your computer and carefully unplug it from the power outlet. Additionally, disconnect any other cables, such as USB or Ethernet cables, from the computer to ensure it is completely disconnected.
- Press the power button: While the computer is unplugged, press and hold the power button for approximately 5-10 seconds. This will help discharge any stored electrical charge in the system.
By following these steps, you have successfully powered off your Dell Optiplex 755 and disconnected it from its power source. This precautionary measure ensures your safety while working on the internal components of the computer. Now that you have powered off and unplugged the computer, you can move on to the next step of opening the case.
Step 2: Open the Case
Now that you have powered off and unplugged your Dell Optiplex 755, it’s time to open the case to access the internal components, including the case fan. Follow these steps to open the case properly:
- Locate the case cover release latch: On the back of the computer, find the small latch or switch that is used to release the case cover. This latch may vary depending on the specific model of your Optiplex 755.
- Unlock the case cover: Slide the release latch or switch towards the unlocked position. This will allow you to remove the case cover. Some models may require you to press a button or use a screwdriver to unlock the case cover.
- Remove the case cover: Once the latch is released, gently slide the case cover towards the back of the computer to remove it. Set the case cover aside in a safe place where it won’t get damaged.
After following these steps, you should have successfully opened the case of your Dell Optiplex 755. Ensure that you take note of any cables or connectors attached to the case cover, as you may need to disconnect them in order to access the case fan. In the next step, we will locate the case fan within the computer.
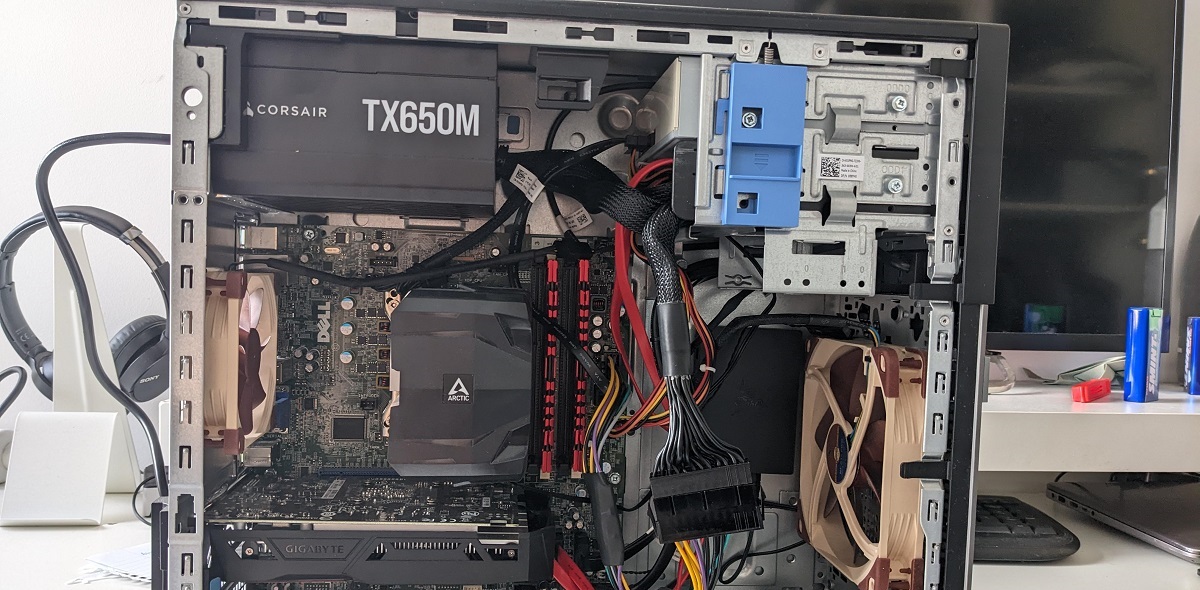
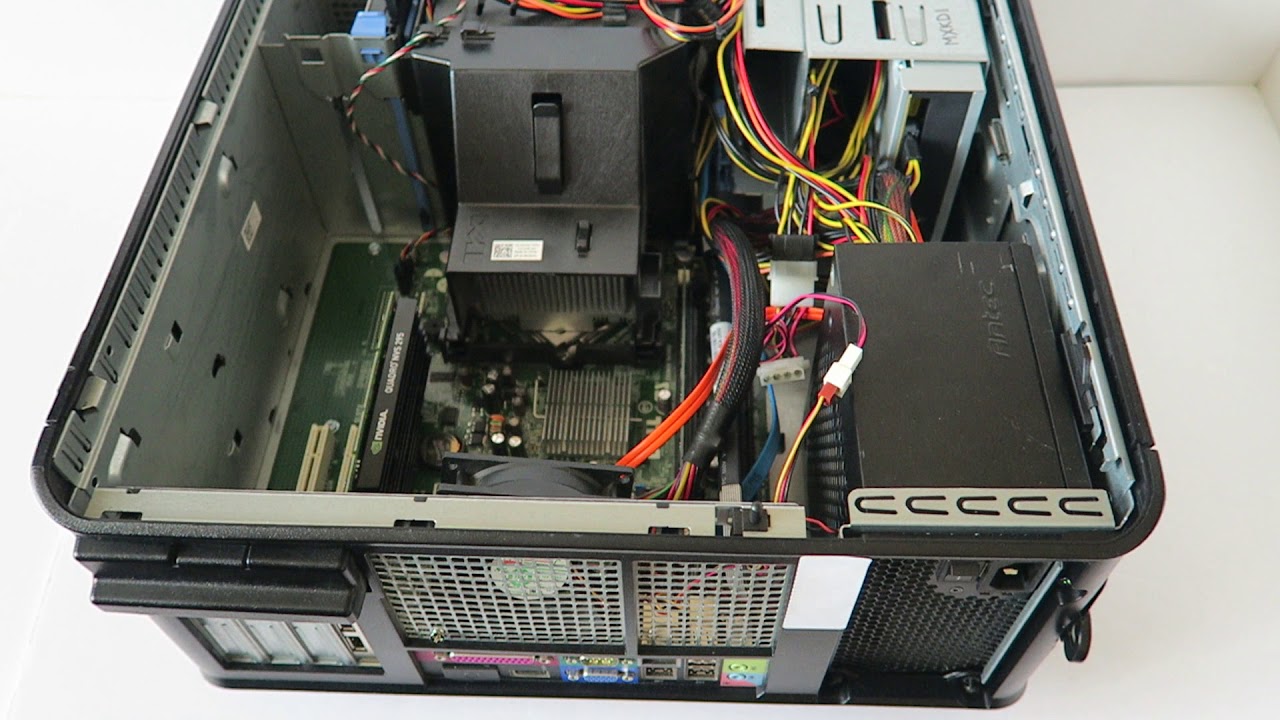
Step 3: Locate the Case Fan
With the case of your Dell Optiplex 755 open, it’s time to locate the case fan within the computer. The case fan is responsible for keeping the system cool by circulating air throughout the case. Follow these steps to locate the case fan:
- Identify the internal components: Take a moment to familiarize yourself with the internal components of the computer. This will help you identify the case fan more easily.
- Look for the case fan: Locate a small fan within the computer case. The case fan is typically located toward the front or rear of the case and may be attached to the metal framework or a plastic housing.
- Identify the fan cables: Look for the cables connected to the case fan. There will typically be two cables – one for power and one for data.
By following these steps, you should be able to locate the case fan within your Dell Optiplex 755. Taking note of its position and the cables connected to it will help you in the upcoming steps when you need to disconnect the fan. In the next step, we will proceed with disconnecting the power and data cables from the case fan.
Step 4: Disconnect the Power and Data Cables
In this step, we will disconnect the power and data cables that are connected to the case fan. It is important to disconnect these cables before proceeding with the removal of the fan. Follow these steps to disconnect the cables:
- Identify the power cable: Locate the power cable that is connected to the case fan. It usually has a 3-pin or 4-pin connector.
- Disconnect the power cable: Gently pull the power cable connector from the socket on the motherboard or the power supply. Avoid pulling on the cables themselves as this might damage them.
- Identify the data cable (optional): If your case fan has a data cable, which is used for monitoring fan speed and other data, locate it near the power cable.
- Disconnect the data cable (optional): If your case fan has a data cable, carefully unplug it from the corresponding socket on the motherboard.
By following these steps, you have successfully disconnected the power and data cables from the case fan. Take your time to ensure that the cables are fully disconnected without applying excessive force. In the next step, we will proceed with removing the mounting screws that secure the case fan in place.
Step 5: Remove the Mounting Screws
Now that the power and data cables are disconnected, we can proceed with removing the mounting screws that secure the case fan in place. These screws hold the fan securely to the case and must be removed before we can take out the fan. Follow these steps to remove the mounting screws:
- Locate the mounting screws: Take a close look at the case fan and identify the screws that are holding it in place. There are usually two or four screws, depending on the model.
- Use a screwdriver: Take your screwdriver and match it with the screw heads. Most case fan screws require a Phillips head screwdriver.
- Remove the screws: Using the appropriate screwdriver, carefully unscrew and remove the mounting screws from the case fan. Place the screws in a safe place to avoid losing them.
Once you have successfully removed the mounting screws, the case fan should be free to be removed from the computer. However, be cautious as it may still be secured by additional clips or connectors. In the next step, we will guide you on how to gently remove the case fan from the Dell Optiplex 755.
Step 6: Gently Remove the Case Fan
Now that the mounting screws are removed, it’s time to carefully remove the case fan from your Dell Optiplex 755. It’s important to handle the fan with care to avoid any damage to the fan blades or other components. Follow these steps to gently remove the case fan:
- Identify any additional clips or connectors: Inspect the area around the case fan to ensure there are no additional clips or connectors holding it in place. Some models may have clips or connectors that need to be released before the fan can be fully removed.
- Detach any remaining clips or connectors: If there are any additional clips or connectors, gently release them by carefully pushing or pulling them as needed. Take your time to avoid applying excessive force, which may cause damage.
- Gently lift and remove the case fan: Once all clips and connectors are released, gently lift the case fan upward to detach it from the computer case. Be cautious not to snag any cables or other internal components as you remove the fan.
By following these steps, you should have successfully removed the case fan from your Dell Optiplex 755. Take a moment to inspect the fan for any signs of damage or excessive dirt and debris. If necessary, this is a good time to clean the fan or replace it with a new one. In the next step, we will cover optional tasks such as cleaning the fan and installing a new one.
Step 7: Clean the Fan (optional)
Cleaning the case fan is an optional but beneficial step to ensure optimal performance and prevent dust buildup. If you have decided to clean the fan before reinstalling it, follow these steps to do so:
- Prepare a clean workspace: Find a well-ventilated area and place a clean, soft cloth or towel to protect the surface where you will be working.
- Use canned air or a small brush: If you have canned air, hold the can upright and use short bursts of air to blow away dust and debris from the fan blades, the housing, and the surrounding area. Alternatively, you can use a small brush to gently sweep away dust and debris.
- Avoid excessive force: Use caution when cleaning the fan blades, as applying excessive force can bend or damage them. Be thorough but gentle to ensure the fan remains intact.
- Remove stubborn dirt or grime: If there are any persistent stains or grime on the fan blades, you can dampen a lint-free cloth with a small amount of isopropyl alcohol and gently wipe the affected areas. Ensure the alcohol has evaporated completely before reinstalling the fan.
Once you have cleaned the case fan to your satisfaction, inspect it carefully to ensure all dust and debris have been removed. Cleaning the fan can help improve airflow and reduce noise caused by excessive dust buildup. If you decide to install a new case fan, skip to the optional step “Step 8: Install the New Case Fan”. Otherwise, proceed to the next step to reassemble the case.
Step 8: Install the New Case Fan (optional)
If you have decided to replace the old case fan with a new one, follow these steps to install the new fan in your Dell Optiplex 755. It’s important to ensure that the new fan is compatible with your computer model and has the necessary power and data connectors.
- Position the new case fan: Take the new case fan and align it with the screw holes on the side of the computer case. Ensure that the fan is facing the correct direction to ensure proper airflow.
- Secure the fan with screws: Using the screws that came with the new case fan or the existing screws, carefully insert and tighten them to secure the fan in place. Be careful not to overtighten, as this can cause damage to the fan or the computer case.
- Connect the power cable: Locate the power cable for the case fan and connect it to the corresponding socket on the motherboard or the power supply. Ensure it is firmly plugged in but be gentle to avoid damage.
- Connect the data cable (if applicable): If your new case fan has a data cable for monitoring fan speed, connect it to the corresponding socket on the motherboard.
Once the new case fan is securely installed and the power and data cables are connected, you can proceed to the next step to reassemble the case. Make sure that all components are properly aligned and securely attached before proceeding further.
Step 9: Reassemble the Case
After completing the necessary tasks such as cleaning the fan or installing a new one, it’s time to reassemble the case of your Dell Optiplex 755. Follow these steps to ensure that all components are properly reattached and secured:
- Position the case cover: Carefully place the case cover back onto the computer, ensuring that it is aligned properly with the screw holes.
- Slide the case cover into place: Slide the case cover gently towards the front of the computer until it locks into place. Make sure that it is securely attached and aligned with the rest of the computer case.
- Lock the case cover: Once the case cover is in position, use the latch or switch to lock it securely. Ensure that the latch is fully engaged to prevent the case cover from accidentally coming loose.
- Connect external cables: If you disconnected any external cables during the process, such as USB or Ethernet cables, now is the time to reconnect them to the appropriate ports.
By following these steps, you have successfully reassembled the case of your Dell Optiplex 755. Take a moment to double-check that all components are securely attached and that there are no loose cables or obstructions that could interfere with the proper functioning of your computer.
Congratulations! You have completed the process of removing and replacing the case fan in your Dell Optiplex 755. You can now proceed to power on your computer and enjoy improved cooling performance or the benefits of a new case fan, if applicable.
Conclusion
In conclusion, removing and replacing the case fan in your Dell Optiplex 755 is a straightforward process that can significantly impact the performance and longevity of your computer. Whether you choose to clean the existing fan or install a new one, ensuring proper cooling is essential to prevent overheating and maintain optimal system performance.
Throughout this guide, we have walked you through the step-by-step process of removing the case fan from your Dell Optiplex 755. We have covered essential steps such as powering off and unplugging the computer, opening the case, locating the case fan, disconnecting the power and data cables, removing the mounting screws, gently removing the case fan, and optionally cleaning the fan or installing a new one. Finally, we discussed reassembling the case to complete the process.
Remember, when working with computer components, it’s important to exercise caution and attention to detail. Take care to follow the instructions closely and handle the internal components with care. If you are unsure or uncomfortable performing any of the steps, it’s always best to seek professional assistance or consult Dell support for guidance.
By maintaining a well-functioning case fan, you can ensure that your Dell Optiplex 755 operates smoothly and efficiently. Regularly cleaning or replacing the case fan will help prevent overheating, reduce noise, and improve the overall lifespan of your computer.
Thank you for following this guide, and we hope it has been helpful in assisting you with removing and replacing the case fan in your Dell Optiplex 755. Enjoy the improved cooling and performance of your computer!