Introduction
Replacing the battery in a waterproof phone can be a daunting task, especially if you're unfamiliar with the inner workings of mobile devices. However, with the right guidance and a careful approach, this process can be successfully navigated, ensuring that your phone continues to function optimally. Whether your current battery is no longer holding a charge or you simply want to upgrade to a higher capacity battery, this step-by-step guide will walk you through the process of replacing the battery in your waterproof phone.
Smartphones have become an integral part of our daily lives, serving as our communication hub, personal assistant, and entertainment center. With this heavy reliance on our devices, it's crucial to ensure that they remain in top condition. The battery is a vital component of any smartphone, providing the necessary power to keep the device running throughout the day. Over time, however, the battery's capacity may diminish, leading to shorter usage times between charges. In such cases, replacing the battery can breathe new life into your phone, restoring its ability to hold a charge and function reliably.
Waterproof phones, in particular, present a unique challenge when it comes to replacing the battery. The waterproofing measures, such as sealed enclosures and adhesive gaskets, require careful handling to maintain the device's water-resistant properties. This guide will provide detailed instructions on how to safely and effectively replace the battery in a waterproof phone, ensuring that the waterproof seals remain intact and the device retains its protective capabilities.
By following the steps outlined in this guide, you'll gain the knowledge and confidence to tackle the battery replacement process with ease. Whether you're a tech enthusiast looking to expand your DIY skills or a smartphone user seeking to prolong the lifespan of your device, this guide is designed to empower you to take control of your phone's maintenance and performance. Let's dive into the step-by-step process of replacing the battery in your waterproof phone, ensuring that you can enjoy uninterrupted usage and seamless functionality.
Step 1: Gather Necessary Tools
Before embarking on the battery replacement process for your waterproof phone, it's essential to gather the necessary tools to ensure a smooth and efficient procedure. Having the right tools at your disposal will enable you to navigate the intricate components of the phone with precision and care. Here's a comprehensive list of the tools you'll need:
-
Replacement Battery: Ensure that you have the correct replacement battery specifically designed for your phone model. It's important to source a high-quality, compatible battery to guarantee optimal performance and safety.
-
Small Phillips Head Screwdriver: A small Phillips head screwdriver is essential for removing the screws securing the back cover of the phone. This precision tool allows you to carefully access the internal components without causing damage.
-
Plastic Opening Tools: These specialized tools are designed to safely pry open the back cover of the phone without scratching or denting the surface. Plastic opening tools provide leverage and precision, making them crucial for disassembling the device.
-
Tweezers: Fine-point tweezers are invaluable for handling small components and disconnecting delicate connectors within the phone. They enable you to maneuver intricate parts with accuracy, minimizing the risk of accidental damage.
-
Adhesive Strips or Adhesive Remover: Waterproof phones often feature adhesive seals to maintain their water-resistant properties. Adhesive strips or adhesive remover can aid in safely detaching the back cover without compromising the integrity of the seals.
-
Anti-Static Wrist Strap (Optional): To prevent electrostatic discharge that can potentially damage sensitive electronic components, an anti-static wrist strap is recommended. While not essential, it provides an added layer of protection during the battery replacement process.
By ensuring that you have these essential tools at your disposal, you'll be well-equipped to proceed with the subsequent steps of the battery replacement process. This comprehensive toolkit will enable you to handle the intricate components of your waterproof phone with precision and care, setting the stage for a successful battery replacement endeavor. With the necessary tools in hand, you're ready to power off the phone and commence the next step of the process.
Step 2: Power Off the Phone
Before initiating the battery replacement process, it is crucial to power off the phone to prevent any potential electrical mishaps and ensure a safe working environment. By turning off the device, you minimize the risk of electrical shock and protect the internal components from accidental damage during the battery replacement procedure. Here's a comprehensive guide on how to power off your waterproof phone:
-
Unlock the Screen: If your phone's screen is locked, unlock it by entering your security code, pattern, or using the biometric authentication method, such as fingerprint or facial recognition.
-
Press and Hold the Power Button: Locate the power button on your phone, typically situated along the side or top edge of the device. Press and hold the power button until the power-off menu appears on the screen.
-
Select "Power Off": Once the power-off menu is displayed, tap on the "Power Off" option to initiate the shutdown process. Depending on the phone model and software interface, you may be prompted to confirm the power-off action.
-
Wait for the Phone to Power Down: Allow the phone to complete the power-off sequence, ensuring that all active processes are safely halted before proceeding with the battery replacement.
-
Verify Power-Off Status: After the phone has powered down, verify that the screen is completely dark and that there are no illuminated indicators, confirming that the device is successfully turned off.
By meticulously following these steps, you can effectively power off your waterproof phone, preparing it for the subsequent stages of the battery replacement process. Ensuring that the device is fully powered down is essential to mitigate the risk of electrical hazards and safeguard the internal circuitry during the battery replacement endeavor. With the phone safely powered off, you are now ready to proceed to the next step of removing the back cover to access the battery compartment.
Ensuring that the device is fully powered down is essential to mitigate the risk of electrical hazards and safeguard the internal circuitry during the battery replacement endeavor. With the phone safely powered off, you are now ready to proceed to the next step of removing the back cover to access the battery compartment.
Step 3: Remove the Back Cover
Removing the back cover of a waterproof phone requires precision and care to maintain the integrity of the device's waterproof seals. The back cover is typically secured by a combination of screws and adhesive, necessitating a methodical approach to ensure a successful removal without causing damage. Here's a detailed guide on how to safely remove the back cover of your waterproof phone:
-
Identify Screw Locations: Using a small Phillips head screwdriver, carefully locate and remove any screws securing the back cover of the phone. These screws are often situated along the edges of the device or near the charging port. Keep the screws in a secure location to prevent misplacement.
-
Utilize Plastic Opening Tools: Once the screws have been removed, employ plastic opening tools to gently pry open the back cover. Start at a corner or edge of the phone and gradually work your way around the perimeter, exerting gentle pressure to release the adhesive seal. Avoid using excessive force to prevent damage to the back cover or the phone's frame.
-
Navigate Adhesive Seals: Waterproof phones are equipped with adhesive seals that contribute to their water-resistant properties. As you carefully detach the back cover, be mindful of any adhesive strips or seals that may be affixed to the inner surface. If necessary, use an adhesive remover to disengage the seals without compromising their effectiveness.
-
Exercise Patience and Precision: Removing the back cover of a waterproof phone may require patience and precision, especially when dealing with stubborn adhesive. Take your time and apply consistent, gentle pressure to gradually release the back cover without causing damage to the device.
-
Verify Seal Integrity: Once the back cover is removed, inspect the adhesive seals and gaskets to ensure they remain intact. Any damaged seals should be replaced with new adhesive strips designed for your specific phone model to uphold its waterproof capabilities.
By meticulously following these steps, you can successfully remove the back cover of your waterproof phone, gaining access to the internal components, including the battery compartment. It's crucial to exercise caution and attentiveness throughout this process to preserve the waterproof seals and prepare the phone for the subsequent steps of replacing the battery. With the back cover removed, you are now ready to proceed to the next stage of locating the battery within the device.
Step 4: Locate the Battery
With the back cover successfully removed, the next crucial step in the battery replacement process is to locate the battery within the intricate framework of the waterproof phone. The placement of the battery may vary depending on the specific model and design of the device, necessitating a careful and methodical approach to identify its position accurately. Here's a detailed guide on how to locate the battery within your waterproof phone:
-
Internal Layout Examination: Upon gaining access to the internal components of the phone, take a moment to visually inspect the layout and arrangement of the internal components. The battery is typically a prominent and sizable component, often situated near the center or bottom of the device. It may be secured in place with adhesive or held down by retaining clips.
-
Refer to Manufacturer Guidelines: If available, consult the manufacturer's guidelines or technical documentation for your specific phone model. Manufacturers often provide detailed schematics and diagrams that highlight the location of the battery within the device, offering valuable insight into its precise placement and securing mechanisms.
-
Identify Power Connector: The battery is connected to the phone's circuitry via a power connector, typically a small, multi-pin connector that facilitates the transfer of power to the device. Follow the wires or ribbon cables from the battery to trace the path of the power connector, aiding in the accurate identification of the battery module.
-
Exercise Caution: As you navigate the internal components to locate the battery, exercise caution to avoid accidental damage to delicate circuitry or connectors. Take note of any additional components, such as thermal pads or insulating materials, that may be positioned in close proximity to the battery.
-
Utilize Proper Lighting: Adequate lighting is crucial for effectively locating the battery within the phone. Consider using a small flashlight or a well-lit workspace to enhance visibility and facilitate the identification of the battery module and its associated components.
By meticulously following these steps, you can successfully locate the battery within your waterproof phone, laying the groundwork for the subsequent stages of disconnecting and replacing the battery. Accurately identifying the battery's position is essential for executing the replacement process with precision and ensuring a seamless transition to the next steps of the procedure. With the battery located, you are now poised to proceed to the pivotal step of disconnecting the battery from the phone's circuitry.
Step 5: Disconnect the Battery
Disconnecting the battery is a critical step in the process of replacing the battery in a waterproof phone. By disconnecting the battery, you effectively isolate the power source, minimizing the risk of electrical mishaps and ensuring a safe working environment. This procedure requires precision and attentiveness to avoid damaging the delicate connectors and circuitry associated with the battery. Here's a detailed guide on how to disconnect the battery from your waterproof phone:
-
Identify the Battery Connector: Within the intricate framework of the phone, locate the battery connector, which is typically a small, multi-pin connector attached to the battery module. The connector may be secured by a latch or retaining clip, requiring careful manipulation to disengage it from the phone's circuitry.
-
Use Fine-Point Tweezers: Fine-point tweezers are invaluable for disconnecting the battery connector with precision and control. Gently grasp the connector and exert even pressure to release it from its socket, ensuring that the delicate pins and contacts remain undamaged during the disconnection process.
-
Avoid Excessive Force: When disconnecting the battery, it's crucial to avoid applying excessive force or undue pressure on the connector and surrounding components. Delicate ribbon cables or wires may be attached to the connector, necessitating a cautious approach to prevent accidental tearing or damage.
-
Verify Disconnection: After releasing the battery connector, verify that it is completely detached from the phone's circuitry. Ensure that there are no residual connections or obstructions that could impede the safe removal of the old battery and the subsequent installation of the new battery.
-
Insulate the Connector: Once the battery is disconnected, consider insulating the exposed battery connector with electrical tape or a protective cover. This precautionary measure helps prevent accidental contact with the connector during the remainder of the battery replacement process, minimizing the risk of electrical shorts or damage.
By meticulously following these steps, you can effectively disconnect the battery from your waterproof phone, preparing it for the pivotal stage of removing the old battery and proceeding with the installation of the new battery. Ensuring a secure and thorough disconnection is essential for maintaining the integrity of the phone's circuitry and facilitating a seamless transition to the subsequent steps of the battery replacement process. With the battery safely disconnected, you are now ready to proceed to the next stage of removing the old battery from the device.
Step 6: Remove the Old Battery
With the old battery safely disconnected, the next critical step in the battery replacement process for your waterproof phone is the removal of the old battery from its housing within the device. This stage requires precision and care to ensure that the old battery is extracted without causing damage to the surrounding components or the phone's internal framework. Here's a detailed guide on how to effectively remove the old battery from your waterproof phone:
-
Assess Securing Mechanisms: Before proceeding with the removal of the old battery, take note of any securing mechanisms that may be in place. Some phones feature adhesive strips, retaining clips, or brackets that hold the battery in position. Carefully inspect the battery housing to identify and understand the securing mechanisms that need to be addressed during the removal process.
-
Exercise Caution and Patience: Removing the old battery requires a steady hand and patience. Avoid rushing the process and take the time to assess the best approach for safely extracting the battery. Delicate ribbon cables, thermal pads, or other components may be positioned near the battery, necessitating a cautious and methodical approach to prevent accidental damage.
-
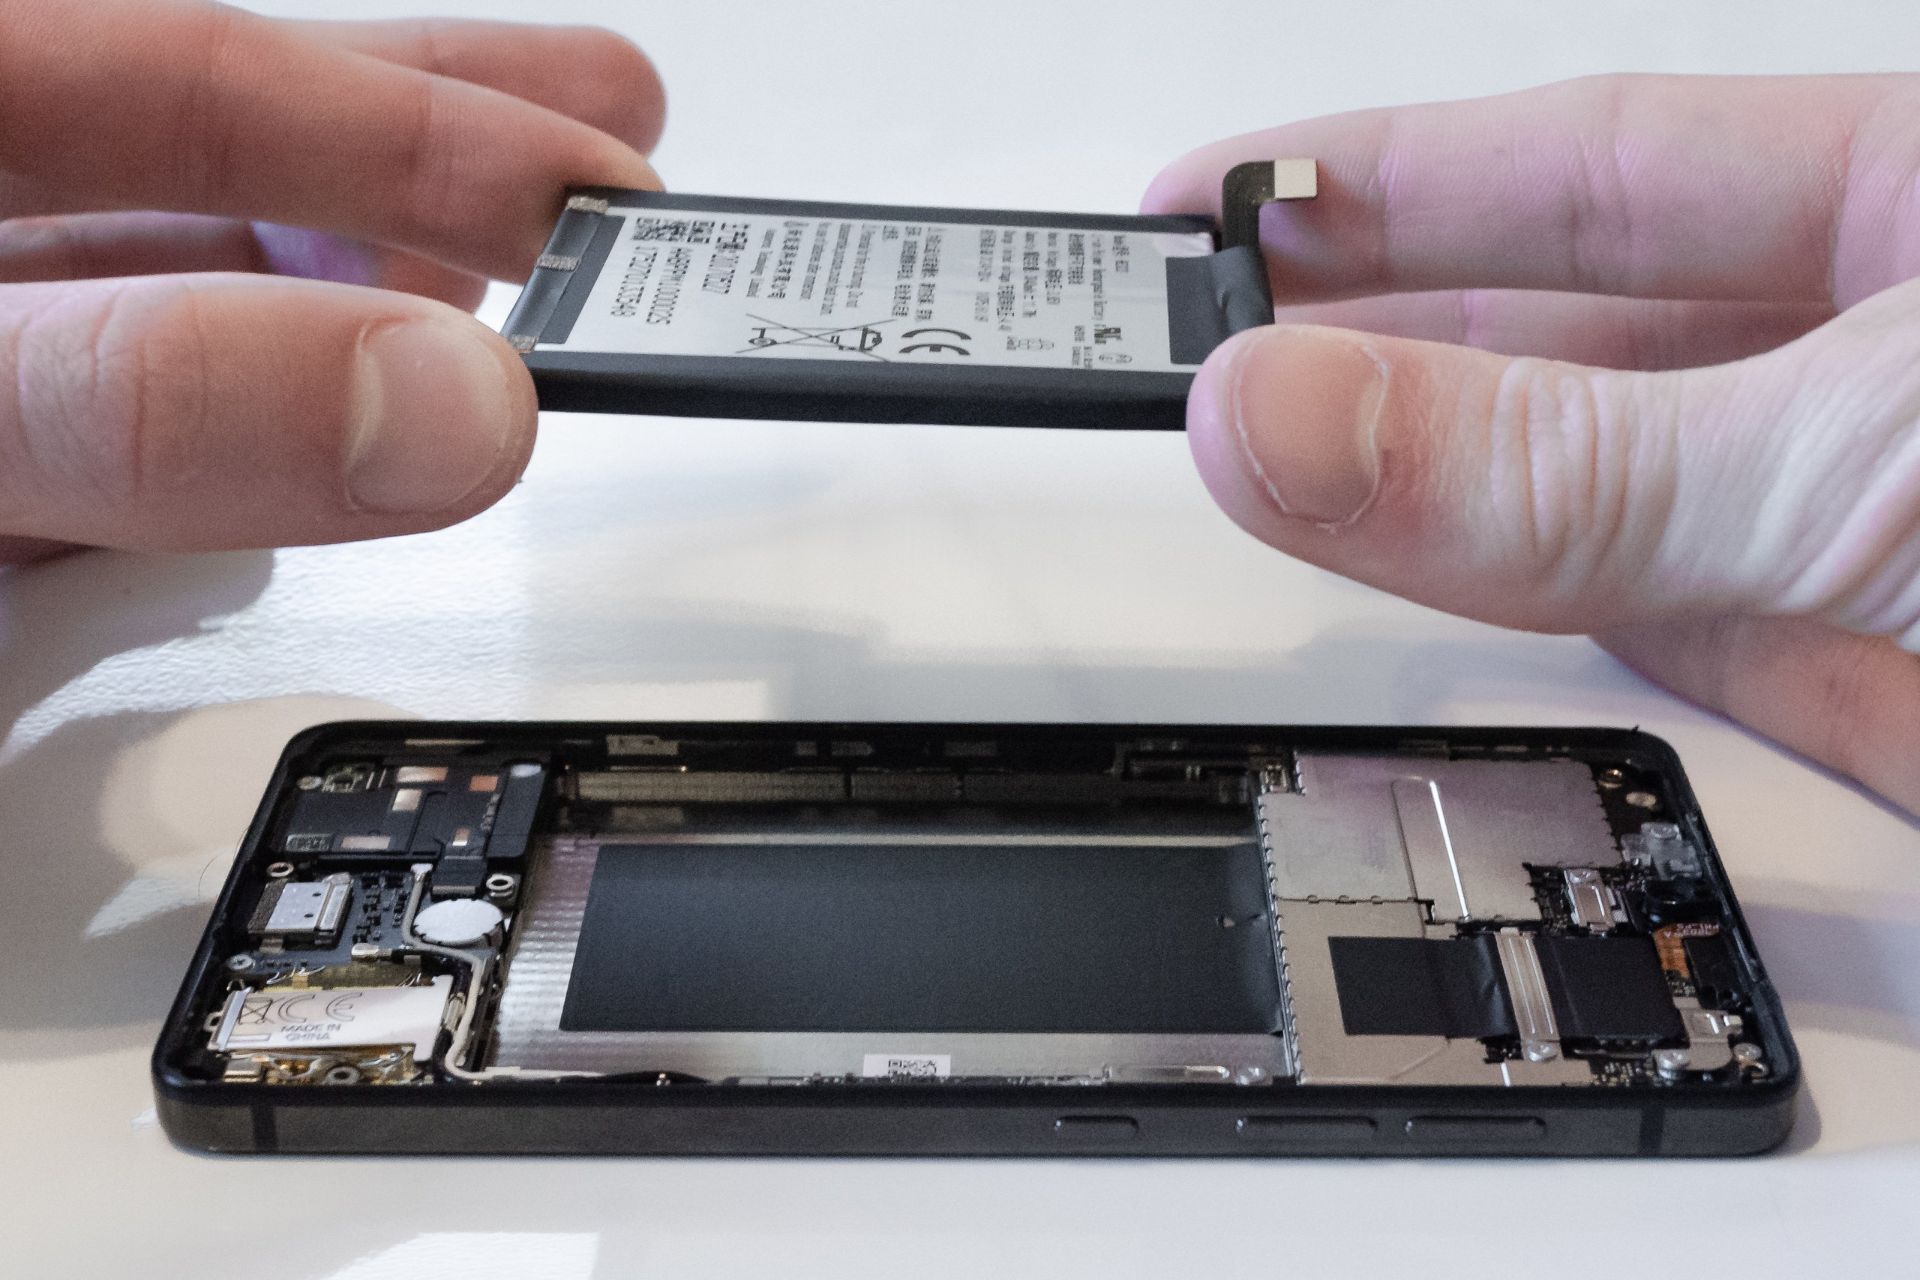
Utilize Plastic Opening Tools: Employ plastic opening tools to gently pry the old battery from its housing. Start at one edge of the battery and gradually work your way around its perimeter, exerting gentle pressure to release any adhesive or securing clips. Take care to avoid bending or puncturing the battery during the removal process.
-
Inspect for Adhesive Residue: In some cases, adhesive residue may remain on the phone's framework after the old battery is removed. Use adhesive remover or isopropyl alcohol and a soft cloth to carefully clean any residual adhesive, ensuring that the battery housing is clean and free from obstructions before installing the new battery.
-
Handle the Battery with Care: As you extract the old battery, handle it with care to prevent damage to the delicate components. Avoid bending, puncturing, or applying excessive force to the old battery, as this could compromise its integrity and safety.
By diligently following these steps, you can safely and effectively remove the old battery from your waterproof phone, paving the way for the subsequent stage of installing the new battery. Ensuring that the old battery is extracted with precision and care sets the stage for a seamless transition to the final steps of the battery replacement process, culminating in the rejuvenation of your phone's power source and functionality. With the old battery removed, you are now prepared to proceed to the pivotal step of inserting the new battery into the device's battery compartment.
Step 7: Insert the New Battery
With the old battery successfully removed from the waterproof phone, the next crucial step in the battery replacement process is the insertion of the new battery into the designated battery compartment. This stage requires precision and care to ensure that the new battery is securely positioned and properly connected within the device. Here's a detailed guide on how to effectively insert the new battery into your waterproof phone:
-
Verify Compatibility: Before proceeding with the installation of the new battery, verify that it is the correct replacement for your specific phone model. Ensure that the battery's specifications, dimensions, and power ratings align with the requirements of your device to guarantee optimal performance and safety.
-
Positioning the Battery: Carefully position the new battery within the designated battery compartment, aligning it with the contacts and housing to ensure a proper fit. Take note of any guiding markers or indicators that assist in aligning the battery correctly within the compartment.
-
Secure the Battery: If the new battery features adhesive strips or securing brackets, follow the manufacturer's guidelines to secure it in place. Ensure that the battery is firmly positioned and does not shift within the compartment, minimizing the risk of disconnection or damage during regular usage.
-
Connect the Battery: Reconnect the battery connector to the phone's circuitry, aligning it with the corresponding socket and carefully securing it in place. Use fine-point tweezers to ensure a secure and stable connection, minimizing the risk of intermittent power supply or connectivity issues.
-
Inspect the Installation: After inserting the new battery and reconnecting it to the phone's circuitry, visually inspect the battery compartment to verify that the installation is secure and precise. Ensure that the battery is seated evenly and that the connector is firmly attached, minimizing the risk of potential issues arising from improper installation.
-
Test the Connection: Power on the phone and verify that the new battery is functioning as intended. Check the battery indicator and power settings to ensure that the phone recognizes the new battery and that it is providing the expected power supply to the device.
By meticulously following these steps, you can effectively insert the new battery into your waterproof phone, ensuring that it is securely positioned and seamlessly integrated into the device's power system. A precise and secure installation sets the stage for the successful rejuvenation of your phone's power source, enabling you to enjoy extended usage times and reliable performance. With the new battery securely in place, you are now poised to proceed to the crucial step of reconnecting the battery and preparing the phone for operation.
Step 8: Reconnect the Battery
After securely inserting the new battery into the designated compartment of your waterproof phone, the next pivotal step in the battery replacement process is to reconnect the battery to the phone's circuitry. This crucial stage requires precision and attentiveness to ensure a stable and reliable connection, facilitating the seamless integration of the new power source into the device. Here's a detailed guide on how to effectively reconnect the battery in your waterproof phone:
-
Align the Battery Connector: Carefully align the battery connector with the corresponding socket on the phone's circuit board, ensuring that the pins and contacts are positioned for a secure connection. Take note of the orientation of the connector to avoid potential misalignment during the reconnection process.
-
Gently Insert the Connector: Use fine-point tweezers or your fingers to gently insert the battery connector into the socket, applying even pressure to ensure that it is fully seated. Exercise caution to avoid bending or damaging the delicate pins and contacts, maintaining a steady and controlled approach throughout the reconnection process.
-
Secure the Connector: Once the battery connector is inserted, verify that it is securely fastened within the socket, minimizing the risk of intermittent connections or power supply disruptions. If the connector features a latch or retaining clip, ensure that it is properly engaged to maintain a stable and reliable connection.
-
Inspect the Connection: After reconnecting the battery, visually inspect the connector and surrounding components to verify that the connection is secure and precise. Ensure that there are no visible signs of misalignment or partial insertion, mitigating the risk of potential issues arising from an insecure connection.
-
Test the Power Supply: Power on the phone and verify that the new battery is delivering the expected power supply to the device. Check the battery indicator and power settings to ensure that the phone recognizes the reconnected battery and that it is functioning as intended.
By meticulously following these steps, you can effectively reconnect the battery in your waterproof phone, ensuring a stable and reliable power supply to the device. A secure and precise reconnection sets the stage for the successful integration of the new battery into the phone's power system, culminating in the restoration of its functionality and reliable performance. With the battery securely reconnected, you are now prepared to proceed to the final step of replacing the back cover and preparing the phone for operation.
Step 9: Replace the Back Cover
After successfully reconnecting the battery and ensuring a stable power supply to your waterproof phone, the final crucial step in the battery replacement process is to replace the back cover, restoring the device to its original state and safeguarding its internal components. This stage requires precision and care to ensure that the back cover is securely reattached, maintaining the device's waterproof properties and aesthetic integrity. Here's a detailed guide on how to effectively replace the back cover of your waterproof phone:
-
Positioning the Back Cover: Align the back cover with the phone's frame, ensuring that it fits snugly and aligns with the screw holes and ports. Take note of any guiding markers or indicators that assist in aligning the back cover correctly with the device.
-
Utilize Adhesive Strips: If your waterproof phone features adhesive seals or strips on the back cover, carefully position them to align with the corresponding areas on the phone's frame. These adhesive strips are crucial for maintaining the device's water-resistant properties and should be securely affixed to ensure a reliable seal.
-
Secure the Screws: If the back cover is secured by screws, carefully reinsert and tighten them using a small Phillips head screwdriver. Ensure that the screws are positioned correctly and tightened to the appropriate level, preventing any potential looseness or instability in the back cover.
-
Apply Even Pressure: Once the back cover is aligned and the adhesive strips are in position, apply even pressure along the edges and surfaces of the back cover to ensure a secure and uniform attachment. This step helps to activate the adhesive and create a reliable seal between the back cover and the phone's frame.
-
Inspect for Gaps or Misalignment: After replacing the back cover, visually inspect the edges and seams to verify that there are no gaps or misalignments. A secure and precise attachment is essential for maintaining the waterproof properties of the device and protecting its internal components.
By meticulously following these steps, you can effectively replace the back cover of your waterproof phone, ensuring that it is securely reattached and that the device's waterproof seals remain intact. A precise and secure reattachment sets the stage for the successful restoration of the device's protective capabilities and aesthetic appeal. With the back cover securely in place, your waterproof phone is now ready to be powered on and resume its seamless functionality.
Step 10: Power On the Phone
After completing the intricate process of replacing the battery in your waterproof phone, the final step involves powering on the device to verify that the new battery is functioning as intended. This pivotal stage marks the culmination of the battery replacement procedure, allowing you to confirm that the phone recognizes the new power source and that it is ready to resume its essential functions. Here's a detailed guide on how to effectively power on your waterproof phone after replacing the battery:
-
Press and Hold the Power Button: Locate the power button on your phone, typically situated along the side or top edge of the device. Press and hold the power button for a few seconds to initiate the power-on sequence.
-
Observe the Startup Process: As the phone powers on, observe the display for any indications of the startup sequence. The screen may illuminate, and the device's logo or manufacturer's branding may appear, signifying that the phone is booting up.
-
Check Battery Indicator: Once the phone has powered on, check the battery indicator to verify that the new battery is recognized and that it is providing the expected power supply to the device. Ensure that the battery level is displayed accurately and that it reflects the charging status if applicable.
-
Monitor Device Functionality: After the phone has fully powered on, navigate through its functions and features to ensure that it is operating as intended. Check for any irregularities in performance, such as unexpected shutdowns or erratic behavior, which may indicate potential issues with the new battery or its integration into the device.
-
Verify Charging Capability: If the new battery requires charging, connect the phone to a power source and verify that it is charging properly. Monitor the charging indicator and ensure that the phone recognizes the charging status, indicating that the new battery is capable of recharging and sustaining the device's power needs.
By meticulously following these steps, you can effectively power on your waterproof phone after replacing the battery, ensuring that the new power source is seamlessly integrated and that the device is ready for regular usage. This final verification stage provides reassurance that the battery replacement process has been successful and that your phone is poised to deliver reliable performance and extended usage times. With the phone powered on and functioning optimally, you can confidently resume using your device, knowing that it is equipped with a new, dependable battery to support its essential operations.
Conclusion
Congratulations on successfully completing the intricate process of replacing the battery in your waterproof phone. By diligently following each step of this comprehensive guide, you have not only gained valuable insight into the inner workings of your device but also empowered yourself to take control of its maintenance and performance.
The meticulous approach to replacing the battery in a waterproof phone underscores the importance of precision, care, and attention to detail when handling delicate electronic components. By gathering the necessary tools, powering off the phone, removing the back cover, locating the battery, disconnecting and removing the old battery, and then meticulously inserting and reconnecting the new battery, you have demonstrated a commendable commitment to ensuring the optimal functionality and longevity of your device.
It's essential to emphasize the significance of maintaining the waterproof properties of your phone throughout the battery replacement process. The careful removal and reattachment of the back cover, as well as the preservation of adhesive seals, are crucial for safeguarding the device against potential water damage. By adhering to the detailed instructions and exercising patience and precision, you have successfully upheld the waterproof integrity of your phone.
As you power on your phone and verify the seamless functionality of the new battery, take pride in the knowledge and skills you have acquired through this process. The ability to confidently navigate the intricate components of your device and perform a critical maintenance task such as battery replacement is a testament to your dedication to preserving the optimal performance of your smartphone.
Moving forward, the rejuvenated power source in your waterproof phone will undoubtedly enhance your daily experience, providing extended usage times and reliable performance. Whether you're utilizing your device for communication, productivity, or entertainment, the new battery is poised to support your diverse needs, ensuring uninterrupted usage throughout the day.
By mastering the battery replacement process for your waterproof phone, you have not only extended the lifespan of your device but also cultivated a sense of self-reliance and technical proficiency. Your commitment to maintaining and optimizing your smartphone sets a commendable example of proactive device ownership and responsible maintenance practices.
As you embark on your continued journey with your newly rejuvenated waterproof phone, may its seamless functionality and dependable performance serve as a testament to your dedication to preserving and enhancing the devices that enrich your daily life.


