Introduction
The Moto G Power is a reliable and versatile mobile device that offers impressive battery life, making it a popular choice among smartphone users. However, there may be instances where you need to remove the battery, whether for troubleshooting, maintenance, or replacement purposes. Understanding the process of removing the battery from your Moto G Power is essential for ensuring the safe and efficient handling of your device.
In this comprehensive guide, we will walk you through the step-by-step process of removing the battery from your Moto G Power. By following these instructions, you can confidently navigate this procedure and gain a deeper understanding of your device's internal components. Whether you are a tech enthusiast, a DIY troubleshooter, or simply curious about the inner workings of your smartphone, this guide will equip you with the knowledge and skills to safely remove the battery from your Moto G Power.
Let's embark on this insightful journey to uncover the inner workings of your Moto G Power and learn the essential steps to safely remove its battery. Whether you're a seasoned smartphone user or a newcomer to the world of mobile devices, this guide will empower you to navigate this process with confidence and precision. So, without further ado, let's delve into the step-by-step process of removing the battery from your Moto G Power.
Step 1: Power off the Moto G Power
Before embarking on the process of removing the battery from your Moto G Power, it is crucial to ensure that the device is powered off. This step is essential for your safety and the proper handling of the device's internal components. By powering off the Moto G Power, you minimize the risk of electrical hazards and prevent potential damage to the device during the battery removal process.
To power off your Moto G Power, follow these simple steps:
-
Locate the Power Button: The power button is typically located on the right-hand side of the device. It is often distinguished by its tactile or raised design, making it easily identifiable.
-
Press and Hold the Power Button: Firmly press and hold the power button until the power-off menu appears on the screen. This action prompts the device to initiate the shutdown process.
-
Select "Power Off": Once the power-off menu is displayed, tap on the "Power Off" option to confirm the shutdown. This action prompts the Moto G Power to power down, ensuring that it is completely turned off before proceeding with the battery removal.
-
Wait for the Device to Power Off: Allow the Moto G Power to complete the shutdown process. You may observe the screen turning off, indicating that the device is powered down and ready for the next steps.
By following these steps, you have successfully powered off your Moto G Power, setting the stage for the safe and efficient removal of the battery. This essential preparatory step ensures that the device is in a secure state for the subsequent stages of the battery removal process.
With the Moto G Power powered off, you are now ready to proceed to the next step, which involves removing the back cover to access the device's battery compartment. This seamless transition from powering off the device to accessing the internal components underscores the importance of following a systematic approach to ensure a smooth and successful battery removal process.
Step 2: Remove the back cover
With the Moto G Power powered off, the next step in the process of removing the battery involves accessing the device's internal components by removing the back cover. The back cover of the Moto G Power is designed to provide secure protection for the device's battery and internal hardware while allowing for convenient access when necessary. By carefully removing the back cover, you can gain access to the battery compartment and proceed with the safe extraction of the battery.
To remove the back cover of your Moto G Power, follow these detailed steps:
-
Locate the Notch: The back cover of the Moto G Power is equipped with a small notch or indentation along the edge of the device. This notch serves as a starting point for the removal process and allows you to begin detaching the back cover from the device.
-
Insert Fingernail or Pry Tool: Gently insert your fingernail or a suitable pry tool into the notch, applying slight pressure to create separation between the back cover and the device's frame. If using a pry tool, exercise caution to avoid applying excessive force that may damage the device.
-
Gradually Separate the Back Cover: With your fingernail or pry tool in place, carefully begin to separate the back cover from the Moto G Power by running along the edges. Take your time and proceed methodically to avoid any sudden or forceful movements that could cause damage.
-
Continue Around the Perimeter: As you gradually separate the back cover, continue running your fingernail or pry tool along the perimeter of the device, ensuring that the cover detaches evenly without resistance. Pay close attention to any areas where the cover may be firmly secured, adjusting your approach as needed.
-
Lift and Remove the Back Cover: Once the back cover is sufficiently detached from the device, gently lift it away from the Moto G Power, taking care to avoid any abrupt movements that could potentially disrupt the internal components. Set the back cover aside in a safe location for reattachment after the battery removal process is complete.
By following these detailed steps, you have successfully removed the back cover of your Moto G Power, gaining access to the device's battery compartment. This crucial preparatory step sets the stage for the subsequent phase of removing the battery from your Moto G Power, allowing you to proceed with confidence and precision.
With the back cover removed, you are now ready to advance to the next step, which involves the careful extraction of the battery from its designated compartment within the Moto G Power. This seamless transition from removing the back cover to accessing the battery compartment underscores the importance of following a systematic approach to ensure a smooth and successful battery removal process.
Step 3: Remove the battery
With the back cover successfully removed, you have gained access to the battery compartment of your Moto G Power, marking a pivotal stage in the battery removal process. The battery, a vital component of the device, is securely housed within its designated compartment, and careful handling is essential to ensure a safe and efficient extraction.
To remove the battery from your Moto G Power, follow these detailed steps:
-
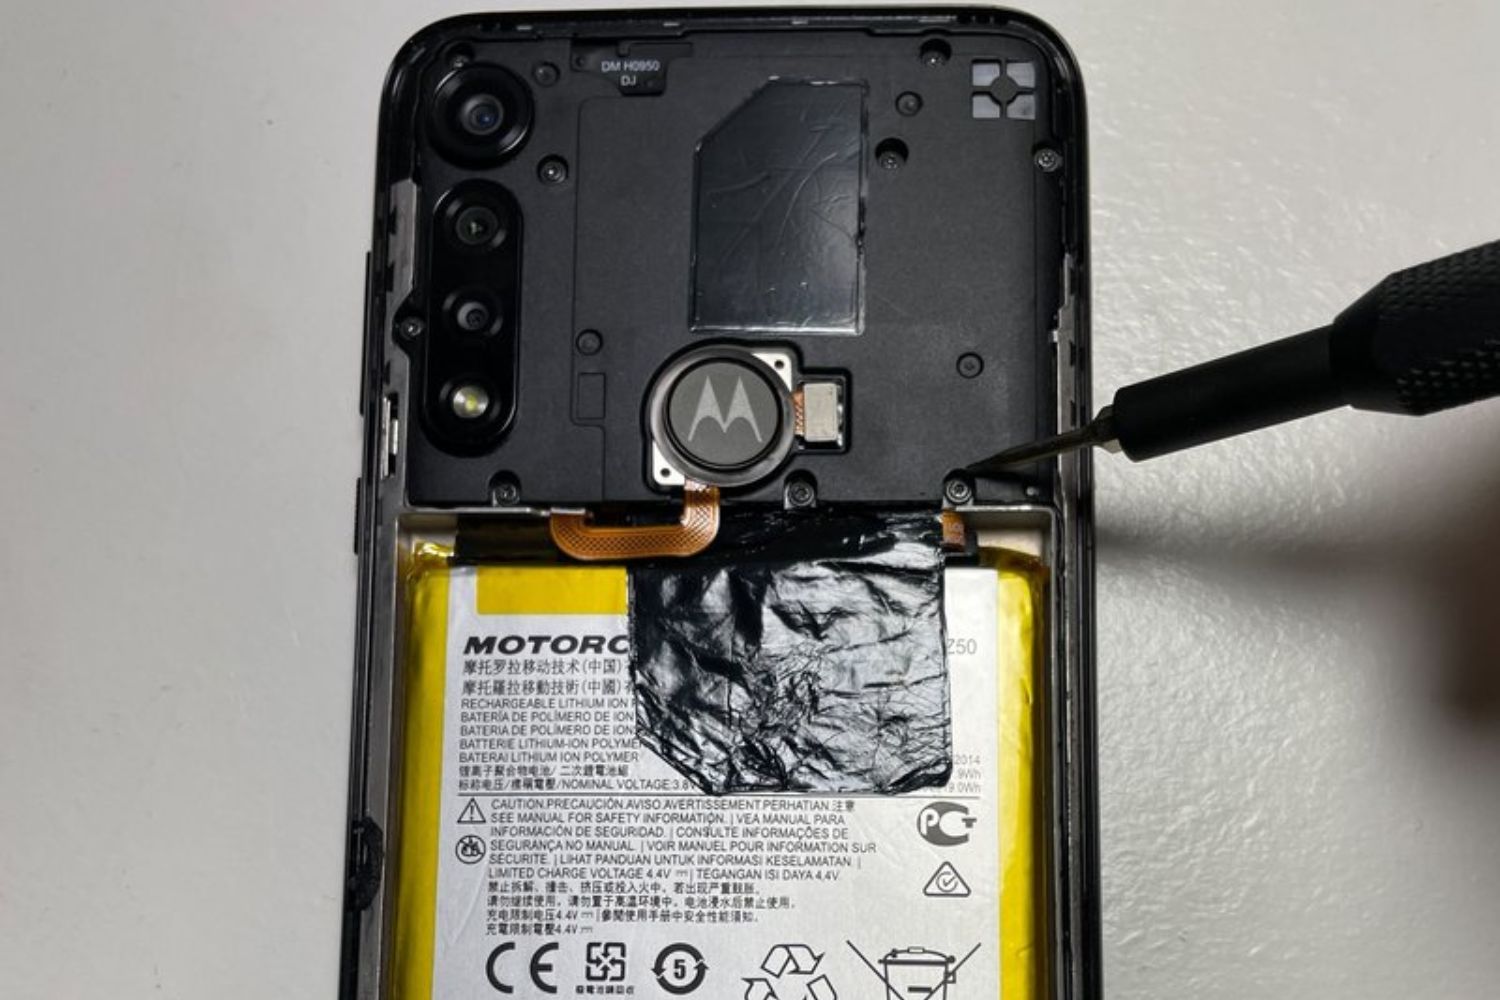
Identify the Battery: Within the exposed interior of the device, locate the battery, which is typically a rectangular or square-shaped component with electrical connectors and identifying labels. Take a moment to familiarize yourself with the battery's positioning and orientation within the compartment.
-
Inspect for Fastening Mechanisms: As you prepare to remove the battery, carefully inspect the surrounding area for any fastening mechanisms or securing clips that may be holding the battery in place. These mechanisms may vary depending on the device model and manufacturer, so thorough observation is crucial.
-
Disconnect the Battery Connector: Using gentle and precise movements, locate the connector attached to the battery and carefully disconnect it from the device's internal circuitry. This connector may feature a latch or tab that requires careful manipulation to release the connection without causing damage.
-
Remove the Battery: With the battery connector safely detached, proceed to carefully lift the battery from its compartment. Exercise caution to ensure that the battery comes out smoothly, avoiding any unnecessary force or abrupt movements that could potentially damage the device or the battery itself.
-
Handle with Care: As you remove the battery, maintain a steady and controlled grip to prevent accidental drops or mishandling. The battery is a sensitive component, and proper handling is essential to avoid any damage to its structure or electrical connections.
-
Set Aside the Battery: Once the battery has been successfully removed, place it in a secure and stable location, away from any potential sources of damage or interference. This ensures that the battery remains in a safe and protected environment until it is ready for reinstallation or further handling.
By meticulously following these steps, you have successfully removed the battery from your Moto G Power, completing a crucial phase in the battery removal process. This meticulous approach ensures that the battery is safely extracted from the device, setting the stage for any necessary maintenance, troubleshooting, or replacement procedures.
With the battery safely removed, you have gained valuable insight into the internal components of your Moto G Power, deepening your understanding of the device's architecture and functionality. This hands-on experience not only equips you with practical knowledge but also instills confidence in handling similar tasks in the future.
The successful removal of the battery from your Moto G Power underscores the importance of methodical and careful execution, ensuring the integrity of the device and its components throughout the process. Whether you are exploring the device's internal mechanisms out of curiosity or addressing specific maintenance needs, this comprehensive guide has empowered you to navigate the battery removal process with precision and confidence.
Conclusion
In conclusion, the process of removing the battery from your Moto G Power encompasses a series of essential steps that require careful attention to detail and a methodical approach. By following the comprehensive guide outlined in this article, you have gained valuable insights into the inner workings of your device and acquired the knowledge and skills necessary to safely navigate the battery removal process.
Throughout this guide, you have learned the importance of powering off the Moto G Power as the initial step, ensuring the safety of both the user and the device. This crucial preparatory measure sets the stage for the subsequent stages of removing the back cover and accessing the battery compartment. By meticulously following the step-by-step instructions, you have successfully removed the back cover, gaining access to the battery compartment and setting the foundation for the safe extraction of the battery.
The detailed process of removing the battery from your Moto G Power emphasized the significance of careful handling and precise maneuvers. From identifying the battery within the compartment to disconnecting the battery connector and safely lifting out the battery, each step was meticulously outlined to ensure a seamless and secure extraction process. The emphasis on handling the battery with care underscores the importance of safeguarding this vital component throughout the removal process.
By successfully completing the battery removal process, you have not only gained practical knowledge but also developed a deeper understanding of your Moto G Power's internal components. This hands-on experience equips you with the confidence to handle similar tasks in the future, whether for maintenance, troubleshooting, or replacement purposes.
As you reflect on the journey of removing the battery from your Moto G Power, it becomes evident that the systematic approach outlined in this guide has empowered you to navigate this process with precision and confidence. Whether you embarked on this endeavor out of curiosity or necessity, the knowledge and skills acquired through this guide have enriched your understanding of your device and its intricate mechanisms.
In essence, the successful removal of the battery from your Moto G Power serves as a testament to your ability to approach technical tasks with diligence and expertise. As you reassemble the device and reflect on the insights gained from this experience, you can take pride in your newfound proficiency and the valuable knowledge acquired throughout this enlightening journey.
By following this comprehensive guide, you have not only removed the battery from your Moto G Power but also embarked on a transformative exploration of your device's internal architecture, solidifying your position as a capable and informed user in the realm of mobile technology.