Introduction
Subtitles are a useful feature that allow viewers to read the dialogue of a movie or TV show on the screen. However, there may be times when you want to turn off the subtitles while watching content on your Xfinity X1 set-top box. Whether you find the subtitles distracting or simply prefer to watch without them, Xfinity offers an easy way to disable subtitles and enjoy a seamless viewing experience.
In this guide, we will walk you through the steps to turn off subtitles on your Xfinity X1 set-top box. By following these simple instructions, you’ll be able to customize your viewing preferences and enjoy your favorite movies and TV shows without the distraction of subtitles.
Before you proceed, make sure you have your Xfinity X1 remote control handy, as you will need it to navigate through the menu settings and make the necessary changes.
So, if you’re ready, let’s dive into the step-by-step process of turning off subtitles on your Xfinity X1.
Section 1: Accessing the Xfinity X1 Menu
To turn off subtitles on your Xfinity X1 set-top box, you first need to access the main menu. Follow these steps:
- Make sure your TV is turned on and properly connected to your Xfinity X1 set-top box.
- Grab your Xfinity X1 remote control.
- Press the “Xfinity” button at the top of your remote control. This will take you to the Xfinity X1 main menu.
- Use the arrow keys on your remote control to navigate through the menu options.
- Select the “Settings” option from the menu. This may be labeled as a gear icon or have the word “Settings” written next to it.
Once you have successfully accessed the Xfinity X1 menu, you are ready to proceed to the next section to find the preferences option.
Section 2: Navigating to Preferences
Once you are in the Xfinity X1 menu, you need to navigate to the preferences section to access the subtitles settings. Follow these steps to find the preferences:
- From the settings menu, use the arrow keys on your remote control to scroll down and select the “Preferences” option. This option may be located towards the bottom of the settings menu.
- Press the OK or select button on your remote control to enter the Preferences section.
- Within the Preferences section, you may find a variety of options to customize your Xfinity viewing experience. Use the arrow keys to navigate through these options.
Now that you have successfully reached the Preferences section, you are one step closer to turning off the subtitles on your Xfinity X1 set-top box.
Stay tuned for the next section, where we will guide you through adjusting the subtitle settings.
Section 3: Adjusting Subtitle Settings
Now that you have accessed the Preferences section on your Xfinity X1 set-top box, it’s time to adjust the subtitle settings. Here’s how:
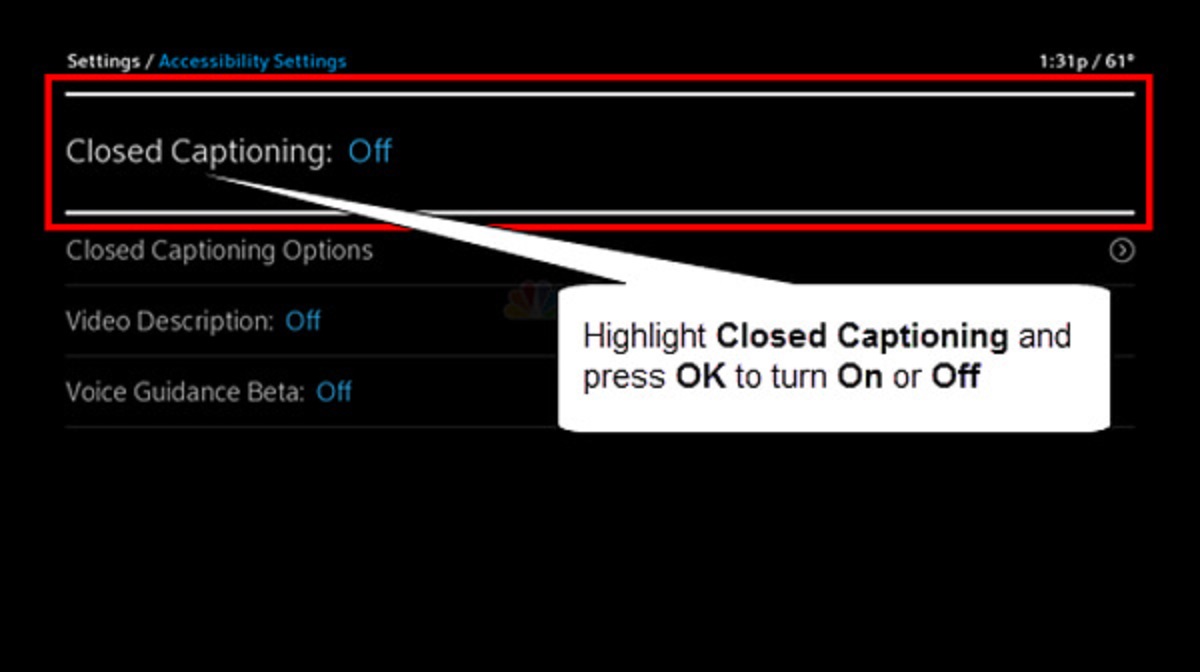
- Within the Preferences section, look for the “Accessibility” or “Closed Captioning” option. This option may be labeled differently depending on your Xfinity X1 interface version.
- Highlight the “Accessibility” or “Closed Captioning” option and press the OK or select button on your remote control to enter the subtitle settings menu.
- Once you are in the subtitle settings menu, you will find various options to customize the subtitle display. These options may include font style, font size, text color, and more.
- Use the arrow keys on your remote control to navigate through the subtitle settings options.
- Find the option that allows you to toggle the subtitles on or off. This option is typically labeled “Enable Subtitles” or “Display Subtitles”.
- To turn off the subtitles, select the “Disable” or “Off” option. This will disable the display of subtitles on your Xfinity X1 set-top box.
By adjusting the subtitle settings in the Preferences section, you have successfully disabled the subtitles on your Xfinity X1. However, it’s important to note that these settings are specific to your set-top box and may not affect other devices you use to watch Xfinity content.
Continue reading to the next section to confirm that the subtitles have been disabled.
Section 4: Disabling Subtitles
Now that you have adjusted the subtitle settings in the Preferences section of your Xfinity X1 set-top box, it’s time to confirm that the subtitles have been successfully disabled. Follow these steps to ensure the subtitles are turned off:
- Exit the subtitle settings menu by pressing the “Exit” or “Back” button on your remote control.
- Resume watching your favorite movie or TV show on Xfinity X1.
- Observe the screen and check if the subtitles are no longer displayed. The absence of subtitles confirms that you have successfully disabled them.
- If the subtitles are still visible, repeat the previous steps to access the subtitle settings menu and double-check that the “Disable” or “Off” option is selected.
- If you continue to experience issues with disabling the subtitles, try restarting your Xfinity X1 set-top box and repeat the steps to disable the subtitles.
Once you have confirmed that the subtitles are disabled, you can now enjoy your favorite movies and TV shows without any distractions. Sit back, relax, and immerse yourself in the content without the presence of subtitles.
Remember, you have full control over your subtitle preferences and can easily enable or disable them whenever you desire.
In the next section, we’ll conclude our guide on turning off subtitles on Xfinity X1 with some final thoughts.
Section 5: Confirming Subtitle Disablement
After following the steps to disable subtitles on your Xfinity X1 set-top box, it’s important to confirm that the changes have been applied successfully. Here’s how you can confirm the subtitle disablement:
- Continue watching a movie or TV show on Xfinity X1 that previously had subtitles enabled.
- Pay close attention to the screen and ensure that no subtitles are being displayed while the content is playing. This confirms that the subtitle disablement has been successful.
- If you still see subtitles during playback, double-check the subtitle settings and ensure that the “Disable” or “Off” option is selected.
- Try exiting the content and re-entering to see if the subtitle disablement applies consistently across different shows and episodes.
- If the issue persists, consider reaching out to Xfinity customer support for further assistance in resolving the subtitle display problem.
By confirming the subtitle disablement, you can enjoy a distraction-free viewing experience on your Xfinity X1 set-top box. Whether you’re watching a thrilling action movie or a captivating TV series, you can fully immerse yourself in the content without any interruptions from subtitles.
Now that you have successfully disabled the subtitles and confirmed the changes, you can sit back and enjoy your favorite entertainment on Xfinity X1 exactly the way you prefer.
As a final reminder, it’s worth noting that you can always enable subtitles again by following the same steps in the subtitle settings menu and selecting the “Enable” or “On” option.
Conclusion
Turning off subtitles on your Xfinity X1 set-top box is a simple process that allows you to customize your viewing experience. By accessing the Xfinity X1 menu, navigating to the preferences section, adjusting the subtitle settings, and confirming the disablement, you can enjoy your favorite movies and TV shows without the distraction of subtitles.
Remember, the steps mentioned in this guide are specific to the Xfinity X1 platform. While these instructions may vary slightly depending on your X1 interface version, the general process remains the same.
Now that you have successfully disabled the subtitles, you can fully immerse yourself in the on-screen action and dialogue without any text distractions. However, if you ever want to enable subtitles again, you can easily do so by following the same steps and selecting the appropriate option.
We hope this guide has been helpful in assisting you with turning off subtitles on your Xfinity X1 set-top box. Sit back, relax, and enjoy your favorite content with a personalized viewing experience!