Introduction
Upgrading the RAM (Random Access Memory) in your HP laptop can significantly enhance its performance and allow for smoother multitasking and faster data processing. If you find your laptop is running slow or struggling to handle multiple applications at once, adding more RAM can be an effective solution.
Before diving into the process of changing the RAM in your HP laptop, it’s important to determine the compatibility of the new RAM module with your specific laptop model. Different laptops have varying RAM requirements, such as the type, speed, and maximum capacity. The wrong RAM module may not be recognized by your laptop or cause compatibility issues. Therefore, it’s crucial to ensure that the RAM module you choose is compatible with your HP laptop model.
In this guide, we will walk you through the step-by-step process of changing the RAM in your HP laptop. We will provide you with the necessary information and instructions to safely and efficiently upgrade your laptop’s RAM and improve its overall performance.
It’s important to note that while changing the RAM in your HP laptop is generally a straightforward process, it’s always recommended to follow the manufacturer’s instructions and guidelines specific to your laptop model. This will ensure that you complete the upgrade correctly and avoid any potential damage to your laptop.
Before starting the process, make sure you have all the necessary tools and equipment on hand. This will include a properly sized screwdriver, an anti-static wristband (optional but recommended), and of course, the new RAM module that meets the specifications of your laptop.
Now, let’s proceed with the step-by-step instructions to change the RAM in your HP laptop and boost its performance to new heights.
Step 1: Determine the Compatibility of the New RAM
The first and most crucial step in changing the RAM in your HP laptop is to determine the compatibility of the new RAM module. Using incompatible RAM can result in system instability or even damage to your laptop’s components. Therefore, it’s essential to verify that the new RAM you plan to install is compatible with your specific laptop model.
To determine the compatibility of the new RAM module, you need to consider a few important factors. First, check your laptop’s specifications and identify the maximum amount of RAM it supports, as well as the type and speed of RAM it requires. This information can usually be found in the laptop’s user manual or on the manufacturer’s website.
Once you have the required RAM specifications, compare them with the specifications of the new RAM module you intend to purchase. Ensure that the type, capacity, and speed of the new RAM module match or exceed the specifications recommended by the laptop manufacturer. For example, if your laptop currently has DDR3 RAM, you should choose a DDR3 module for compatibility.
It’s also important to consider the maximum amount of RAM your laptop can handle. If your laptop supports a maximum of 8GB of RAM, purchasing a 16GB module would be pointless as the laptop wouldn’t utilize the additional capacity. Be sure to check if your laptop has any limitations on the size and number of RAM modules it can accommodate.
In addition to the technical specifications, it’s advisable to buy RAM from reputable manufacturers or authorized dealers to ensure quality and compatibility. These manufacturers often provide compatibility tools on their websites, allowing you to enter your laptop model to verify which RAM modules are compatible.
If you’re unsure about the compatibility of the new RAM module, you can consult with a computer technician or reach out to the laptop manufacturer’s customer support for assistance. They can provide you with accurate information and help you choose the right RAM module for your HP laptop.
By taking the time to determine the compatibility of the new RAM module, you can ensure a smooth and successful upgrade process without any compatibility issues. Now that you have confirmed the compatibility, you can move on to the next step of gathering the necessary tools and equipment for the RAM installation process.
Step 2: Gather the Necessary Tools
Before you begin changing the RAM in your HP laptop, it’s important to gather all the necessary tools and equipment. Having the right tools on hand will make the process easier and help you avoid any potential damage to your laptop or components. Here is a list of tools you will need:
- Screwdriver: You will need a screwdriver that fits the screws on your laptop’s back cover. It’s recommended to have a magnetic screwdriver to prevent losing any tiny screws.
- Anti-static wristband (optional): An anti-static wristband can be used to ground yourself and prevent any static electricity damage to your laptop’s sensitive components. While optional, it’s highly recommended for added safety.
- New RAM module: Make sure you have the new RAM module that is compatible with your HP laptop. Check the specifications of your laptop to determine the type and speed of RAM required.
It’s important to note that some laptops may require additional tools depending on the specific model. Before proceeding, refer to your laptop’s user manual or manufacturer’s website to check if any specific tools or additional equipment are necessary for the RAM upgrade process.
Ensure that you gather all the tools in a clean and organized workspace. This will help you keep track of the screws and other small components and prevent them from getting lost. It’s also a good idea to work on an anti-static mat or a non-static surface to further protect your laptop during the process.
With the necessary tools gathered, you are now ready to move on to the next step: shutting down and unplugging your laptop.
Step 3: Shut Down and Unplug the Laptop
Before beginning the process of changing the RAM in your HP laptop, it’s crucial to shut down the laptop and unplug it from the power source. This ensures your safety and prevents any potential damage to the laptop or its internal components.
Follow these steps to shut down and unplug your laptop:
- Save your work: Before shutting down the laptop, save any open files and close any running programs to prevent data loss.
- Shut down the laptop: Click on the “Start” menu in the bottom left corner of the screen and select “Shut Down” from the options. Wait for the laptop to power down completely.
- Unplug the power adapter: Disconnect the power adapter from the laptop. This ensures that there is no electrical current running through the device while you work on it.
- Remove the battery (if applicable): If your laptop has a removable battery, carefully remove it by sliding the battery release latches to the unlocked position and then sliding the battery out of its compartment. Not all laptops have removable batteries, so if yours doesn’t, you can skip this step.
Once you have shut down the laptop and disconnected it from the power source, it’s important to wait for a few minutes to allow any residual electricity to disperse. This prevents any potential electric shock or damage to the laptop’s internal components.
Remember to handle your laptop with care and avoid applying excessive force or pressure during the RAM installation process. By following these steps and ensuring your laptop is properly shut down and unplugged, you can proceed to the next step of removing the back cover.
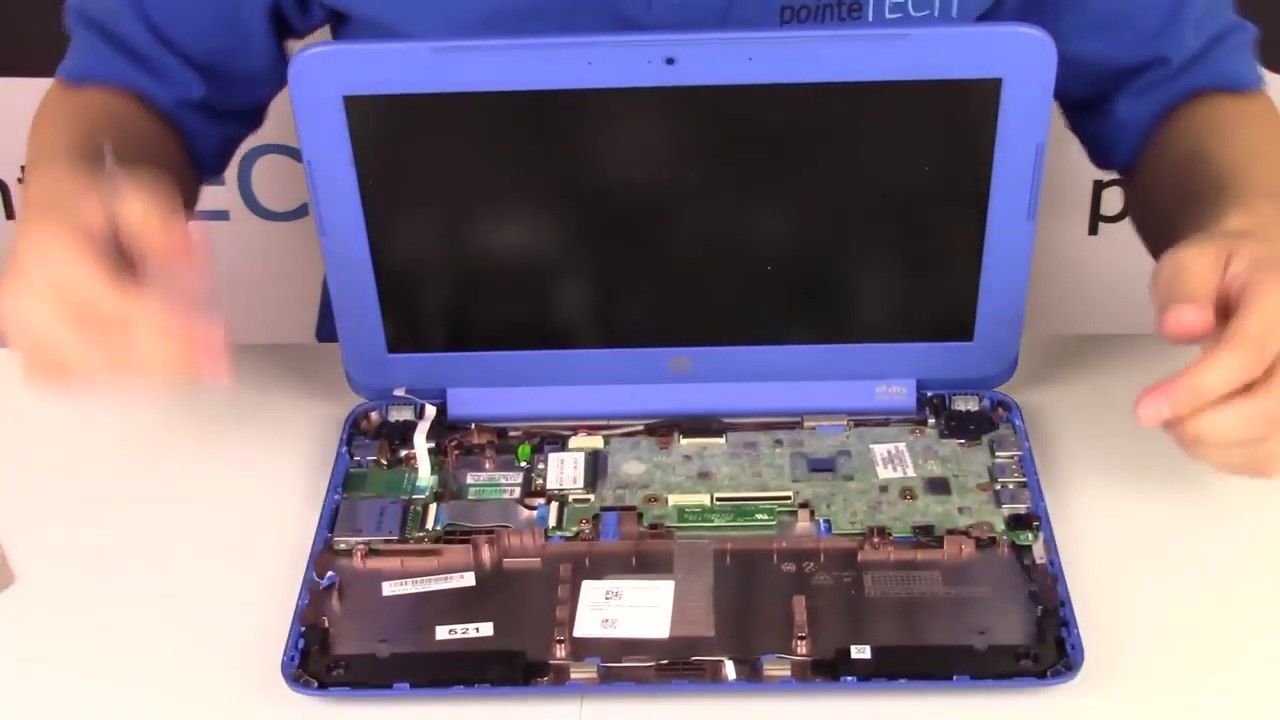
Step 4: Remove the Back Cover of the Laptop
With your HP laptop properly shut down and unplugged, it’s time to remove the back cover to access the internal components, including the RAM slots. Follow these steps to remove the back cover:
- Place the laptop on a flat surface: Find a stable and clean surface to work on. It’s recommended to use a soft cloth or an anti-static mat to protect the laptop’s surface from scratches.
- Locate and remove the screws: Examine the back cover of your laptop and identify the screws that secure it. Typically, there will be several small screws around the edges, although the exact placement may vary depending on your laptop model. Use the appropriate screwdriver to carefully unscrew each screw, making sure to keep them in a safe place.
- Remove the back cover: Once all the screws are removed, gently lift the edges of the back cover using your fingertips or a non-metal pry tool. Be cautious not to apply too much force to avoid damaging any internal components. Slowly and carefully, lift the back cover until it is completely detached from the laptop’s body.
Some laptops may have additional clips or latches securing the back cover. If you encounter resistance or difficulty in removing the back cover, check your laptop’s user manual or manufacturer’s website for specific instructions on removing the cover for your particular model.
After successfully removing the back cover, place it aside in a safe and clean location. Take note of any internal markings or labels that indicate the location of the RAM slots. This will help you locate them easily in the next step.
Now that the back cover is removed, you are one step closer to upgrading the RAM in your HP laptop. The next step is to locate the RAM slots, which we will guide you through in the following section.
Step 5: Locate the RAM Slots
With the back cover of your HP laptop successfully removed, the next step is to locate the RAM slots. The RAM slots are where the existing RAM modules are installed and where you will insert the new RAM module(s). Follow these steps to locate the RAM slots:
- Refer to the laptop’s user manual: If you have the user manual for your HP laptop, it will provide detailed information on the location of the RAM slots. The manual may include diagrams or illustrations that clearly indicate where the RAM slots are positioned in your laptop.
- Look for markings or labels: Examine the area beneath the back cover where the RAM modules should be located. Look for any labels or markings that indicate the RAM slots. These may be in the form of text, symbols, or illustrations. Common labels include “RAM,” “DIMM,” or “SODIMM.”
- Inspect the motherboard: If there are no clear markings or labels visible, you may need to inspect the motherboard itself. Carefully locate the large circuit board inside your laptop, which is the motherboard. The RAM slots are usually located near the center or edges of the motherboard. Look for rectangular-shaped slots with metal contacts.
Keep in mind that the exact location and number of RAM slots can vary depending on your HP laptop model. Some laptops have the RAM slots easily accessible, while others may require you to remove additional components or modules to access them. If you are having trouble locating the RAM slots, consult your laptop’s user manual or manufacturer’s website for specific instructions and diagrams.
Once you have located the RAM slots, you are ready to move on to the next step: removing the existing RAM module(s) from the laptop. Understanding the location of the RAM slots will help you navigate the process smoothly and efficiently.
Step 6: Remove the Existing RAM Module(s)
Now that you have located the RAM slots in your HP laptop, it’s time to remove the existing RAM module(s) before installing the new one. Follow these steps to remove the existing RAM module(s) safely:
- Ensure proper grounding: To prevent any static electricity damage, it’s important to wear an anti-static wristband or periodically touch a grounded object to discharge any static buildup from your body.
- Identify the existing RAM modules: Take a close look at the RAM slots and locate the existing RAM module(s). They will be inserted at an angle into the slots. Depending on your laptop, you may have one or multiple RAM modules.
- Release the retention clips: The existing RAM module(s) will be held in place by retention clips on either side of the RAM slot. Gently push the clips away from the module until they release the module. The module should slightly pop up at an angle.
- Remove the RAM module(s): Once the retention clips are released, carefully grasp the sides of the RAM module and gently pull it out of the slot at the same angle. Take extra caution to avoid applying too much force, as excessive pressure can damage the module or the slot.
- Place the removed RAM module(s) in a safe location: To ensure the modules don’t get lost or damaged, set them aside in an anti-static bag or on a soft cloth. It’s recommended to label them if you have multiple modules to keep them organized.
It’s important to note that RAM modules are delicate components, so handle them with care to avoid any damage from static electricity or physical mishandling. Additionally, if you plan to reuse the existing RAM modules or sell them, store them safely to prevent any potential damage.
With the existing RAM module(s) successfully removed, you are now ready to proceed with the next step of the RAM upgrade process: inserting the new RAM module(s). Properly removing the existing modules ensures a smooth installation of the new RAM and a seamless upgrade for your HP laptop.
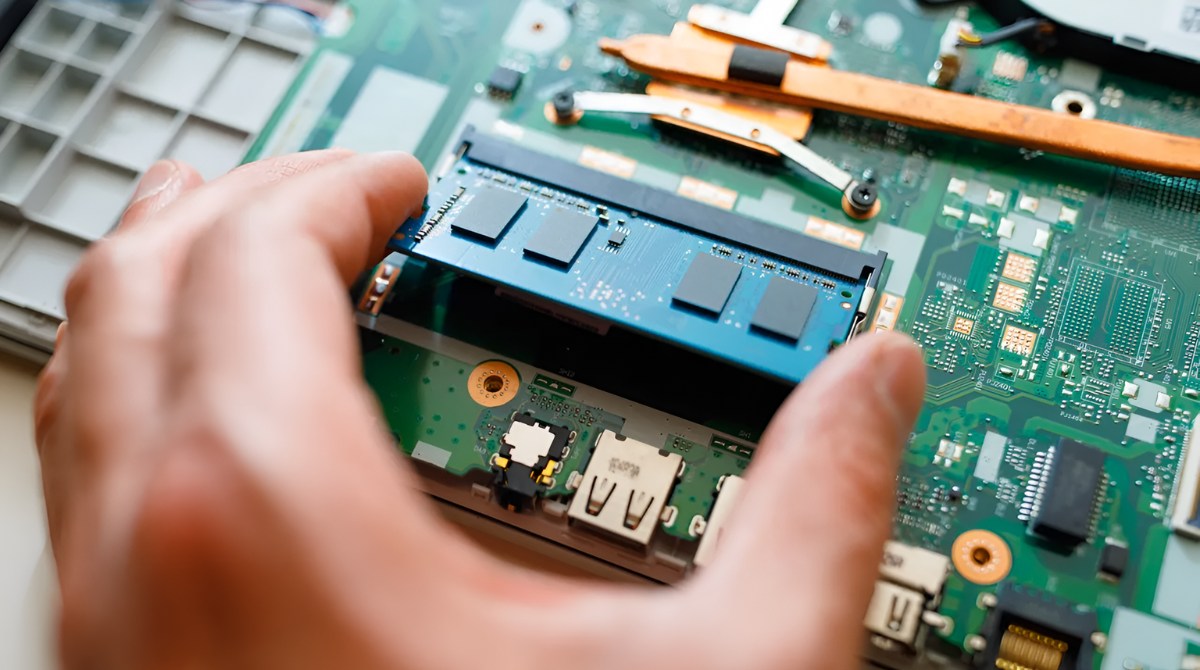
Step 7: Insert the New RAM Module(s)
With the existing RAM module(s) safely removed from your HP laptop, it’s time to insert the new RAM module(s) into the RAM slots. Follow these steps to install the new RAM module(s) correctly:
- Check for proper alignment: Before inserting the new RAM module(s), make sure they are aligned correctly. Each RAM module has a notch or a groove on the bottom edge that matches a protrusion in the RAM slot. Ensure that the notch on the module aligns with the protrusion in the slot.
- Hold the RAM module at the correct angle: Position the new RAM module at about a 45-degree angle, with the golden connectors facing downward. Align the notch on the module with the protrusion in the RAM slot.
- Insert the RAM module: Gently but firmly press down on the RAM module, applying equal pressure to both sides, until the module is fully inserted into the slot. The retention clips on either side of the slot should automatically clip back into place, securing the module.
- Repeat for multiple modules (if applicable): If you have multiple RAM modules to install, repeat the previous steps for each additional module. Place them in the remaining RAM slots, following the same alignment and insertion procedure.
It’s important to note that some laptops may require installing RAM modules in a specific sequence or order. Refer to your laptop’s user manual or manufacturer’s website for any specific instructions on the installation sequence, particularly if you have multiple RAM modules.
Once the new RAM module(s) are securely inserted into the RAM slots, you can proceed to the next step of securing the module(s) in place. Properly inserting the new RAM module(s) ensures optimal performance and compatibility with your HP laptop.
Step 8: Secure the RAM Module(s) in Place
With the new RAM module(s) successfully inserted into the RAM slots of your HP laptop, the next step is to securely lock them in place to ensure proper connectivity and stability. Follow these steps to secure the RAM module(s) in place:
- Verify proper alignment: Double-check that the RAM module(s) are aligned correctly in the RAM slots. Ensure that the golden connectors are fully inserted and making contact with the metal contacts in the slots.
- Press down evenly: Apply gentle and equal pressure to both ends of the RAM module(s) to ensure they are fully seated in the slots. Use your fingers or thumbs to press down firmly on the module(s) until you feel them fully secure in the slot(s).
- Verify retention clip engagement: Confirm that the retention clips on both sides of the RAM slots have snapped back into place and securely hold the RAM module(s). These clips provide additional support and prevent the module(s) from accidentally dislodging.
- Give the modules a gentle tug: To ensure the RAM module(s) are firmly locked in place, give them a light tug to check for any movement or looseness. If they are securely installed, they should not move or come out easily.
It’s important to note that excessive pressure or force should not be applied when securing the RAM module(s). Pressing too hard or applying uneven pressure can cause damage to the module(s) or the motherboard. Be gentle but firm in securing the module(s) to ensure a stable connection.
Once you have successfully secured the RAM module(s) in place, you can proceed to the next step of replacing the back cover of your HP laptop. Properly securing the RAM module(s) is crucial for reliable performance and uninterrupted use of your laptop.
Step 9: Replace the Back Cover
With the RAM module(s) securely in place inside your HP laptop, the next step is to carefully put the back cover back on. Follow these steps to accurately replace the back cover:
- Align the back cover: Hold the back cover in a position where it aligns properly with the edges of the laptop body. Ensure that any ports or connectors on the laptop align with the corresponding holes or slots on the back cover.
- Lower the cover into position: Gently lower the back cover onto the laptop body, aligning it with the screw holes. Be mindful not to force or apply pressure; the cover should fit naturally into place.
- Replace the screws: Insert and tighten the screws into their respective holes on the back cover. Start with the corners and work your way around, making sure to evenly tighten the screws. Do not overtighten, as it may damage the laptop’s casing or internal components.
It’s important to note that different laptops may have varying numbers or sizes of screws. Make sure to use the correct screws and keep track of their positions. If you’re uncertain about the screw placement, refer to your laptop’s user manual or manufacturer’s website for guidance.
Once you have replaced and tightened all the screws, give the back cover a gentle press to ensure it is firmly secured in place. The cover should be flush with the laptop body and should not move or wiggle.
With the back cover successfully replaced, the last step is to power on your HP laptop and confirm that the new RAM installation was successful. We will cover this final step in the next section.
Step 10: Power On the Laptop and Check for Successful Installation
After replacing the back cover of your HP laptop, it’s time to power on the laptop and ensure that the new RAM installation was successful. Follow these steps to check for successful installation:
- Double-check the connections: Before powering on the laptop, make sure that all cables and connections are securely in place. Confirm that the power adapter is connected, and if applicable, reinsert the battery.
- Press the power button: Press the power button on your laptop to turn it on. Wait for the laptop to boot up and reach the desktop or login screen.
- Check the system information: Once the laptop is powered on, navigate to the system information or settings to verify that the new RAM module(s) are recognized. This information will confirm that the RAM installation was successful. Check the total amount of RAM displayed and ensure that it matches the capacity of the newly installed module(s).
- Test performance: Use your laptop as you would normally, opening multiple applications or performing tasks that previously strained its performance. Observe any improvements in speed, multitasking capability, or general responsiveness. If the laptop is running smoother and faster, it indicates a successful RAM upgrade.
If the new RAM module(s) are not recognized or if you encounter any issues after installation, turn off the laptop and recheck the RAM module(s) for proper insertion and alignment. It’s also a good idea to refer to your laptop’s user manual or consult with the manufacturer’s support for troubleshooting guidance.
Congratulations! You have successfully changed the RAM in your HP laptop, enhancing its performance and expanding its multitasking capabilities. Enjoy the improved speed and efficiency as you use your laptop for various tasks and activities.
Conclusion
Changing the RAM in your HP laptop can have a significant impact on its performance and overall user experience. By following the step-by-step guide provided in this article, you can successfully upgrade the RAM module(s) and enjoy smoother multitasking, faster data processing, and improved system responsiveness.
Throughout the process, it’s important to determine the compatibility of the new RAM module(s) with your specific laptop model. Ensuring that the RAM module(s) meet the required specifications will prevent compatibility issues and ensure optimal performance.
Gathering the necessary tools and properly shutting down and unplugging the laptop before beginning the RAM installation process is crucial for safety and preventing any damage to your laptop or its internal components.
Removing the back cover, locating the RAM slots, and securely inserting the new RAM module(s) are vital steps in the process. Taking care to align the modules correctly and apply gentle pressure when inserting and securing them will help guarantee a successful installation.
Replacing the back cover and tightening the screws ensure that the RAM module(s) are protected and firmly held in place. Checking for successful installation by powering on the laptop, verifying the recognition of the new RAM module(s), and testing performance will help confirm a successful upgrade.
If you encounter any difficulties or issues during the RAM installation process, it’s recommended to consult your laptop’s user manual or reach out to the manufacturer’s customer support for guidance and assistance.
By following this step-by-step guide, you can confidently and effectively change the RAM in your HP laptop, elevating its performance and enhancing your overall computing experience.