Introduction
Welcome to this guide on how to allow Chrome to access the network in your firewall or antivirus settings. In today’s digital world, where internet connectivity is a necessity, we rely heavily on web browsers to access information, communicate, and perform various online tasks. One of the most popular web browsers is Google Chrome, known for its speed, reliability, and user-friendly interface.
However, there are instances where you might encounter issues with Chrome not being able to access the network due to firewall or antivirus software restrictions. Firewalls are security measures that monitor and control incoming and outgoing network traffic, while antivirus software protects your computer from malicious threats. These software programs, though essential for maintaining the security of your system, can sometimes block Chrome’s access to the internet.
It’s important to understand why Chrome requires access to the network. Without network access, Chrome won’t be able to load web pages, stream videos, download files, or interact with online services. Therefore, it’s crucial to ensure that Chrome is allowed in the firewall or antivirus settings so that you can enjoy a seamless browsing experience.
In this guide, we will walk you through the steps to allow Chrome to access the network in different scenarios. We will cover both Windows and Mac firewall settings, as well as how to configure Chrome in third-party antivirus software. Additionally, we will address common issues you may encounter and provide troubleshooting tips to resolve them.
Whether you’re a Windows user, a Mac enthusiast, or rely on third-party antivirus software, this guide will provide you with the necessary instructions to allow Chrome access to the network. By following the steps outlined in this guide, you’ll be able to regain full browsing functionality and enjoy all the benefits that Chrome has to offer.
What is a Firewall and Antivirus Software?
Before we delve into allowing Chrome access to the network, let’s take a moment to understand what firewalls and antivirus software are and why they are essential for your computer’s security.
A firewall is a network security device or software program that acts as a barrier between your computer and the internet. Its primary function is to monitor and control incoming and outgoing network traffic based on predetermined security rules. Firewalls work by analyzing packets of data and determining whether they should be allowed to pass through or blocked to protect your system from unauthorized access and potential threats.
On the other hand, antivirus software is designed to identify, prevent, and remove malicious software, commonly known as malware, from your computer. It typically consists of a combination of real-time scanning, heuristic analysis, and threat intelligence to detect and eliminate various types of malware, including viruses, worms, ransomware, and spyware. Antivirus software helps safeguard your system’s integrity and the privacy of your data.
Both firewalls and antivirus software play crucial roles in keeping your computer and personal information secure from online threats. Firewalls protect your system by controlling which network connections are allowed and stopping potentially harmful traffic from entering your computer. Antivirus software, on the other hand, provides defense against specific types of attacks, such as malware infections or phishing attempts.
By working together, firewalls and antivirus software provide a layered approach to security, strengthening your system’s defenses and minimizing the risk of unauthorized access, data breaches, and other cyber threats.
Now that we have a basic understanding of firewalls and antivirus software, we can move on to the next section, where we will explore why Chrome needs access to the network and the importance of allowing it in your firewall or antivirus settings.
Why does Chrome need access to the network?
Chrome, like any other web browser, relies on network access to provide you with a seamless browsing experience. Here are some reasons why Chrome needs access to the network:
1. Web page rendering and loading: When you enter a website address or click on a link, Chrome requests the necessary data from the web server and receives the webpage’s content. Without network access, Chrome won’t be able to retrieve and display web pages.
2. Online services and applications: Many online services and applications, such as email, social media platforms, cloud storage, and productivity tools, require an internet connection to function. Chrome allows you to access and utilize these services, enabling you to interact with online platforms seamlessly.
3. Downloading files and media: Chrome allows you to download files, images, videos, and other media from the internet. Whether it’s a document for work, a photo album, or your favorite TV show, Chrome requires network access to retrieve and save these files to your computer.
4. Streaming content: With the rise of streaming platforms, Chrome has become a popular choice for watching videos, movies, and TV shows online. Streaming content requires a stable internet connection, and Chrome acts as the gateway to deliver that content to your screen.
5. Security updates and protection: Chrome constantly updates its security features and protocols to protect users from known vulnerabilities and threats. To receive these updates and maintain a secure browsing experience, Chrome needs to connect to the network.
6. Browsing extensions and plugins: Chrome supports a wide range of extensions and plugins that enhance your browsing experience. These extensions require network access to function properly and provide additional features and functionalities.
In summary, Chrome needs network access to load web pages, interact with online services and applications, download files and media, stream content, receive security updates, and support browsing extensions and plugins. Allowing Chrome access to the network in your firewall or antivirus settings ensures that you can enjoy the full functionality of the browser without any restrictions or interruptions.
Allowing Chrome in Windows Firewall
If you’re using Windows as your operating system and have Windows Firewall enabled, you may need to allow Chrome access through the firewall. Follow these steps to allow Chrome in Windows Firewall:
1. Open Windows Defender Firewall: Type “Windows Defender Firewall” in the search bar and select the “Windows Defender Firewall” option from the search results. Alternatively, you can access it through the Control Panel by going to “System and Security” and then clicking on “Windows Defender Firewall.”
2. Click on “Allow an app or feature through Windows Defender Firewall”: In the left-hand menu, click on the option that says “Allow an app or feature through Windows Defender Firewall.” This will open a new window.
3. Click on “Change settings”: In the new window, click on the “Change settings” button located near the top right corner. You may need to enter your administrator password or provide confirmation if prompted.
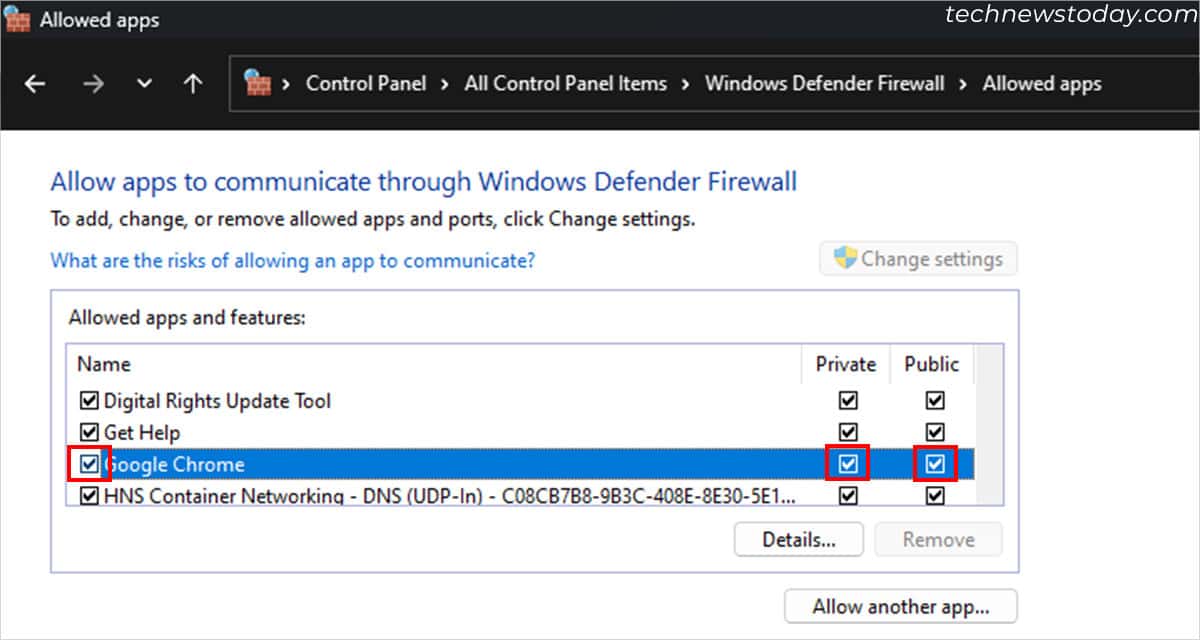
4. Locate Google Chrome: Scroll through the list of apps and features until you find “Google Chrome” or simply type “Chrome” in the search box to quickly locate it.
5. Enable access for Chrome: Once you’ve located Chrome, make sure the box next to it is checked for both “Private” and “Public” networks. This grants Chrome access to both private and public networks.
6. Save the changes: After enabling access for Chrome, click on the “OK” button to save the changes and exit the Windows Defender Firewall settings.
7. Restart Chrome: To ensure the changes take effect, close any open Chrome windows and relaunch the browser.
By following these steps, you have successfully allowed Chrome through the Windows Firewall. Now, Chrome should be able to access the network without being blocked by the firewall. If you continue to experience issues with Chrome’s network access, proceed to the next section for troubleshooting steps or consider checking your antivirus software settings.
Allowing Chrome in Mac Firewall
If you are using a Mac and have the macOS built-in firewall enabled, you may need to allow Chrome access through the firewall to ensure proper network connectivity. Here’s how you can allow Chrome in the Mac Firewall:
1. Open System Preferences: Click on the Apple logo in the top left corner of your screen and select “System Preferences” from the dropdown menu.
2. Select Security & Privacy: In the System Preferences window, click on the “Security & Privacy” icon, usually represented by a lock.
3. Unlock the settings: If the lock icon in the bottom left corner is closed, click on it and enter your administrator password to make changes.
4. Click on the Firewall tab: Once you have unlocked the settings, click on the “Firewall” tab located at the top of the window.
5. Click on “Firewall Options…”: In the Firewall tab, click on the “Firewall Options…” button.
6. Locate Google Chrome in the applications list: In the Firewall Options window, scroll through the list of applications until you find “Google Chrome.” You can use the search bar to find it quickly.
7. Select “Allow incoming connections” for Chrome: Once you’ve located Chrome, make sure the box next to it is checked for “Allow incoming connections.” This grants Chrome access to incoming network connections.
8. Click on “OK” to save the changes: After allowing incoming connections for Chrome, click on the “OK” button to save the changes and exit the Firewall Options window.
9. Exit System Preferences: Close the System Preferences window to exit the settings.
10. Restart Chrome: To ensure the changes take effect, close any open Chrome windows and relaunch the browser.
By following these steps, you have successfully allowed Chrome through the Mac Firewall. Chrome should now have network access without being blocked. If you encounter any further issues accessing the network, continue to the next section for instructions on allowing Chrome through third-party antivirus software, or consider checking your antivirus settings for any additional restrictions.
Allowing Chrome in Third-Party Antivirus Software
If you have installed a third-party antivirus software on your computer, it may have its own firewall or network access settings that can interfere with Chrome’s connectivity. Here are general instructions on how to allow Chrome in third-party antivirus software:
1. Open the antivirus software: Locate and launch your third-party antivirus software from the system tray or the Start menu.
2. Navigate to the firewall or network settings: Look for options related to firewall, network access, or application control in the antivirus software’s interface. The location of these settings may vary depending on the software you are using.
3. Find Chrome in the application list: Once you’re in the appropriate settings section, search for Chrome in the list of applications or processes. If you can’t find it, you may need to manually browse for the Chrome executable file.
4. Configure access for Chrome: Locate the settings related to network access or firewall rules for Chrome. Ensure that these settings allow Chrome full access to the network. You may need to enable both inbound and outbound connections for Chrome.
5. Save and apply the changes: After configuring the settings for Chrome, save the changes and apply them within the antivirus software.
6. Restart Chrome: Close all open instances of Chrome and then relaunch the browser to ensure the changes take effect.
Please note that the instructions provided above are generalized, and the steps may vary depending on the specific antivirus software you are using. It’s recommended to consult the documentation or support resources provided by your antivirus software for more detailed instructions on allowing Chrome in their firewall or network settings.
By following these steps and allowing Chrome in your third-party antivirus software, you should be able to resolve any network access issues and use Chrome without restrictions. However, if you continue to experience connectivity problems, it’s advisable to reach out to the customer support of your antivirus software for further assistance.
Common Issues and Troubleshooting
While allowing Chrome access to the network in your firewall or antivirus settings should resolve most connectivity issues, there may be cases where you still encounter problems. Here are some common issues and troubleshooting steps to help you address them:
1. Chrome still cannot access the network: If you have followed the instructions to allow Chrome through your firewall or antivirus software but are still experiencing network connectivity issues, try temporarily disabling the firewall or antivirus software to see if it resolves the problem. If it does, you may need to adjust the settings further or contact the software provider for assistance.
2. Chrome keeps getting blocked by the firewall: If you notice that Chrome’s access is repeatedly blocked by the firewall, check if there are any firewall rules or settings that specifically target Chrome. You may need to modify or delete these rules to allow Chrome unrestricted access.
3. Conflicting firewall or antivirus software: If you have multiple firewall or antivirus software installed on your computer, they may conflict with each other and result in connectivity issues. Consider disabling or uninstalling one of the conflicting software to see if it resolves the problem.
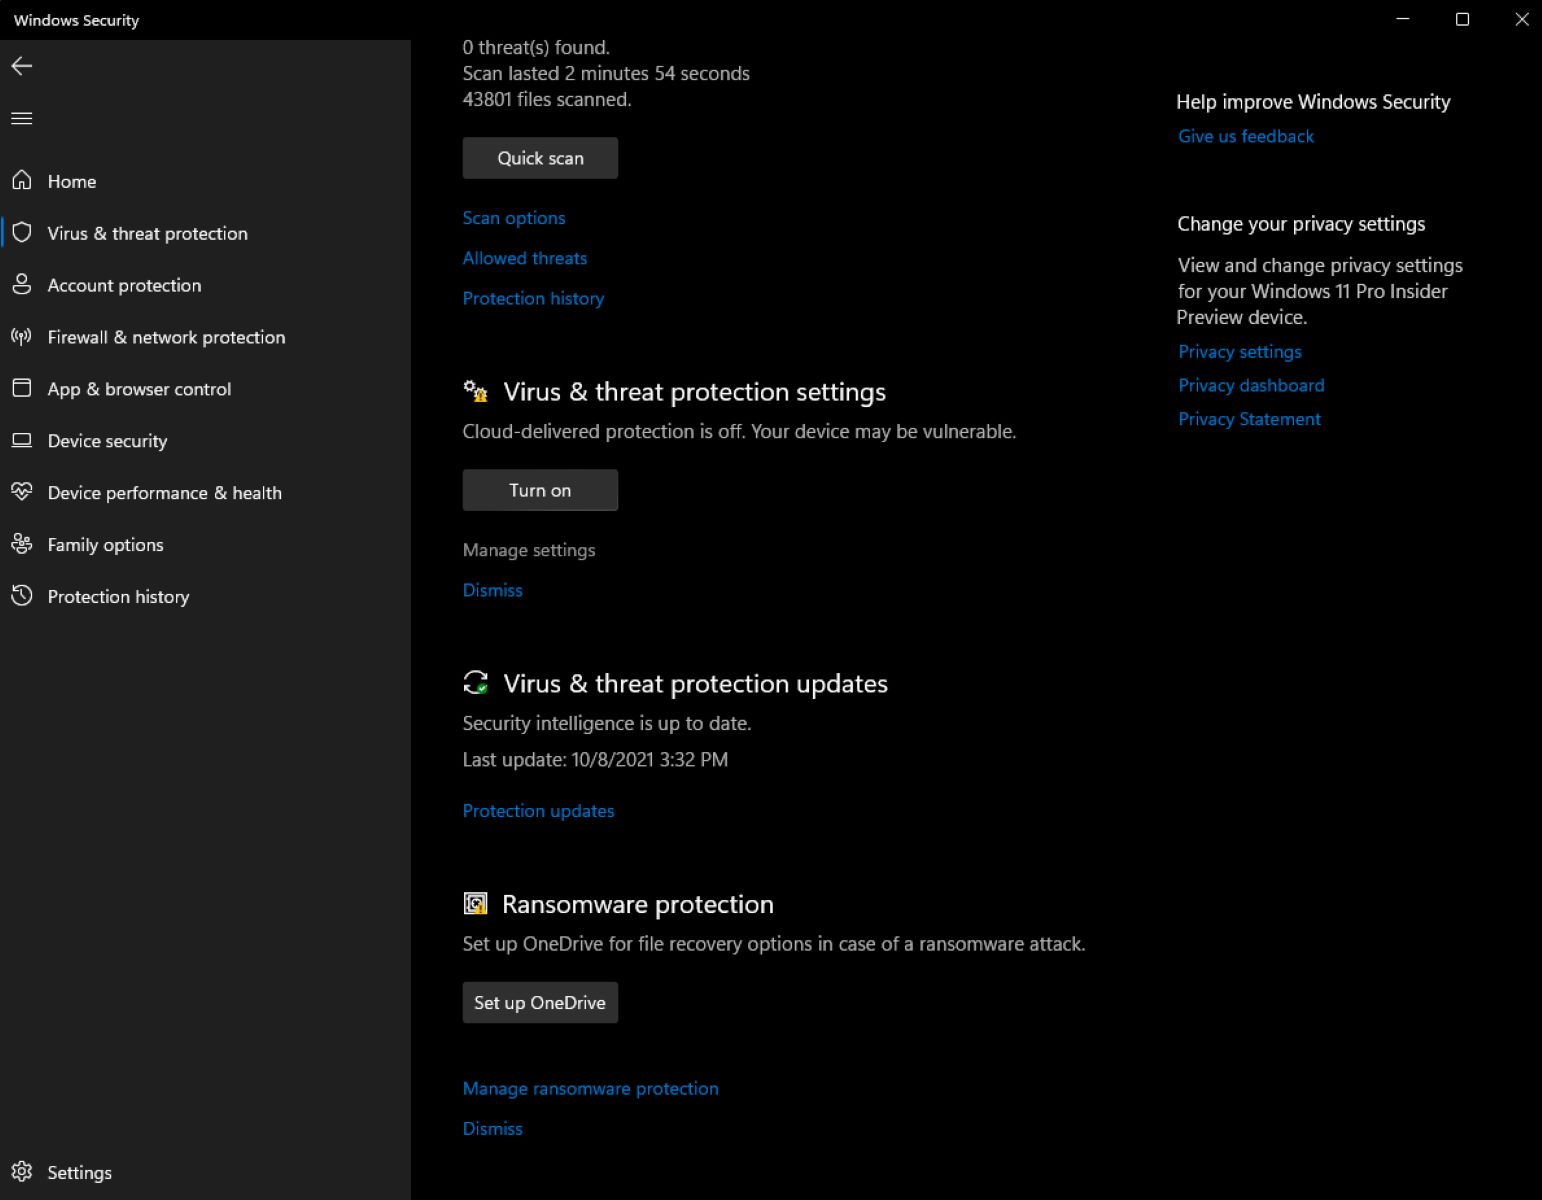
4. Updating firewall or antivirus software: Ensure that both your firewall and antivirus software are up to date. Outdated software may have compatibility issues with newer versions of Chrome, leading to network access problems. Check for updates and install them as necessary.
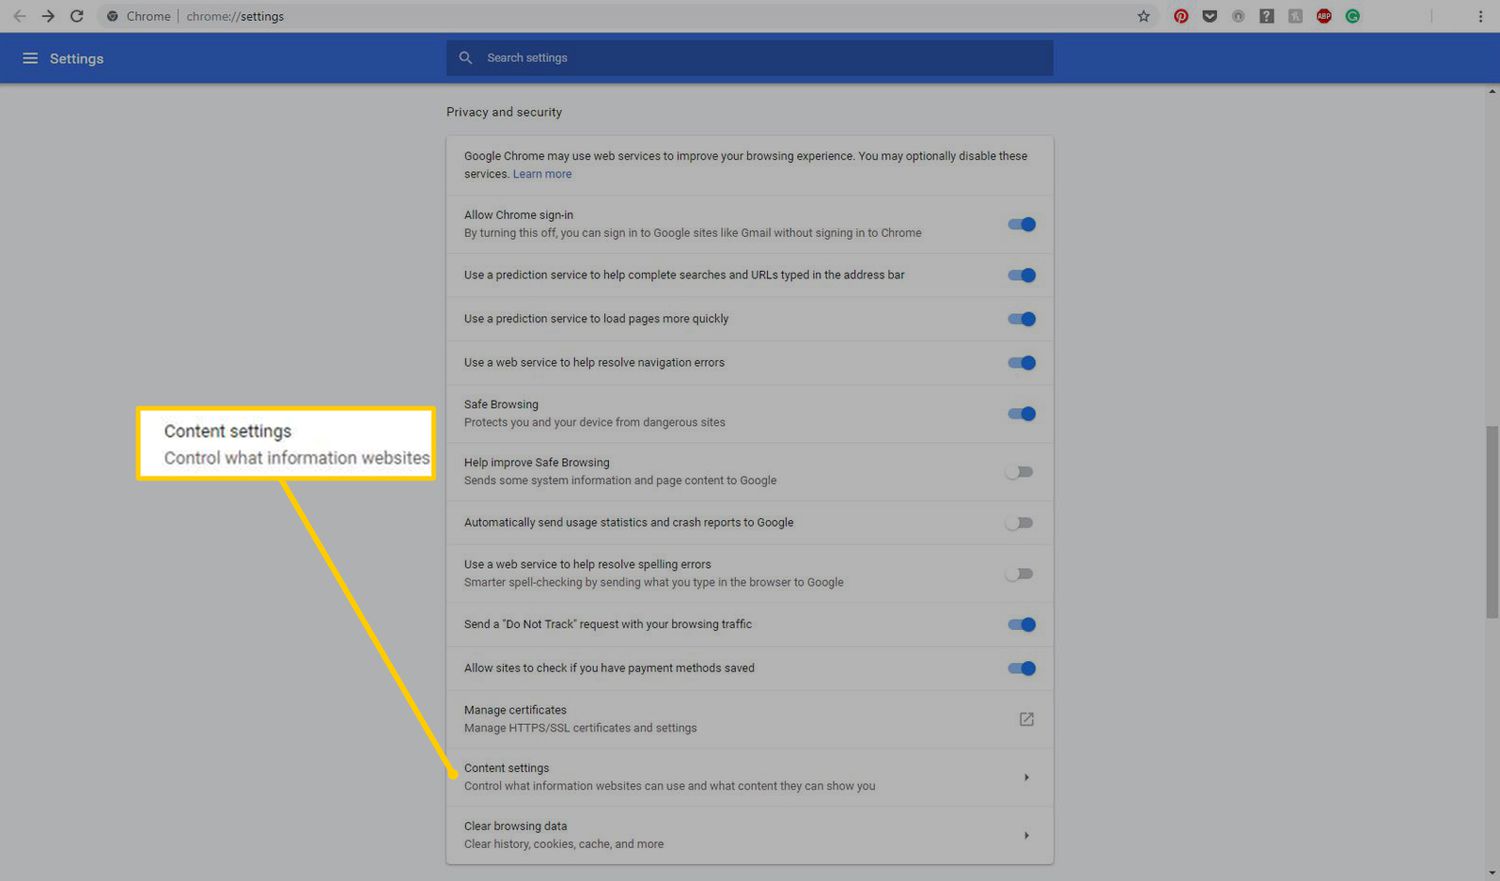
5. Resetting Chrome settings: Occasionally, issues with network connectivity in Chrome may be due to corrupted settings. To reset Chrome settings, go to Chrome’s settings menu, click on “Advanced,” and scroll down to the “Reset and clean up” section. From there, select “Restore settings to their original defaults” and follow the prompts to reset Chrome.
6. Check other network-related settings: If Chrome still cannot access the network, ensure that your computer’s network settings, such as DNS settings or proxy configurations, are properly configured. Incorrect settings can prevent Chrome from connecting to the internet.
If you have exhausted these troubleshooting steps and are still experiencing network connectivity issues with Chrome, it may be useful to seek further assistance from technical support forums, community groups, or the Chrome support website. They can provide specific guidance based on your operating system, firewall, or antivirus software configuration.
By troubleshooting common issues and taking appropriate actions, you can overcome obstacles that prevent Chrome from accessing the network and regain full browsing functionality.
Conclusion
In this guide, we have covered the steps to allow Chrome access to the network in your firewall or antivirus settings. We started by understanding the importance of allowing Chrome in the firewall and antivirus software to ensure a seamless browsing experience. We explored how firewalls and antivirus software play a crucial role in protecting our systems from potential threats while also acknowledging the need for Chrome to have network access.
We then provided specific instructions on how to allow Chrome through the Windows Firewall and the Mac Firewall, catering to users of different operating systems. Additionally, we addressed the process of allowing Chrome in third-party antivirus software, considering that many users rely on additional security tools for enhanced protection.
Furthermore, we discussed common issues that users may encounter and provided troubleshooting steps to address them. These troubleshooting tips are aimed at resolving connectivity issues that may persist even after allowing Chrome in the firewall or antivirus settings.
Remember, ensuring that Chrome has access to the network is essential for performing various online tasks, such as browsing websites, accessing online services, downloading files, streaming media, and receiving security updates. By following the instructions and troubleshooting steps outlined in this guide, you can overcome any restrictions or blocks and enjoy a seamless browsing experience with Chrome.
If you have followed all the steps and troubleshooting methods provided but are still experiencing network issues with Chrome, it is recommended to seek further assistance from technical support forums or the Chrome support website. They can provide tailored guidance based on your specific setup and help resolve any persistent issues.
By allowing Chrome access to the network and addressing connectivity issues promptly, you can fully utilize the capabilities of Chrome and enjoy a secure and efficient browsing experience.